Dini Argeo LTP Installation And Operating Instructions Manual
Hydraulic weighing system for forklift truck
Hide thumbs
Also See for LTP:
- Operating instructions manual (32 pages) ,
- Installation and operating instructions manual (52 pages) ,
- Operating instructions manual (28 pages)

Subscribe to Our Youtube Channel
Related Manuals for Dini Argeo LTP


Summary of Contents for Dini Argeo LTP
- Page 1 Hydraulic weighing system for forklift truck INSTALLATION AND OPERATING INSTRUCTIONS ENGLISH www.diniargeo.com...
-
Page 3: Table Of Contents
Contents Introduction Weighing system specifications Warnings Kit components Weight indicator Bracket for fixing the indicator in the cabin Pressure sensor Reference stickers Kit installation Before installation Sensor installation Installing the indicator Applying reference adhesives Calibration Basic functions Ignition - On Switching off Zero Adjusting the display brightness... - Page 4 Advanced scale functions How to enter the functions menu Horizontal totalization Exchange between net and gross weight Unit of measure conversion Maintenance Replacing the printer paper roll USER_MAN_ENG_LTP...
-
Page 5: Introduction
This publication is optimized for A4 printing. Weighing system specifications SUPPLY LTP: 4 AA batteries (max. duration 40h), or 12V via power supply unit (optional). LTPKPXP: 12V from forklift truck, via power supply unit (optional). MAXIMUM CAPACITY 4000 PSI / 280 bar. -
Page 6: Warnings
• Please read this manual carefully before using the system. • Assistance must only be carried out by personnel authorized by Dini Argeo. • Dini Argeo is not responsible for any weighing errors resulting from improper use of the system. USER_MAN_ENG_LTP... -
Page 7: Kit Components
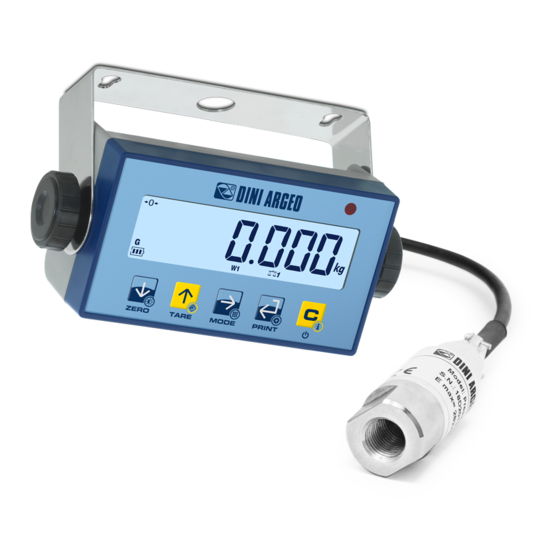
Weight indicator Two indicator models are available: • LTP: powered by AA batteries (including about 40 hours of autonomy), 5-key keypad. The vertical inclination can be adjusted using the integrated bracket. • LTPKPXP: powered at 12 Vdc directly from the forklift truck, extended keyboard with 17 keys. - Page 8 DISPLAY POS. ICON DESCRIPTION Indicates that the scale is unloaded (gross zero). Indicates that the weight is unstable. The net weight is displayed. note: there is a tare in memory. 4 / 5 The gross weight is displayed. Indicates the battery level: AND activates a locked tare.
- Page 9 KEYBOARD Button Description • Resets the weight value on the scale. • If pressed for a long time (2 sec), it allows you to set the brightness of the display. • Performs tare on the scale. • If pressed for a long time (2 sec) it allows you to insert a preset tare. •...
-
Page 10: Bracket For Fixing The Indicator In The Cabin
Bracket for fixing the indicator in the cabin Bracket compatible with both models of weight indicator that allows horizontal adjustment during installation. Pressure sensor Stainless steel sensor, IP65 degree of protection and hydraulic connector with 1/4 inch parallel PSB female. Sensor dimensions: length: 73.5 mm;... -
Page 11: Kit Installation
Kit installation Before installation • Check that the maximum oil pressure is lower than the maximum value indicated on the sensor datasheet (4000 psi = 280 bar). • Remove the pressure in the hydraulic circuit; this can be done in two ways: Lower the forks to the maximum and Place the forks on a stable object. -
Page 12: Sensor Installation
Sensor installation The sensor is connected to the lift truck’s hydraulic system via a compatible T-connector (not included in the kit). Install the sensor in the pressure pipe that guides the cylinder (the sensor should be positioned as close as possible to the cylinder). Forintensive use of the forklift truck, it is advisable to use a tube of about 50 cm between the T-piece and the sensor. -
Page 13: Installing The Indicator
Installing the indicator 1. FIND A SUITABLE LOCATION FOR THE INDICATOR: Direct the indicator vertically (LTP model only) and horizontally so that it is clearly visible and easy to reach. For the LTPKPXP model, recommended installation is (at dashboard height). - Page 14 SEN- EXC+ BLACK EXC- SHIELD YELLOW SEN+ EXC+ SEN- EXC- INDICATOR POWER SUPPLY 1. LTP: 4 x AA batteries 4,8 Vdc POWER RS232 COM 2 RS232 COM 1 BATTERY PACKAGE CPU CARD (4 x AA) 12Vdc from forklift via external power supply unit...
-
Page 15: Applying Reference Adhesives
2. LTPKPXP: 12Vdc from forklift via power supply unit 12Vdc POWER +Vdc +BAT CELL 1 EXC- EXC+ CELL 1 CELL 2 SEN- SIG- BATTERY DC-DC POWER SUPPLY UNIT CPU CARD SIG+ SEN+ TROLLEY ELEVATOR The use of protection fuses is optional and is the installer’s responsibility. Applying reference adhesives Apply the adhesives at a height of at least 50 cm above the ground. -
Page 16: Use
(indicated by the stickers). The theoretical precision of the LTP system, correctly installed on suitable forklifts and used under optimal conditions, varies from 0.5% to 5% of the capacity (min. 20 kg). -
Page 17: Calibration
Calibration BRING THE OIL OF THE HYDRAULIC CIRCUIT TO TEMPERATURE Before starting the calibration procedure for all purposes, it is necessary to heat up the oil in the hydraulic circuit by lifting the forks a few times in a vacuum. In this way the oil temperature during calibration and during use will be almost equal. - Page 18 Start of calibration procedure: Set the resolution (*) and press 0 . 001 ÷ How to set the value Set the capacity value (*) 000000 CapaC of the forklift truck and press How to set the value unload -ok- Enter the calibration weight (At least 2/3 of the 000000 capacity) and press...
-
Page 19: Basic Functions
Basic functions Ignition - On Visualization Display: Visualization Display: Condition of the forklift truck: Condition of the forklift truck: Switching off Visualization Display: Visualization Display: -off- Press for 2 s Condition of the forklift truck: Condition of the forklift truck: Zero Visualization Display: Visualization Display:... -
Page 20: Adjusting The Display Brightness
Adjusting the display brightness Visualization Display: Visualization Display: ZERO brGt 0 Press for 2 s Condition of the forklift truck: Set the brightness value: Increase value Decrease value Confirm Auto-weighted tare ? kg ? kg Visualization Display: Visualization Display: TARE Condition of the forklift truck: Condition of the forklift truck: Visualization Display:... -
Page 21: Tare Cancellation
Tare cancellation Visualization Display: Visualization Display: TARE Condition of the forklift truck: Condition of the forklift truck: USER_MAN_ENG_LTP... -
Page 22: Setting A Known Tare Value (Pt)
Setting a known tare value (PT) 50 kg ? kg Visualization Display: Visualization Display: TARE 000050 Press for 2 s Condition of the forklift truck: Set the tare value: Increase/ decrease the value Visualization Display: Visualization Display: CONFIRM Condition of the forklift truck: Condition of the forklift truck: 200 kg 50 kg... -
Page 23: Print
Print Visualization Display: Visualization Display: PRINT print Condition of the forklift truck: Condition of the forklift truck: NUM. WEIGHED GROSS 15.000 kg TARA 3.000 kg 12.000 kg RECEIPT NO. 54321 15/11/2018 15:39:03 Metric information Visualization Display: Visualization Display: TARE INFo Press for 4 s Condition of the forklift truck:... -
Page 24: Additional Functions For Models With Numeric Keypad
Additional functions for models with numeric keypad Archive 30 tares Allows you to store the most used tares (up to 30), to simplify the activation through quick recall. Example 10 kg 20 kg 50 kg HOW TO STORE A TARE Visualization Display: Visualization Display: t.01... -
Page 25: Automatic Tare Cancellation
HOW TO RECALL A STORED TARE Visualization Display: Visualization Display: Visualization Display: Fun 1 t.01 Condition of the forklift truck: Select the memory: Increase / Decrease value Enter the value Visualization Display: PRINT Condition of the forklift truck: Automatic tare cancellation Visualization Display: Visualization Display: Visualization Display:... -
Page 26: Numeric Ids
Numeric IDs The instrument has 2 memories for the temporary recording of numerical codes that can be used to identify the product, the operator, the batch, etc.. These codes, if inserted, will be shown on the receipt at the time of printing. HOW TO INSERT THE ID Visualization Display: Visualization Display:... -
Page 27: Date And Time
HOW TO ACTIVATE THE AUTOMATIC DELETION OF THE ID Visualization Display: Visualization Display: Visualization Display: iidn Fun 4 Condition of the forklift truck: Select the memory: Enter the value Visualization Display: Visualization Display: iidn id1L Cancellation automatically deactivated. id1u Automatic deletion active: the entered ID will be deleted automatically once the forklift truck is unloaded. -
Page 28: Printing (And Reprinting Of The Last Receipt)
Printing (and reprinting of the last receipt) PRINT Visualization Display: Visualization Display: PRINT print Condition of the forklift truck: Condition of the forklift truck: NUM. WEIGHED GROSS 15.000 kg TARA 3.000 kg 12.000 kg RECEIPT NO. 54321 15/11/2018 15:39:03 REPRINTING THE LAST RECEIPT Visualization Display: PRINT print... -
Page 29: Metric Information
Metric information Press Visualization Display: Visualization Display: for 4s INFo Condition of the forklift truck: Condition of the forklift truck: Press for 2s 2000 USER_MAN_ENG_LTP... -
Page 30: Advanced Scale Functions
Advanced scale functions How to enter the functions menu Visualization Display: Visualization Display: MODE funCt Press for 5 s Condition of the forklift truck: The indicator has entered into the configuration menu: the currently active function will appear. Horizontal totalization total Sum of the weight of multiple objects to know the total weight... -
Page 31: Horizontal Totalization
Horizontal totalization HOW TO ADD UP THE WEIGHINGS Visualization Display: Visualization Display: PRINT Condition of the forklift truck: Condition of the forklift truck: NUM. WEIGHED 00000001 100 kg Visualization Display: Visualization Display: PRINT Condition of the forklift truck: Condition of the forklift truck: NUM. - Page 32 HOW TO MOMENTARILY READ THE TOTAL Visualization Display: MODE Number of weighings Total weight With the numeric keypad, the F + 7 key combination displays the current total without printing/resetting it. HOW TO END THE TOTALIZATION AND RESET THE TOTAL NUM.
-
Page 33: Exchange Between Net And Gross Weight
Exchange between net and gross weight Visualization Display: Visualization Display: TARE Condition of the forklift truck: Condition of the forklift truck: Visualization Display: Visualization Display: Condition of the forklift truck: Condition of the forklift truck: Visualization Display: Visualization Display: MODE Condition of the forklift truck: Condition of the forklift truck: MODE... -
Page 34: Unit Of Measure Conversion
Unit of measure conversion HOW TO CONVERT THE UNIT OF MEASUREMENT TO POUNDS (STANDARD MODE) Visualization Display: Visualization Display: MODE 440.9 Condition of the forklift truck: Condition of the forklift truck: MODE By pressing at any time you can switch from weight in kg to weight in pounds. HOW TO CONVERT THE UNIT OF MEASURE WITH FREE CONVERSION FACTOR Visualization Display: Visualization Display:... - Page 35 Visualization Display: Visualization Display: MODE 101.2 Condition of the forklift truck: Condition of the forklift truck: MODE By pressing at any time, the unit of measurement can be converted with a free conversion factor. USER_MAN_ENG_LTP...
-
Page 36: Maintenance
Maintenance The results of the weighing system depend on the condition of the various parts of the lift truck. The weighing system does not require any special maintenance, but a poor condition of the various parts of the forklift truck can negatively affect the accuracy. - Page 37 Notes This publication, or part of it, may be reproduced without written permission from the Manufacturer. All the information contained in this manual is based on the data available at the time of its publication; the Manufacturer reserves the right to make changes to its products at any time, without notice and without incurring any penalty. We therefore recommend that you always check for updates.
- Page 38 Notes USER_MAN_ENG_LTP...
- Page 40 Authorized service center stamp HEAD OFFICE Via Della Fisica, 20 41042 Spezzano di Fiorano, Modena - Italy Tel. +39 0536 843418 - Fax +39 0536 843521 SERVICE ASSISTANCE Via Dell’Elettronica, 15 41042 Spezzano di Fiorano, Modena - Italy Tel. +39 0536 921784 - Fax +39 0536 926654 www.diniargeo.com...
Need help?
Do you have a question about the LTP and is the answer not in the manual?
Questions and answers