Table of Contents
Advertisement
Quick Links
Advertisement
Table of Contents

Related Manuals for Leckey Mygo Stander


Summary of Contents for Leckey Mygo Stander
- Page 1 Mygo Stander User Manual English Supporting Children...
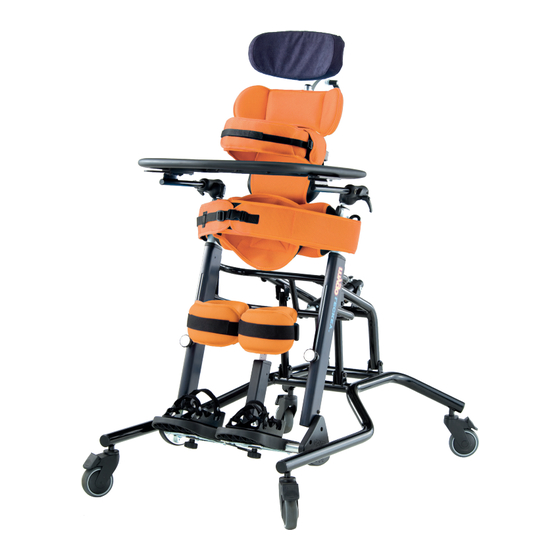
- Page 2 Mygo Stander User Manual The Mygo Stander can be positioned in prone, upright or supine, to allow a progressive and varied standing therapy programme. For use by individual or multiple children, the Mygo Stander aids and increases functionality for children of all abilities.
- Page 3 Mygo Stander User Manual p3 CONTENTS Intended use Certification Warning and Cautions Terms of warranty Product history record Product Training Safety Information Precautions and Contraindications How to unpack and assemble Fitting the covers Clinical setup for postural management Frequent adjustments for daily use...
-
Page 4: Section 01: Intended Use
Regulation (2017/745), UK Medical Indications for use Device Regulations 2002, Medial Device Directive (93/42 EEC) and Mygo Stander is for use in prone, EN 12182:2012 Assistive products supine and upright standing. Mygo for persons with disability, general Stander comes in 2 sizes, size 1 is for requirements and test methods. -
Page 5: Section 03: Warnings And Cautions
Mygo Stander User Manual p5 SECTION 03: WARNINGS AND CAUTIONS 1) WARNING TOPPLING HAZARD 4) CAUTION FINGER PINCH HAZARD • Never use the product on a sloping • While the user is in the product, surface greater than 5 degrees. -
Page 6: Section 04: Terms Of Warranty
Mygo Stander User Manual SECTION 04: 7) CAUTION CLEANING • Clean the stander regularly to prevent TERMS OF the build-up of dirt. Accumulated WARRANTY dirt can prematurely wear the fabric components and encourage corrosion on the stander. Only use... -
Page 7: Section 06: Product Training Record
Mygo Stander User Manual p7 SECTION 07: SECTION 06: PRODUCT TRAINING SAFETY INFORMATION RECORD Your Leckey product is a prescribed 1. Always read instructions fully Class 1 Medical Device and as such before use. Leckey recommend that parents, 2. Users should not be left... - Page 8 Mygo Stander User Manual 7. When used in the supine position the child’s reach are tightened it is important to ensure the and secure at all times. knee pads are fastened securely. 13. Leckey products comply with Always check the clips are fully fire safety regulations in engaged.
-
Page 9: Section 08: Precautions And Contraindications
Mygo Stander User Manual p9 SECTION 08: PRECAUTIONS AND CONTRAINDICATIONS Precautions Contraindications • Fixed spinal deformities such as • Children experiencing pain scoliosis or kyphosis or discomfort that cannot be resolved by adjustment of support/ • Severe muscle contractures positioning •... -
Page 10: Section 09: How To Unpack And Assemble
Mygo Stander User Manual SECTION 09: HOW TO UNPACK AND ASSEMBLE Your Mygo Stander will arrive flat in a cardboard box. Firstly remove everything from the box and check you have all the parts you have ordered. To assemble the product with the... - Page 11 Mygo Stander User Manual p11 7.2 HOW TO ATTACH THE CHEST SUPPORT Remove the screw on the chest support, place the chest support onto the metal extrusion at the required height, replace the screw and tighten. 7.1 MULTI TOOL A number of adjustments will require the use of a multi tool, which is supplied with each product.
- Page 12 Mygo Stander User Manual 9.3 HOW TO ATTACH THE TRAY RECEIVER AND TRAY First of all ensure that your tray is and push it in, this will push configured to the size of your stander. the clamp plate out of the way of the For the Size 1 the brackets on the tray tray receiver bar.
- Page 13 Mygo Stander User Manual p13 9.4 INSERTING ATTACHMENT BOLT ON SANDALS Insert the required attachment bolt along with the retention plate Place a rubber lid on both the top and bottom of the sandal. Fasten using the four screws provided. To remove or replace the attachment bolt, reverse this process.
- Page 14 Mygo Stander User Manual 9.5 ATTACHING THE 9.6 HOW TO ATTACH SANDALS THE SHOULDER SUPPORT FOR SUPINE STANDING Place the sandal so that the attachment bolt goes through the slot in the footplate. To secure, on To attach the shoulder support to...
- Page 15 Mygo Stander User Manual p15 9.7 ATTACHING 9.8 ATTACHING THE THE HEADREST FOR KNEE STRAPS SUPINE STANDING First of all you will need to feed the webbing through the plastic D ring as The head support cannot be used shown in without the shoulder support for supine standing.
- Page 16 Mygo Stander User Manual 9.10 ATTACHING THE HIP BELT BRACKET Before you can attach the de-rotation hip belt you will first of all need to attach the hip belt bracket. To do this slide the bracket into the receiving...
- Page 17 Mygo Stander User Manual p17 9.12 ATTACHING THE POSTERIOR SUPPORT 9.11 ATTACHING THE AND POMMEL HIP LATERALS RECEIVERS The hip wrap around harness requires If a posterior support is required, hip laterals. To attach the hip laterals first attach the posterior support...
- Page 18 Mygo Stander User Manual 9.13 ATTACHING THE STANDARD, FLIPAWAY & COMPLEX CHEST LATERALS The chest wrap around harness requires chest laterals, either standard or flipaway. 9.12.1 ATTACHING Pull back the PU chest pad to gain THE POMMEL access . Then insert the lateral...
- Page 19 Mygo Stander User Manual p19 9.14 ATTACHING THE CHEST/HIP WRAP AROUND HARNESS To attach the chest/hip wrap around harness, slide the cushions onto the PU lateral with the flaps towards the outside of the stander , feed the plastic buckle...
- Page 20 Mygo Stander User Manual 9.15 ATTACHING THE the plastic buckle and clip should then be secured to ensure the band is PELVIC BAND not accidentally unfastened In supine the pelvic band should stay attached to the product. When the...
-
Page 21: Section 10: Fitting Covers
Mygo Stander User Manual p21 SECTION 10: FITTING COVERS 10.1 KNEE SUPPORT 10.2 HIP PAD COVER COVERS Place the cover on the hip pad in the correct orientation. Wrap the bottom Wrap the covers around the knee flap underneath the hip pad and... - Page 22 Mygo Stander User Manual 10.4 SHOULDER SUPPORT PAD Follow the instructions in section 11.9 to angle the shoulder support laterals inwards, slide the cover over the shoulder wings and secure with the snap fasteners 10.3 CHEST PAD COVER Wrap the cover over the top of the...
-
Page 23: Section 11: Clinical Setup For Postural Management
Mygo Stander User Manual p23 10.5 HEAD CUSHION SECTION 11: AND COVER CLINICAL SETUP FOR POSTURAL Place the cushion onto the head MANAGEMENT support. Secure the central fastener . Bring the lower flap under the head support and secure with the... - Page 24 Mygo Stander User Manual 11.2 ADJUSTING THE at the side of the knee post , adjust to the required depth and retighten CHEST & SHOULDER securely. To alter the lateral position SUPPORT HEIGHT of the knees, loosen the knob at the...
- Page 25 Position the client in the Mygo Stander. While carefully supporting the head and shoulders, move the client into a horizontal position. Open the knee...
- Page 26 Position necessary, always taking care to the client in the Mygo Stander and assess the client’s comfort, and move it into a horizontal position. retighten the bolts securely. Then...
- Page 27 Mygo Stander User Manual p27 11.5 POSITIONING 11.6 SECONDARY SANDALS FOOTPLATE ANGLE To set the angle to accommodate Each sandal is attached to the plantar-flexion or dorsi-flexion, individual footplate with a single simply loosen the Allen bolt located fixing bolt. The footplate is...
- Page 28 Mygo Stander User Manual 11.8 ADJUSTING THE STANDARD, COMPLEX AND FLIPAWAY CHEST LATERAL SUPPORTS To adjust the height and angle of the lateral supports, loosen the Allen bolt , adjust to the required width, height and angle and retighten securely.
- Page 29 Mygo Stander User Manual p29 11.10 HEADREST To adjust the height, depth and angle of the headrest, loosen the hand knobs and when set to the desired position retighten the knobs. Do not remove the headrest while the user is in the stander.
- Page 30 Mygo Stander User Manual 911.11.1 ATTACHING AND ADJUSTING THE POMMEL To attach the pommel, loosen the receiver allen bolt , slide the pommel into the receiver tighten at the required depth. The height can also be adjusted using the allen bolt at the back of the pommel.
- Page 31 Mygo Stander User Manual p31 Attach the grab rail receiving brackets as shown. Place the grab rail into the receiving brackets. Adjust to the required height and tighten both sides.
-
Page 32: Section 12: Frequent Adjustments For Daily Use
Mygo Stander User Manual 11.14 TRAY INSERT SECTION 12: CHANGES FREQUENT ADJUSTMENTS FOR To swap out different inserts for tray, DAILY USE firstly, turn the tray upside down, then remove Allen bolts holding in the current insert and tray protection Parents and carers should be shown pad (if there is one). - Page 33 Mygo Stander User Manual p33 12.2 SETTING THE 12.3 POSITIONING STANDER ANGLE THE SANDALS Whether used in supine or prone the To position the user’s feet in the frame angle can be easily adjusted by sandals, secure the Velcro straps pulling and twisting the safety lock provided so the foot is held in place.
- Page 34 Mygo Stander User Manual 12.4 KNEE STRAPS 12.5 POSITIONING AND ATTACHING THE To attach the knee straps insert the PELVIC BAND plastic clip into the buckle the side of the main knee support. There is a different pelvic band for...
- Page 35 Mygo Stander User Manual p35 12.6 WRAP AROUND LATERAL HARNESS To open the wrap around chest In supine the pelvic band should stay harness, simply unclip the side buckle attached to the product. When the and open. Reverse the process...
-
Page 36: Tray Adjustment
Mygo Stander User Manual 12.7 TRAY ADJUSTMENT To insert and adjust the depth of the tray, loosen the knobs on the back Never use the tray to steer of both tray receivers , slide the or push the chair. -
Page 37: Section 13: Cleaning & Care Information
Mygo Stander User Manual p37 SECTION 13: CLEANING & CARE INFORMATION How to Maintain wet the fabric, as this will cause the staining to spread. When cleaning the product we recommend that you use only warm 4. Antiseptic cleaning agents water and a nonabrasive detergent. -
Page 38: Section 14: Daily Product Inspection
Mygo Stander User Manual SECTION 14: DAILY PRODUCT INSPECTION (Therapists, Parents & Carers) We recommend that daily visual checks of the equipment are carried out by therapists, carers or parents to ensure the product is safe for use. The recommend daily checks are detailed below. -
Page 39: Section 15: Annual Product Inspection
Mygo Stander User Manual p39 SECTION 15: ANNUAL PRODUCT INSPECTION (Therapist, Technician, Leckey 2. Lift the base to check each wheel Product Advisor, Dealer) individually. Make sure they are moving freely and remove any Leckey recommend that each product dirt from the rubber wheels. -
Page 40: Section 16: Re-Issuing Leckey Products
Mygo Stander User Manual SECTION 16: RE-ISSUING LECKEY PRODUCTS Most Leckey products are assessed 1. Where possible, we recommend and ordered to meet the needs of the use of an automated “fogger” an individual user. Before reissuing disinfection system that is used... -
Page 41: Section 17: Product Servicing
Mygo Stander User Manual p41 SECTION 17: PRODUCT SERVICING Servicing of all Leckey products should only be carried out by technically competent persons who have been trained in the use of the product. In the UK & ROI please contact the... -
Page 42: Section 18: Technical Information
Mygo Stander User Manual SECTION 18: TECHNICAL INFORMATION Technical Details Size Size 1 Size 2 Age (Years Approx) 4 - 10 8- 14 Max user weight 50kgs / 110lbs 60kgs / 132lbs User height 1080mm / 42.5 inches 1350mm / 53.1inches 1450mm / 57.1 inches... - Page 43 Mygo Stander User Manual p43 TABLE OF SYMBOLS Symbol Meaning Medical Device Read the Instructions for Use CE mark Warning Manufacturer Serial number Product Code Max occupancy weight Date of Manufacture For indoor use only...
- Page 44 Mygo Stander User Manual Symbol Meaning Latex free Unique Device Identification Machine wash- water temperature 70°C Machine wash- water temperature 40°C Tumble dry- low heat Do not iron Do not bleach...
- Page 45 Mygo Stander User Manual PRODUCT AND ACCESSORY CODES Code Mygo Stander 143-1600 Size 1 stander - with manual angle adjustment, PU chest pad, PU hip pad, PU knee supports, two piece footplate 143-2600 Size 2 stander - with manual angle adjustment, PU chest pad, PU hip...
- Page 46 Mygo Stander User Manual p46 143-1768-07 Shoulder pad cover - orange 120-859 Headrest hardware 143-1787 Headrest cushion and cover - infection control (black) 137-800-05 Headrest cushion and cover (black) 137-699-05 Headrest cushion and cover (black) (includes hardware) 143-1662 Headrest - infection control (black) (include hardware)
- Page 47 Mygo Stander User Manual 143-3775-14 Size 3 chest/hip wraparound harness - infection control (black) 143-1798-09 Size 1 prone derotation hip belt - pink (includes hardware) 143-1798-08 Size 1 prone derotation hip belt - blue (includes hardware) 143-1798-07 Size 1 prone derotation hip belt - orange (includes hardware)
- Page 48 Split knee straps - orange - fits both sizes 143-1690 Extended knee brackets 143-1609 Size 1 Mygo stander tray 143-1633 Size 1 Mygo stander tray with bowl insert 143-1610 Size 1 Mygo stander tray with clear insert 143-2609 Size 2 Mygo stander tray 143-2633...
- Page 49 Split knee straps - orange - fits both sizes 143-1690 Extended knee brackets 143-1609 Size 1 Mygo Stander tray 143-1633 Size 1 Mygo Stander tray with bowl insert 143-1610 Size 1 Mygo Stander tray with clear insert 143-2609 Size 2 Mygo Stander tray 143-2633...
- Page 50 Mygo Stander User Manual p50 143-1792-08 Pommel support cover - blue 143-1792-07 Pommel support cover - orange 143-1792-14 Pommel support cover - infection control 152-1600 Sandals Size 1 152-2600 Sandals Size 2 152-3600 Sandals Size 3 143-1615 Sandal raisers 143-1649...
- Page 51 Mygo Stander User Manual NOTES...
- Page 52 Mygo Stander User Manual p52 NOTES...
- Page 53 LS262-08...
Need help?
Do you have a question about the Mygo Stander and is the answer not in the manual?
Questions and answers