Table of Contents
Advertisement
SITRANS T
Temperature sensors
SITRANS TS100/TS200/TS300/
TS500/TSinsert/TSthermowell
Operating Instructions
08/2020
A5E47810090-AA
Introduction
Safety notes
Description
Installing/mounting
Connecting
Commissioning
Operating
Parameter assignment
Service and maintenance
Diagnostics and
troubleshooting
Technical data
Dimension drawings
Product documentation and
support
Remote operation
1
2
3
4
5
6
7
8
9
10
11
12
A
B
Advertisement
Table of Contents
Troubleshooting

Related Manuals for Siemens SITRANS TS Series


Summary of Contents for Siemens SITRANS TS Series
- Page 1 Introduction Safety notes Description SITRANS T Installing/mounting Temperature sensors SITRANS TS100/TS200/TS300/ Connecting TS500/TSinsert/TSthermowell Commissioning Operating Instructions Operating Parameter assignment Service and maintenance Diagnostics and troubleshooting Technical data Dimension drawings Product documentation and support Remote operation 08/2020 A5E47810090-AA...
- Page 2 Note the following: WARNING Siemens products may only be used for the applications described in the catalog and in the relevant technical documentation. If products and components from other manufacturers are used, these must be recommended or approved by Siemens. Proper transport, storage, installation, assembly, commissioning, operation and maintenance are required to ensure that the products operate safely and without any problems.
-
Page 3: Table Of Contents
Table of contents Introduction ............................9 Purpose of this documentation .................... 9 Scope of documentation ...................... 9 Functional Safety Manual ..................... 9 Document history ......................10 Product compatibility TH320/420 ..................10 Checking the consignment....................10 Security information ......................11 Transportation and storage ....................11 Notes on warranty ...................... - Page 4 Table of contents Installing/mounting ..........................27 Basic safety notes....................... 27 4.1.1 Installation and location requirements................28 4.1.2 Proper mounting........................ 29 Mounting the SITRANS TS500 .................... 31 Mounting SITRANS TS300 in clamp-on design..............32 Rotating the display ......................33 Disassembly........................34 Connecting ............................
- Page 5 Table of contents Locking the device ......................65 7.3.1 Introduction........................65 7.3.2 Enable write protection with write protection switch ............65 7.3.3 Enable the User PIN on the display ..................66 7.3.4 Enable the button lock on the display ................. 67 Parameter assignment.........................
- Page 6 Table of contents 8.3.24.2 Disabling button lock ......................94 Assigning parameters using remote operation ..............95 8.4.1 Introduction........................95 8.4.2 "Quick Start" wizard ......................95 8.4.3 Identification ........................96 8.4.4 User-specific type ....................... 96 8.4.4.1 Introduction........................96 8.4.4.2 Set the linearization table (60 breakpoints) ................ 98 8.4.4.3 Set the spline curve (40 breakpoints) .................
- Page 7 Table of contents 11.1.2.1 General limitations for compression fittings ..............128 11.1.2.2 SITRANS TS100 ........................ 128 11.1.2.3 SITRANS TS500 ........................ 129 11.1.3 Maximum permitted sample temperatures within the process .......... 138 11.1.4 Measuring range......................139 11.2 Construction........................140 11.3 Electrical data ........................141 11.4 Measuring tolerances for resistance thermometers ............
- Page 8 Table of contents 12.5.25 SITRANS TS500, type GP, general purpose, no well ............187 12.6 SITRANS TSinsert - measuring inserts for SITRANS TS500 ..........188 Product documentation and support ....................189 Product documentation ....................189 Technical support......................190 QR code label........................190 Remote operation ..........................
-
Page 9: Introduction
You can find instructions and additional information regarding functional safety of the SITRANS TH/TR/TF 320/420 and SITRANS TS500 transmitters in the English edition of the Functional Safety Manual Functional Safety Manual (https://www.siemens.com/ processinstrumentation/documentation). Document number: A5E41864869 SITRANS TS100/TS200/TS300/TS500/TSinsert/TSthermowell Operating Instructions, 08/2020, A5E47810090-AA... -
Page 10: Document History
Introduction 1.6 Checking the consignment Document history The overview below summarizes the most important changes in the documentation when compared to the previous edition. Edition Comment 08/2020 First edition Product compatibility TH320/420 The following table describes the compatibility between the edition of this manual, the device version, the engineering system and the associated EDD. -
Page 11: Security Information
Use of product versions that are no longer supported, and failure to apply latest updates may increase customer’s exposure to cyber threats. To stay informed about product updates, subscribe to the Siemens Industrial Security RSS Feed under https://www.siemens.com/industrialsecurity. -
Page 12: Notes On Warranty
The content reflects the technical status at the time of publishing. Siemens reserves the right to make technical changes in the course of further development. -
Page 13: Safety Notes
Safety notes Preconditions for use This device left the factory in good working condition. In order to maintain this status and to ensure safe operation of the device, observe these instructions and all the specifications relevant to safety. Observe the information and symbols on the device. Do not remove any information or symbols from the device. -
Page 14: Conformity With European Directives
Note Operation under special ambient conditions We highly recommend that you contact your Siemens representative or our application department before you operate the device under special ambient conditions as can be encountered in nuclear power plants or when the device is used for research and development purposes. -
Page 15: Use In Hazardous Areas
Use in flameproof enclosures "d" and protection in enclosures "tb" WARNING Impermissible repair of explosion protected devices Risk of explosion in hazardous areas • Repair must be carried out by Siemens authorized personnel only. SITRANS TS100/TS200/TS300/TS500/TSinsert/TSthermowell Operating Instructions, 08/2020, A5E47810090-AA... -
Page 16: For Sitrans Ts500
Safety notes 2.4 Use in flameproof enclosures "d" and protection in enclosures "tb" WARNING Electrostatic charge Risk of explosion in hazardous areas if electrostatic charges develop, for example, when cleaning plastic surfaces with a dry cloth. • Prevent electrostatic charging in hazardous areas. 2.4.1 For SITRANS TS500 2.4.1.1... -
Page 17: For Sitrans Tsinsert/Ts100/Ts200/Ts500
Safety notes 2.4 Use in flameproof enclosures "d" and protection in enclosures "tb" • A technical standard is in effect for mounted or installed components (terminal compartments, sockets, cable entry fixtures, plug-in connectors) that meets at least the specifications in the certificate of conformity; a separate test certificate must also have been issued for these components. - Page 18 Safety notes 2.4 Use in flameproof enclosures "d" and protection in enclosures "tb" SITRANS TS100/TS200/TS300/TS500/TSinsert/TSthermowell Operating Instructions, 08/2020, A5E47810090-AA...
-
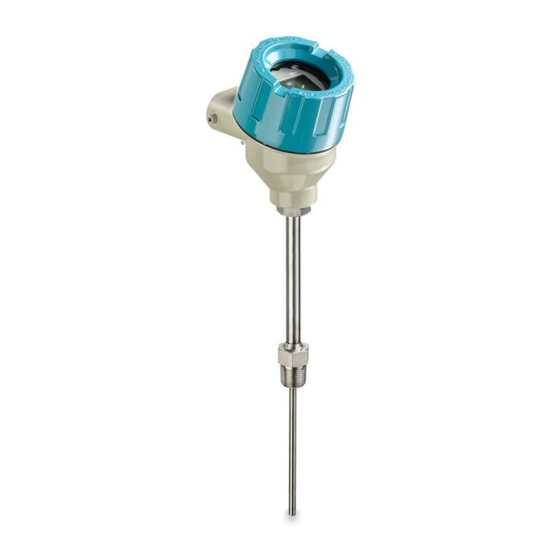
Page 19: Description
Description Overview SITRANS TS product family ① SITRANS TS100 7MC71.. general use, compact design with connecting cable ② SITRANS TS200 7MC72.. general use, compact design ③ SITRANS TS500 7MC75../7MC55.. general use, modular design with connection head (European portfolio/ Chinese portfolio) ④... -
Page 20: Application
Description 3.4 Nameplate structure Application The temperature sensors of the SITRANS TS product family are used for measuring temperatures in industrial plants. Depending on the specifications, sensors can be combined with different connection heads, extension tubes, and process connections. This makes the sensors suitable for a variety of process engineering applications, in the following sectors: •... -
Page 21: Temperature Transmitter For Sitrans Ts500
Description 3.5 Temperature transmitter for SITRANS TS500 Example of nameplate Industry Sector 76181 Karlsruhe, Germany SITRANS TS*** II 1D Ex iaD 20 T150 °C II 1D Ex iaD 20 T150 °C II 1G Ex ia IIC T6 / T4...T1 II 1G Ex ia IIC T6 / T4...T1 7MC71XX-XXXXX-Z Ta=see operating instructions Ta=se... -
Page 22: Measuring Inserts For Sitrans Ts500
Description 3.6 Measuring inserts for SITRANS TS500 Transmitter Properties TH320 • Universal • Output options – 4 ... 20 mA – 4 ... 20 mA or HART • Diagnostic functions • Po: 23.3 mW TH420 • Universal • Output 4 ... 20 mA or HART •... -
Page 23: Connection Heads For Sitrans Ts500
Description 3.7 Connection heads for SITRANS TS500 Connection heads for SITRANS TS500 The transmitters can be mounted in connection heads of type B and bigger. The following mounting types are possible: • Measuring insert mounting – Standard type with compact design –... -
Page 24: Usb Modem And Siprom T
Improper use of the USB modem The USB modem and the connected devices can be damaged. • Only use the USB modem for parameter assignment of the named Siemens temperature transmitters. • Always use the SIPROM T parameter assignment software. -
Page 25: Meaning Of Leds On The Usb Modem
Description 3.8 USB modem and SIPROM T 3.8.3 Meaning of LEDs on the USB modem LED on the USB Meaning modem Power LED lit The USB modem is connected to the USB port of the PC. green. The operating system of your PC is in normal state. Power LED flashes The temperature transmitter is assigned parameters. - Page 26 Description 3.8 USB modem and SIPROM T SITRANS TS100/TS200/TS300/TS500/TSinsert/TSthermowell Operating Instructions, 08/2020, A5E47810090-AA...
-
Page 27: Installing/Mounting
Installing/mounting Basic safety notes WARNING Exceeded maximum permissible operating pressure Risk of injury or poisoning. The maximum permissible operating pressure depends on the device version, pressure limit and temperature rating. The device can be damaged if the operating pressure is exceeded. Hot, toxic and corrosive process media could be released. -
Page 28: Installation And Location Requirements
Installing/mounting 4.1 Basic safety notes CAUTION Hot surfaces resulting from hot process media Risk of burns resulting from surface temperatures above 65 °C (149 °F). • Take appropriate protective measures, for example contact protection. • Make sure that protective measures do not cause the maximum permissible ambient temperature to be exceeded. -
Page 29: Proper Mounting
Installing/mounting 4.1 Basic safety notes CAUTION Process load The thermowell is affected by the static, dynamic and chemical load from the process parameters, e.g. static and dynamic load, flow induced vortexes. This has influence to the shape of the thermometer, stem diameter and insertion length. Ensure that the applicable and relevant directives and standards are respected, e.g. - Page 30 Installing/mounting 4.1 Basic safety notes IP54 < 208 IP54 Figure 4-1 Mounting angle of plastic head type BM0 CAUTION Loss of IP protection Do not unscrew the device housing from the mounted parts with NPT threaded connection. NOTICE Incorrect mounting The device can be damaged, destroyed, or its functionality impaired through improper mounting.
-
Page 31: Mounting The Sitrans Ts500
Installing/mounting 4.2 Mounting the SITRANS TS500 Mounting the SITRANS TS500 Requirement The device is suitable for the process with regard to the process connection, media compatibility, temperature resistance and measuring range. See section Technical data (Page 127). Procedure 1. You prevent faults caused by the heat dissipation in non-representative arrangements by observing the following basic rules: 2. -
Page 32: Mounting Sitrans Ts300 In Clamp-On Design
Installing/mounting 4.3 Mounting SITRANS TS300 in clamp-on design ② 7. With small conduit diameters, mount the sensors against the direction of flow. Angled ③ in a pipe elbow ① At a right angle to the flow ② In the pipe elbow against the direction of flow ③... -
Page 33: Rotating The Display
Installing/mounting 4.4 Rotating the display 4. Tighten the fixing screws (tightening torque 4 Nm). 5. Mount the vibration protection and tighten it manually. – You can pull out the measuring insert by loosening the RTD recessed grip gland(s). – Do not twist the enclosure. –... -
Page 34: Disassembly
Installing/mounting 4.5 Disassembly Disassembly WARNING Incorrect disassembly The following risks may result from incorrect disassembly: - Injury through electric shock - Risk through emerging media when connected to the process - Risk of explosion in hazardous area In order to disassemble correctly, observe the following: •... -
Page 35: Connecting
Connecting Basic safety notes WARNING Unsuitable cables, cable glands and/or plugs Risk of explosion in hazardous areas. • Use only cable glands/plugs that comply with the requirements for the relevant type of protection. • Tighten the cable glands in accordance with the torques specified in Technical data (Page 127). - Page 36 Connecting 5.1 Basic safety notes WARNING Lack of equipotential bonding Risk of explosion through compensating currents or ignition currents through lack of equipotential bonding. • Ensure that the device is potentially equalized. Exception: It may be permissible to omit connection of the equipotential bonding for devices with type of protection "Intrinsic safety Ex i".
- Page 37 Connecting 5.1 Basic safety notes WARNING Connecting or disconnecting device in energized state Risk of explosion in hazardous areas. • Connect or disconnect devices in hazardous areas only in a de-energized state. Exceptions: • Devices having the type of protection "Intrinsic safety Ex i" may also be connected in energized state in hazardous areas.
-
Page 38: For Sitrans Tsinsert
Connecting 5.1 Basic safety notes 5.1.1 For SITRANS TSinsert WARNING Flying leads Risk of explosion in hazardous areas due to loss of Intrinsic Safety protection. • Shorten the ends of flying leads to the appropriate length. • Keep a minimal clearance of 2 mm between the wires of different circuits, or any circuit and the grounded enclosure. -
Page 39: For Sitrans Ts500
Connecting 5.3 Connecting the resistance thermometer 5.1.4 For SITRANS TS500 NOTICE Condensation in the device Damage to device through formation of condensation if the temperature difference between transportation or storage and the mounting location exceeds 20 °C (36 °F). • Before taking the device into operation, let the device adapt for several hours in the new environment. -
Page 40: Connecting The Thermocouple
Connecting 5.4 Connecting the thermocouple 3-wire connection 3-wire connection 4-wire connection 4-wire connection Abbreviation of color: RD = red; WH = white; YE = yellow; BK = black Connecting the thermocouple 1 thermocouple 2 thermocouples Thermocouples Cable colors Type Black White Green White... -
Page 41: Connecting The Plug-In Connector
Connecting 5.5 Connecting the plug-in connector Connecting the plug-in connector M12 x 1 connection with SITRANS TH100 transmitter Lemo 1S connection for SITRANS TS100/TS200 Hole 1x Thermocouple 2x Thermocouple 1x PT100 2x PT100 4-wire connection 3-wire connection White White Black Yellow M12 connector for single sensor SITRANS TS100/TS200/TS500 1x Thermocouple... -
Page 42: Connecting The Sitrans Ts500
Connecting 5.6 Connecting the SITRANS TS500 1x Thermocouple 2x Thermocouple Transmitters TH: 1x PT100 2x PT100 flying leads 4-wire connection 3-wire connection White White Black Yellow White Connection of DVM-LCD and transmitter Connecting the SITRANS TS500 5.6.1 Opening the device Procedure ①... -
Page 43: Connecting The Sitrans Ts500 And Th320
Connecting 5.6 Connecting the SITRANS TS500 5.6.2 Connecting the SITRANS TS500 and TH320 Condition The device is opened. (Page 42) If you use stranded wire used, you need a ferrule. Note the maximum permissible core cross-section (Page 140). Procedure 1. Remove the local display from the holder. ①... - Page 44 Connecting 5.6 Connecting the SITRANS TS500 3. Increase the protection from high-frequency radiation through shielded connecting cables. ② – Lead the shielded connecting cables through the EMC cable glands - or - ③ – Connect the cable shield to the screw of the ground terminal The screw of the ground terminal is electrically connected to the external protective conductor connection.
-
Page 45: Connecting The Sitrans Ts500 And Th420
Connecting 5.6 Connecting the SITRANS TS500 7. Close the device. Closing the device (Page 48) ⑦ 8. Connect the device to the plant with the protective conductor connection 5.6.3 Connecting the SITRANS TS500 and TH420 Condition The device is opened. (Page 42) If you use stranded wire used, you need a ferrule. - Page 46 Connecting 5.6 Connecting the SITRANS TS500 Procedure 1. Remove the local display from the holder. ① 2. Loosen the fastening screws of the temperature transmitter and remove it. SITRANS TS100/TS200/TS300/TS500/TSinsert/TSthermowell Operating Instructions, 08/2020, A5E47810090-AA...
- Page 47 Connecting 5.6 Connecting the SITRANS TS500 3. Increase the protection from high-frequency radiation through shielded connecting cables. ② – Lead the shielded connecting cables through the cable glands - or - ③ – Connect the cable shield to the screw of the ground terminal The screw of the ground terminal is electrically connected to the external protective conductor connection.
-
Page 48: Closing The Device
Connecting 5.6 Connecting the SITRANS TS500 7. Close the device. Closing the device (Page 48) ⑦ 8. Connect the device to the plant with the protective conductor connection 5.6.4 Closing the device Procedure ① Cover ② Safety catch ③ Cable gland Figure 5-4 Closing device with single chamber housing ①... -
Page 49: Connecting Th320
Connecting 5.7 Connecting TH320 Connecting TH320 Requirement If you use stranded wire used, you need a ferrule. Note the maximum permissible core cross-section (Page 140). Procedure 1. Connect the input or inputs to terminals 3 to 6. 2-wire, 3-wire or 4-wire RTD or TC (internal CJC or linear resistance external 2-wire or 3-wire CJC) -
Page 50: Connecting Th420
Connecting 5.8 Connecting TH420 Connecting TH420 Requirement If you use stranded wire used, you need a ferrule. Note the maximum permissible core cross-section (Page 140). SITRANS TS100/TS200/TS300/TS500/TSinsert/TSthermowell Operating Instructions, 08/2020, A5E47810090-AA... - Page 51 Connecting 5.8 Connecting TH420 Procedure 1. Connect the input or inputs to terminals 3 to 9. Input 1 (I1) and/or Input 1 (I1) and/or Input 1 (I1) and/or input 2 (I2): input 2 (I2): input 2 (I2): 2-wire, 3-wire or 4-wire RTD or TC (int.
- Page 52 Connecting 5.8 Connecting TH420 SITRANS TS100/TS200/TS300/TS500/TSinsert/TSthermowell Operating Instructions, 08/2020, A5E47810090-AA...
-
Page 53: Commissioning
Commissioning Basic safety notes WARNING Improper commissioning in hazardous areas Device failure or risk of explosion in hazardous areas. • Do not commission the device until it has been mounted completely and connected in accordance with the information in Installing/mounting (Page 27). •... -
Page 54: Commissioning
Commissioning 6.3 Commissioning the USB modem and SIPROM T Commissioning Requirements Ensure that the following commissioning conditions are being met: • You have connected the sensors correctly. For additional information, refer to: – Connecting the resistance thermometer (Page 39) – Connecting the thermocouple (Page 40) •... -
Page 55: Installing The Siprom T Parameterization Software
Procedure 1. Download the SIPROM T parameter assignment software from the Internet free of charge. (http://www.siemens.com/processinstrumentation/downloads) 2. Uninstall the SIPROM T installations from your PC. 3. Before you start the installation, read the information for preparation in the Readme file. - Page 56 Commissioning 6.3 Commissioning the USB modem and SIPROM T 4. Open the "Device Manager" in Windows. Figure 6-1 Windows Device Manager 5. Double-click "Ports (COM & LPT)". The newly installed USB port is named "USB Serial Port (COMx)", where x stands for the COM port number.
-
Page 57: Connecting Usb Modem
Commissioning 6.3 Commissioning the USB modem and SIPROM T 6.3.3 Connecting USB modem Procedure ① ② USB modem ③ Connecting cable to the temperature transmitter Red cable plus Black cable minus ④ USB cable ⑤ SITRANS TH100slim ⑥ Contact 1 plus Contact 3 minus... - Page 58 Commissioning 6.3 Commissioning the USB modem and SIPROM T ② ① ④ 1. Connect the USB modem to your PC using the USB cable ③ 2. Connect the USB modem to the temperature transmitter using the connecting cable SITRANS TS100/TS200/TS300/TS500/TSinsert/TSthermowell Operating Instructions, 08/2020, A5E47810090-AA...
-
Page 59: Operating
Operating Local operation 7.1.1 Buttons The four buttons are located below the local display. To access the buttons, remove the cover. Figure 7-1 Single chamber housing with open cover SITRANS TS100/TS200/TS300/TS500/TSinsert/TSthermowell Operating Instructions, 08/2020, A5E47810090-AA... -
Page 60: Operating The Device With Display
Operating 7.1 Local operation 7.1.2 Operating the device with display 7.1.2.1 Navigating in the views You navigate in the views with the Buttons (Page 59) buttons: Figure 7-2 The colors represent three different views: Measured value view, parameter view and edit view SITRANS TS100/TS200/TS300/TS500/TSinsert/TSthermowell Operating Instructions, 08/2020, A5E47810090-AA... -
Page 61: Measurement View
Operating 7.1 Local operation 7.1.2.2 Measurement view Measurement view The measurement view shows the current measured values as well as status and diagnostic messages: ① Name and unit of the measured value (alternating) ② Measured value ③ Measured value ID ④... -
Page 62: Parameter View
Operating 7.1 Local operation Procedure 1. Use the buttons to navigate in the measurement view. 2. To switch to the parameter view, press the button. 7.1.2.3 Parameter view Parameter view The parameter view shows the parameters, parameter values and the wizards of the device. ①... -
Page 63: Edit View
Operating 7.1 Local operation Parame‐ Parameter name on Meaning ter ID the display LOOP TEST Loop test TRIM INPUT 1 One-point calibration input 1 TRIM INPUT 2 One-point calibration input 2 CHANGE PIN Change User PIN PIN RECOVERY PIN recovery USER PIN Enable and disable User PIN MIN INPUT 1... - Page 64 Operating 7.1 Local operation ① ④ Name of parameter and, if availa‐ "EDIT" symbol (flashing) ble, unit (alternating) ② ⑤ Enumeration arrows (for enumera‐ Parameter value tions only) ③ Parameter ID Figure 7-5 Example of edit view For parameters with an associated unit, the parameter name and unit are displayed as ①...
-
Page 65: Remote Operation
Operating 7.3 Locking the device Remote operation You can operate the device using HART communication. The following is required for this purpose: • A handheld (e.g. FC475) or PC software such as SIMATIC PDM. • A HART modem to connect a PC with the device or a lead to connect the handheld with the device. -
Page 66: Enable The User Pin On The Display
Operating 7.3 Locking the device Procedure 1. Unscrew the cover. 2. Slide the write protection switch to the closed lock position. Figure 7-6 Enable write protection using the write protection switch Result When the write protection switch is set to the closed lock position, measured values and parameters can be read. -
Page 67: Enable The Button Lock On The Display
Operating 7.3 Locking the device Result 7.3.4 Enable the button lock on the display Procedure 1. Navigate to the parameter view. Navigating in the views (Page 60) 2. In the parameter view, select the "Button lock" parameter. 3. Press the button. - Page 68 Operating 7.3 Locking the device SITRANS TS100/TS200/TS300/TS500/TSinsert/TSthermowell Operating Instructions, 08/2020, A5E47810090-AA...
-
Page 69: Parameter Assignment
Parameter assignment Overview of parameters and functions Introduction You can operate the device via local operation or remote operation (e.g. SIMATIC PDM). • The parameters that you can reach over the device with a display are marked by the parameter ID. Hereinafter, the parameter ID is always written inside parentheses after the parameter name. - Page 70 Parameter assignment 8.1 Overview of parameters and functions Current output SIMATIC PDM Device with display (local operation) Set current output "Settings > Current output" parameter group Set saturation limits "Settings > Current output" parameter group Loop test Menu command "Device > Loop test [13] (Page 86) Loop test"...
- Page 71 Parameter assignment 8.1 Overview of parameters and functions Maintenance and diagnostics SIMATIC PDM Device with display (local operation) Calibration Menu command "Maintenance > Calibra‐ One-point calibration input 1 [14] tion" (Page 88) / One-point calibration input 2 [15] (Page 88) Display operating time Menu command "Diagnostics >...
-
Page 72: Advanced Functions
Parameter assignment 8.1 Overview of parameters and functions Functional Safety The following additional functionality is available for devices with Functional Safety: Functional Safety SIMATIC PDM Device with display (local operation) Enable and disable Functional Safety Menu command "Device > Functional Safety Manual (Page 9) Functional Safety"... -
Page 73: Parameter Assignment With Usb Modem And Siprom T
Parameter assignment 8.2 Parameter assignment with USB modem and SIPROM T Parameter assignment with USB modem and SIPROM T Requirements • SITRANS TH100Slim/TH100/TH200/TH320 with 4 to 20 mA • SITRANS TR200/TR320 with 4 to 20 mA • SITRANS TF with SITRANS TH200 •... -
Page 74: Parameter Assignment Over Device With Display
Parameter assignment 8.3 Parameter assignment over device with display Sensor calibration (Page 98) Transmitter sensor matching (Page 101) Operating hours counter (Page 102) Current output (Page 103) Parameter assignment over device with display Introduction This section describes all parameters that you can reach over the device with a display. You will find information on operating the device with display in the section Operating the device with display (Page 60). - Page 75 Parameter assignment 8.3 Parameter assignment over device with display You can select all input types via remote operation. SITRANS TS100/TS200/TS300/TS500/TSinsert/TSthermowell Operating Instructions, 08/2020, A5E47810090-AA...
- Page 76 Parameter assignment 8.3 Parameter assignment over device with display Remote operation Indication on the display Meaning Setting range: kOhm KOHM kiloOhms Calibrated RTD - Callendar-Van Calibrated RTD - Callendar-Van Dusen coeffi‐ Dusen cients Potentiometers Potentiometers RTD Ptx - IEC 751, 10 ≤ x ≤ 10,000 PTX I RTD Ptx - IEC751, 10 ≤...
- Page 77 Parameter assignment 8.3 Parameter assignment over device with display Remote operation Indication on the display Meaning RTD Nix – GOST 6651-2009 NIX G RTD Nix – GOST 6651-2009 (α = 0.00617) (α = 0.00617) RTD Ni50 – GOST 6651-2009 N50 G RTD Ni50 –...
-
Page 78: Connection Type For Input 1 [02]
Parameter assignment 8.3 Parameter assignment over device with display 8.3.2 Connection type for input 1 [02] Selects the connection type for input 1 depending on the selected sensor. Indication on the dis‐ WIRING 1 play Setting range: 2, 3, 4-wire Factory setting: 3-wire 8.3.3... - Page 79 Parameter assignment 8.3 Parameter assignment over device with display You can select all input types via remote operation. SITRANS TS100/TS200/TS300/TS500/TSinsert/TSthermowell Operating Instructions, 08/2020, A5E47810090-AA...
- Page 80 Parameter assignment 8.3 Parameter assignment over device with display Setting Remote operation Indication on the display Meaning range: Ohms kiloOhms KOHM kiloOhms Calibrated RTD - Cal Van Dusen Calibrated RTD - Cal Van Dusen Potentiometers Potentiometers RTD Ptx - IEC 751, 10 ≤ x ≤ 10.000 PTX I RTD Ptx - IEC751, 10 ≤...
-
Page 81: Connection Type For Input 2 [05]
Parameter assignment 8.3 Parameter assignment over device with display RTD Ni50 – GOST 6651-2009 (α = N50 G RTD Ni50 – GOST 6651-2009 (α = 0.00617) 0.00617) RTD Ni100 – GOST 6651-2009 (α N100G RTD Ni100 – GOST 6651-2009 (α = 0.00617) = 0.00617) Micro-Volts bipolar µV±... -
Page 82: Wire Resistance For Connecting Cable At Input 2 [06]
Parameter assignment 8.3 Parameter assignment over device with display 8.3.6 Wire resistance for connecting cable at Input 2 [06] Requirement: Connection type 2-wire Selects the wire resistance for Input 2. Indication on the dis‐ WIRE RES 2 play Setting range: 0 to 100 Ω... -
Page 83: Setting The Assignment Of The Primary Variable
Parameter assignment 8.3 Parameter assignment over device with display 8.3.7.2 Setting the assignment of the primary variable Requirement You know the parameter values for the "Assignment of the primary variable" parameter. (Page 82) Procedure 1. Navigate to the parameter view. Navigating in the views (Page 60) 2. -
Page 84: Lower Range Value [09]/Upper Range Value [10]
Parameter assignment 8.3 Parameter assignment over device with display 8.3.9 Lower range value [09]/Upper range value [10] 8.3.9.1 Lower range value [09] parameter Sets the lower range value. Indication on the dis‐ LOWER RANGE play: Setting range: Within the measuring limits Factory setting: 0 °C The lower range value (4 mA) corresponds to 0% of the measuring range. -
Page 85: Damping Value [11]
Parameter assignment 8.3 Parameter assignment over device with display 3. Press the button. 4. Enter a value within the measuring limits of the selected input type with the button. 5. Use the button to confirm. The lower range value is set. Note that the upper range value does not move automatically. 6. -
Page 86: Functional Safety [12]
Functional Safety [12] Enables Functional Safety. The parameter is only visible for devices with Functional Safety. See also Functional Safety Manual (https://www.siemens.com/processinstrumentation/documentation) 8.3.12 Loop test [13] Sets a constant loop current for test purposes. You have the option of selecting preset values or a user-defined value. -
Page 87: Loop Test With User Defined Loop Current Value
Parameter assignment 8.3 Parameter assignment over device with display 3. Use the button to confirm. The loop test starts: – The "EDIT" symbol flashes. – The "Function check" symbol is displayed. – The "Co" symbol (constant current mode) is displayed. 4. -
Page 88: One-Point Calibration Input 1 [14]
Parameter assignment 8.3 Parameter assignment over device with display 8.3.13 One-point calibration input 1 [14] Calibrates the lower calibration point at input 1. The device moves the characteristic by the difference between the original and the new calibration point. The result of the one-point calibration is saved in the TRIM INPUT 1 parameter. -
Page 89: Pin Recovery [17]
Parameter assignment 8.3 Parameter assignment over device with display Procedure 1. Navigate to the parameter view. Navigating in the views (Page 60) 2. Select the parameter "Change user PIN". 3. Press the button. 4. Enter the old user PIN. 5. Enter the new user PIN with a value between 1 and 65535. Changing parameter values (Page 64) 6. -
Page 90: Recovering The User Pin
Parameter assignment 8.3 Parameter assignment over device with display 8.3.16.1 Recovering the user PIN Requirement • You have received the PUK from Technical Support (Page 190) using the serial number of your device. • The "User PIN (Page 91)" parameter is enabled. Procedure 1. -
Page 91: User Pin [18]
Parameter assignment 8.3 Parameter assignment over device with display 8.3.17 User PIN [18] 8.3.17.1 User PIN Used to enable or disable the user PIN. Setting range: Enable user PIN Disable user PIN Factory setting: User PIN disabled When user PIN is enabled, the measured values and parameters are read-only. •... -
Page 92: Minimum Measured Peak Value At Input 1 [19]
Parameter assignment 8.3 Parameter assignment over device with display Procedure 1. Navigate to the parameter view. Navigating in the views (Page 60) 2. Select the parameter "User PIN". 3. Use the button to confirm. 4. Select YES with the button. 5. -
Page 93: Minimum Measured Peak Value At Input 2 [21]
Parameter assignment 8.3 Parameter assignment over device with display 8.3.20 Minimum measured peak value at Input 2 [21] Shows the minimum measured peak value at input 2. Indication on the dis‐ MIN INPUT 2 play 8.3.21 Maximum measured peak value at Input 2 [22] Shows the maximum measured peak value at input 2. -
Page 94: Enabling Button Lock
Parameter assignment 8.3 Parameter assignment over device with display 8.3.24.1 Enabling button lock Procedure 1. Navigate to the parameter view. Navigating in the views (Page 60) 2. In the parameter view, select the "Button lock" parameter. 3. Press the button. The "EDIT"... -
Page 95: Assigning Parameters Using Remote Operation
Parameter assignment 8.4 Assigning parameters using remote operation Assigning parameters using remote operation 8.4.1 Introduction Introduction This section describes the most important parameters and functions that are available additionally over remote operation: • "Quick Start" wizard • Identification (TAG) • Custom type •... -
Page 96: Identification
Factory setting Short tag Long tag (TAG) Description Message Installation date dd.mm.yyyy Device Manufacturer_id Siemens Device type SITRANS TH320/TH420/TR320/TR420 Product name SITRANS TH320 Serial number in accordance with device manufacture Final assembly number Hardware version in accordance with device manufacture... - Page 97 Parameter assignment 8.4 Assigning parameters using remote operation Enter up to 60 breakpoints via SIPROM T or the remote operation. • Set the linearization table (60 breakpoints) (Page 98) Enter the desired number of breakpoints. You can freely position x and y values on the linearization curve.
-
Page 98: Set The Linearization Table (60 Breakpoints)
Parameter assignment 8.4 Assigning parameters using remote operation 8.4.4.2 Set the linearization table (60 breakpoints) Procedure 1. Select the "Custom type" option for the "Type" parameter. 2. Select a custom type from the list, e.g. resistance. 3. Select the "Linearization table" option for the "Linearization type" parameter. 4. -
Page 99: Setting One-Point Calibration
Parameter assignment 8.4 Assigning parameters using remote operation Enter the calibration points within the measuring range using the remote operation. 8.4.5.2 Setting one-point calibration Requirement • The measured value for the low calibration point is stable. • There is no sensor error. •... -
Page 100: Setting Two-Point Calibration
Parameter assignment 8.4 Assigning parameters using remote operation Original characteristic Characteristic after the one-point calibration of the low calibration point 8.4.5.3 Setting two-point calibration Requirement • The measured values for the high and low calibration point are stable. • There is no sensor error. •... -
Page 101: Transmitter Sensor Matching
Parameter assignment 8.4 Assigning parameters using remote operation Result The device calibrates to your measured values. The device moves the characteristic by the difference between the original and the new calibration points. Original characteristic Characteristic after the two-point calibration of the low calibration point Characteristic after the two-point calibration of the high calibration point 8.4.6 Transmitter sensor matching... -
Page 102: Changing The Callendar-Van Dusen Coefficients
Parameter assignment 8.4 Assigning parameters using remote operation 8.4.6.2 Changing the Callendar-Van Dusen coefficients Procedure 1. Select a sensor with Callendar-Van Dusen coefficients for the "Input type" parameter. 2. Change the values for R0, A, B and C, or R0, Alpha, Beta and Delta. 3. -
Page 103: Current Output
Parameter assignment 8.4 Assigning parameters using remote operation Operating hours counter for sensor measuring temperature • Monitors the sequence of the sensor connected to the transmitter in various process areas. • The operating hours sequence of the process variable is recorded in 9 ranges. It is subdivided according to the connected sensor and its sensor limits. -
Page 104: Lower Saturation Limit Parameter
Parameter assignment 8.4 Assigning parameters using remote operation 20.5 mA 20 mA 22.8 mA 3.55 mA 3.8 mA 4 mA ① Normal operation ② Lower fault current (factory setting) ③ Lower saturation limit (factory setting) ④ Upper saturation limit (factory setting) ⑤... -
Page 105: Upper Saturation Limit Parameter
Parameter assignment 8.4 Assigning parameters using remote operation The loop current cannot drop below the set threshold. ② Setting range: Between lower fault current and 4 mA Factory setting: 3.8 mA, or as specified in order 20.5 mA 20 mA 22.8 mA 3.55 mA 3.8 mA... -
Page 106: Setting The Fault Current Of The Internal Transmitter With Switch To ≥ 21 Ma
Parameter assignment 8.5 Setting the fault current of the internal transmitter with switch to ≥ 21 mA WARNING Undetected failure in devices with functional safety Note the following: • For the maximum current output signal to be output, set the measuring range within the maximum permissible measuring span. - Page 107 Parameter assignment 8.5 Setting the fault current of the internal transmitter with switch to ≥ 21 mA Procedure 1. Unscrew the cover. 2. Move the left switch to the HI position. Fault current Lower fault current ≤ 3.6 mA Upper fault current ≥ 21 mA Reserved for devices with PA (simulation mode) Figure 8-3 Set the upper fault current using switch...
- Page 108 Parameter assignment 8.5 Setting the fault current of the internal transmitter with switch to ≥ 21 mA SITRANS TS100/TS200/TS300/TS500/TSinsert/TSthermowell Operating Instructions, 08/2020, A5E47810090-AA...
-
Page 109: Service And Maintenance
Service and maintenance Basic safety notes Note The device is maintenance-free. 9.1.1 Maintenance The device is maintenance-free. However, a periodic inspection according to pertinent directives and regulations must be carried out. An inspection can include, for example, check of: • Ambient conditions •... -
Page 110: Cleaning
Service and maintenance 9.2 Cleaning CAUTION Releasing button lock Improper modification of parameters could influence process safety. • Make sure that only authorized personnel may cancel the button locking of devices for safety-related applications. NOTICE Penetration of moisture into the device Damage to device. -
Page 111: Maintenance And Repair Work
9.3 Maintenance and repair work Maintenance and repair work WARNING Impermissible repair and maintenance of the device • Repair and maintenance must be carried out by Siemens authorized personnel only. WARNING Impermissible repair of explosion protected devices Risk of explosion in hazardous areas •... -
Page 112: Uninstalling Usb Drivers
Service and maintenance 9.3 Maintenance and repair work 9.3.1 Uninstalling USB drivers Procedure 1. Select "Ports (COM & LPT)" > "USB Serial Port (COMx)" in the Windows Device Manager. 2. Right-click on "USB Serial Port (COMx)". 3. Select "Uninstall" from the shortcut menu. 4. -
Page 113: Sitrans Ts500
Service and maintenance 9.3 Maintenance and repair work 5. Right-click on "USB Serial Converter". 6. Select "Uninstall" from the shortcut menu. Result The associated registration entry for the USB modem is deleted. 9.3.2 SITRANS TS500 CAUTION Hot surfaces Risk of burns during maintenance work on parts having surface temperatures exceeding 70 °C (158 °F). -
Page 114: Replacing The Display
Service and maintenance 9.3 Maintenance and repair work 9.3.3 Replacing the display 9.3.3.1 Removing the display Procedure 1. De-energize the device. 2. Open the device. Opening the device (Page 42) 3. Remove the local display from the holder. 4. Disconnect the cable from the local display. SITRANS TS100/TS200/TS300/TS500/TSinsert/TSthermowell Operating Instructions, 08/2020, A5E47810090-AA... -
Page 115: Installing The Display
Service and maintenance 9.3 Maintenance and repair work 9.3.3.2 Installing the display Procedure 1. Connect the cable to the local display as shown in the figure. Figure 9-1 Ensure correct polarity! 2. Fasten the local display in the holder. 3. Close the device. Closing the device (Page 48) 9.3.4 Service and maintenance... -
Page 116: Return Procedure
Service and maintenance 9.4 Return procedure Recalibration of SITRANS TS300 Description Recalibration procedure Clamp-on version Do not disconnect the pipe sleeve from the pipe - leave the measuring position unchanged for reproducible measure‐ ment. It is not necessary to disconnect the power supply to per‐ form calibration. -
Page 117: Disposal
Service and maintenance 9.5 Disposal Required forms • Delivery note • Return document (http://www.siemens.com/processinstrumentation/returngoodsnote) with the following information: – Product (item description) – Number of returned devices/replacement parts – Reason for returning the item(s) • Decontamination declaration (http://www.siemens.com/sc/declarationofdecontamination) With this declaration you warrant "that the device/replacement part has been carefully cleaned and is free of residues. - Page 118 Service and maintenance 9.5 Disposal SITRANS TS100/TS200/TS300/TS500/TSinsert/TSthermowell Operating Instructions, 08/2020, A5E47810090-AA...
-
Page 119: Diagnostics And Troubleshooting
– Local display (using Namur symbols) will show "Configuration error" as higher priority. – SIMATIC PDM (using Siemens standard symbols) will show "Maintenance demanded" as higher priority. Be aware of the priority for each device status, depending on the interface used. - Page 120 Diagnostics and troubleshooting 10.1 Device status symbols Display NAMUR SIMATIC PDM/PLC – NAMUR NE 107 – HCF Symbol Device status Priority * Symbol Device status Priority * Maintenance re‐ Maintenance demanded quired Cause:Output signal is still valid, but wear reserve is almost exhausted and/or a function will be limited soon. Measure:Maintenance is strongly recommended as soon as possible.
- Page 121 Cause: Device state ok. No errors from active diagnostics. Measure: No action required. * The smallest number indicates the highest level of error severity. ** In SIMATIC PDM, the Siemens standard symbol as well as the corresponding NA\ symbol is displayed (by the device display). SITRANS TS100/TS200/TS300/TS500/TSinsert/TSthermowell...
-
Page 122: Diagnostic Messages
Diagnostics and troubleshooting 10.2 Diagnostic messages 10.2 Diagnostic messages The following table shows the IDs of diagnostic messages and possible causes and instructions for corrective actions. Symbols Message Cause/Remedy Input 1 error A sensor error (broken/shorted sensor) is detected at Input 1. Unplug and reconnect the sensor cable. - Page 123 Diagnostics and troubleshooting 10.2 Diagnostic messages Symbols Message Cause/Remedy Drift detected, reference volt‐ A critical measurement error was detected at the internal voltage age VREF reference. Reconnect or repair the sensor. If the problem persists, contact Technical Support. Drift detected at Input 1 A critical measurement error was detected at Input 1.
- Page 124 Diagnostics and troubleshooting 10.2 Diagnostic messages Symbols Message Cause/Remedy Loop current fixed The loop current is being held at a fixed value and is not responding to process variations. Disable the simulation to return to normal operation. Loop current in saturation The loop current has reached its upper (or lower) saturation limit and cannot increase (or decrease) any further.
- Page 125 Diagnostics and troubleshooting 10.2 Diagnostic messages Symbols Message Cause/Remedy Maximum supply voltage excee‐ The device is operated above its specified supply voltage range. Check the power supply (at the output terminals). Reset the device or switch it off and back on. If the problem persists, contact Technical Support.
-
Page 126: Troubleshooting Of Usb Modem
Diagnostics and troubleshooting 10.3 Troubleshooting of USB modem 10.3 Troubleshooting of USB modem Below you can find information on how to troubleshoot simple errors yourself. LED on the USB modem Cause of error Remedy Power LED is not lit. The USB cable is not connected. •... -
Page 127: Technical Data
Technical data 11.1 Rated conditions Storage Storage temperature -40 ... +80 °C (-40 ... +176 °F) Degree of protection in accordance with EN 60529 See nameplate. The degree of protection is achieved when the device is moun‐ ted correctly. See section Installing/mounting (Page 27). 11.1.1 Minimum permissible ambient temperatures in the connection area of the sensor... -
Page 128: Maximum Permissible Ambient Temperatures In The Connection Area Of The Sensor
Technical data 11.1 Rated conditions 11.1.2 Maximum permissible ambient temperatures in the connection area of the sensor 11.1.2.1 General limitations for compression fittings Due to the PTFE sealing, standard compression fittings are limited to a maximum temperature of 200 °C. 11.1.2.2 SITRANS TS100 Note... -
Page 129: Sitrans Ts500
Technical data 11.1 Rated conditions 11.1.2.3 SITRANS TS500 Dust SITRANS TS500 in "intrinsic safety Ex i" in "flameproof enclosure (Ex d)" is part of "intrinsic safety Ex i" - or - - or - in "Non-sparking nA/ec" in "non-intrinsically safe cir‐ cuits (Ex tb)"... - Page 130 Technical data 11.1 Rated conditions Dust SITRANS TS500 in "intrinsic safety Ex i" in "flameproof enclosure (Ex d)" is part of "intrinsic safety Ex i" - or - - or - in "Non-sparking nA/ec" in "non-intrinsically safe cir‐ cuits (Ex tb)" With temperature ≤...
- Page 131 Technical data 11.1 Rated conditions SITRANS TH100/200/300 with DVM LCD or SITRANS TH320/420 with display You can find the values of ∆T2G in the tables Table 11-3 Gas Ex i/nA/ec (Page 133), Table 11-4 Gas Ex i/nA/ec (Page 134), Table 11-5 Type 2N (Page 134) and Table 11-6 Type 2N (Page 135) and ∆T2D in the table Table 11-9 Dust Ex i/tb (Page 137) and Table 11-10 Type 2N (Page 138).
- Page 132 Technical data 11.1 Rated conditions Permissible power supply parameters = Permissible ambient temperature Gas hazardous area Zone 1 / Div. 1: Gas hazardous area Zone 1: SITRANS TH100/200/300 SITRANS TH320/420 with DVM LCD with display = 27 V T85 °C: -40 °C ≤ T ≤...
- Page 133 Technical data 11.1 Rated conditions Gas hazardous area: Ex i / IS / Ex nA/ec / NI The maximum ambient temperatures T of the respective connection head without transmitter can be found in the cells of the following tables. The temperature rise caused by the medium is already taken into account in the tables.
- Page 134 Technical data 11.1 Rated conditions Table 11-4 Gas Ex i/nA/ec Header type BT0, AH0 Header 80 °C 80 °C 100 °C Temperature class Temperature Tempera‐ Extension in °C in °C in °C in °C of medium (°C) ture rise length "X" caused by (mm) medi‐...
- Page 135 Technical data 11.1 Rated conditions Table 11-6 Type 2N Header type BA0: BB0; BC0; BD0; AA0, AB0, BMO, BT0, AC0, KJ0, BS0, AG0 Header 100 °C 80 °C 100 °C Temperature class Temperature Temperature in °C in °C in °C in °C in °C of medium (°C)
- Page 136 Technical data 11.1 Rated conditions Table 11-8 Type 2N Head type AH0, AV0, SI‐ AG0, UG0 AU0, UU0 TRANS TF head 85 °C 100 °C 120 °C Temperature class Max. permitted pow‐ 0 ... 3 1 ... 3 1 ... 3 er consumption of With or without Without elec‐...
- Page 137 Technical data 11.1 Rated conditions Dust hazardous area: Ex i / IS / Ex tb / DIP The maximum ambient temperatures T for the respective connection head with or without transmitter can be obtained from the cells in the following tables. The temperature increase given by the medium is already considered there.
-
Page 138: Maximum Permitted Sample Temperatures Within The Process
Technical data 11.1 Rated conditions Table 11-10 Type 2N Head type AH0, AV0, SITRANS TF AG0, UG0 AU0, UU0 head T85 °C 100 °C 120 °C Max. permitted power con‐ sumption of electronic (W) Without With elec‐ Without With elec‐ Without With elec‐... -
Page 139: Measuring Range
Technical data 11.1 Rated conditions 1 x RTD TF/3 mm/6 mm Max. permissible sample temperature (°C) 2 x RTD TF/3 mm/6 mm Certified transmitter in Zone 0 with type of Certified transmitter in Zone 1, 2 with protection "Intrinsically safe" type 1 x RTD WW/3 mm/6 mm of protection "Intrinsically safe"... -
Page 140: Construction
Technical data 11.2 Construction 11.2 Construction Table 11-13 Torque values for M20 accessories Torques for M20 accessories Plastic header Metal header Cable cross-section Cable gland made of plastic 5.0 Nm 5.0 Nm 6 ... 12 mm Cable gland made of metal 5.0 Nm 5 ... -
Page 141: Electrical Data
Technical data 11.3 Electrical data 11.3 Electrical data Devices for general use Measured current (Pt 100) 0.3 ... 1.0 mA Measuring (Pt 1000) 0.1 ... 0.3 mA Measuring Devices in explosion-protected version Equipment protection by means of intrinsic safety ≤ 30 V ≤... -
Page 142: Measuring Tolerances For Resistance Thermometers
Technical data 11.5 Measuring accuracy for thermocouples 11.4 Measuring tolerances for resistance thermometers Tolerance classes The tolerance classes of the resistance thermometers are defined as follows in accordance with IEC 60751: Tolerance class Precision ∆t Class B Basic accuracy ±(0.30 °C +0.0050|t[°C]|) ±1.8x0.30 °F +0.0050x|t[°F]-32| Class A Increased accuracy... - Page 143 Technical data 11.5 Measuring accuracy for thermocouples Catalog versions Type Basic accuracy, Class 2 Increased accuracy, Class 1 -40 °C ... +333 °C ±2.5 °C -40 °C ... +375 °C ±1.5 °C (-40 °F ... +631 °F ±4.5 °F) (-40 °F ... +707 °F ±2.7 °F) 333 °C ...
-
Page 144: Certificates And Approvals
AEx ia IIC T6/T4 … T1 Ga AEx ia IIIC T200 °C Da Ex ic IIC T6/T4 … T1 Gc Class I, Zone 2, AEx ic IIC T6/T4 … T1 Gc See also Certificates (http://www.siemens.com/processinstrumentation/certificates) Product documentation (Page 189) SITRANS TS100/TS200/TS300/TS500/TSinsert/TSthermowell Operating Instructions, 08/2020, A5E47810090-AA... -
Page 145: Sitrans Ts500
Zone 21 AEx tb IIIC T* Db Ta = -40 °C up to +Tx °C (only FMus) Ex tb IIIC T* Db Ta = -40°C up to +Tx °C (only cFM) Type 4X, IP66/67 See also Certificates (http://www.siemens.com/processinstrumentation/certificates) Product documentation (Page 189) SITRANS TS100/TS200/TS300/TS500/TSinsert/TSthermowell Operating Instructions, 08/2020, A5E47810090-AA... -
Page 146: Display
Technical data 11.7 Display 11.7 Display Ambient conditions Ambient temperature -20 ... +85 °C (-7 ... +185 °F) You can find the data for use in hazardous areas in the respective certificate. Storage temperature -40 ... +85 °C (-40 ... +185 °F) You can find the data for use in hazardous areas in the respective certificate. -
Page 147: Factory Settings Of Sitrans Th320/Th420
Technical data 11.8 Factory settings of SITRANS TH320/TH420 Power supply of temperature transmitter Available power supply Max. 23 mA Available supply voltage Max. 20 V (at 4 mA) Construction Weight Approx. 250 g Dimensions (W x H x D) Approx. 105 x 58 x 26 mm Degree of protection IP20 11.8... - Page 148 Technical data 11.8 Factory settings of SITRANS TH320/TH420 Factory settings SITRANS TH420/TR420 Input monitoring wire break and short-circuit Sensor calibration No sensor calibration of the input and output Damping 0.0 s SITRANS TS100/TS200/TS300/TS500/TSinsert/TSthermowell Operating Instructions, 08/2020, A5E47810090-AA...
-
Page 149: Dimension Drawings
Dimension drawings 12.1 Overview The following tables contain brief descriptions of the temperature sensors as well as references to the corresponding dimensional drawings. Table 12-1 Overview of SITRANS TS100 dimensional drawings Versions Description Basic version • Temperature sensors in cable design, for universal use, plastic-insulated version, for unfavorable space conditions. - Page 150 Dimension drawings 12.1 Overview Table 12-4 Overview of SITRANS TS500 dimensional drawings Versions Description Type 2, pipe version without process • Temperature sensors for containers and pipelines, pipe version for low to medi‐ connection um stress, without process connection, without extension, for plugging-in or use with sliding compression joints •...
- Page 151 Dimension drawings 12.1 Overview Versions Description Type SS, threaded straight well • Temperature sensors for vessels and pipelines, threaded process connection, straight thermowell (7MC55..) • SITRANS TS500, type SS, threaded straight well (7MC55..) (Page 169) Type SR, threaded reduced well •...
- Page 152 Dimension drawings 12.1 Overview Versions Description Type SWR, socket reduced well • Temperature sensors for vessels and pipelines, socket well process connection, tapered thermowell (7MC55..) • SITRANS TS500, type SWR, socket reduced well (7MC55..) (Page 184) SITRANS TS500 for installation in exist‐ •...
-
Page 153: Sitrans Ts100
Dimension drawings 12.2 SITRANS TS100 12.2 SITRANS TS100 ① TS100 mineral-insulated version ∅d External diameter of measuring insert (6 (0.24)) Length of measuring insert Cable length Non bendable length Temperature sensitive length Mounting length Figure 12-1 Dimensional drawings SITRANS TS100 - dimensions in mm (inch) SITRANS TS100/TS200/TS300/TS500/TSinsert/TSthermowell Operating Instructions, 08/2020, A5E47810090-AA... -
Page 154: Sitrans Ts200
Dimension drawings 12.3 SITRANS TS200 12.3 SITRANS TS200 (1.59) (5.91) (0.39) (1.57) (0.39) (1.41) (0.39) (1.97) (0.20) (0.79) Length of measuring insert Mounting length Height of head ① Basic sensor U = B ② Flying Leads U = B + 10 (0.39) ③... -
Page 155: Sitrans Ts300
Dimension drawings 12.4 SITRANS TS300 12.4 SITRANS TS300 SITRANS TS300 Modular: Length of measuring insert Height of head ∅d External diameter of measuring insert Nominal length ∅D External diameter of process connection Mounting length (see process connection options) ∅D3 Internal diameter of protective tube Extension (see process connection options) Figure 12-3 Dimensions in mm (inch) - Page 156 Dimension drawings 12.4 SITRANS TS300 Process connection options: tapered coupling with tapered coupling with tri-clamp connection groove union nut asep‐ groove union nut per tic design per DIN 11851 DIN 11864-1 clamp connection per thermowell with weld‐ G1A dead-zone free (con‐ DIN 32676 or ISO 2852 ing ball 30 x 40 mm ical metal taper)
- Page 157 Dimension drawings 12.4 SITRANS TS300 SITRANS TS300 Clamp-on: ① ⑥ circular connector M12 x 1 cable connection M16 x 1,5 cable ∅4, 5-10 ② ⑦ transmitter with circular connector clamping shoe for pipe ≥ ∅10 - ∼∅300 M12 x 1 ③...
- Page 158 Dimension drawings 12.4 SITRANS TS300 Figure 12-4 Dimensions in mm (inch) SITRANS TS100/TS200/TS300/TS500/TSinsert/TSthermowell Operating Instructions, 08/2020, A5E47810090-AA...
-
Page 159: Sitrans Ts500
Dimension drawings 12.5 SITRANS TS500 12.5 SITRANS TS500 12.5.1 SITRANS TS500, types 2 and 2N G 1/2" 9 (0.35) ① Type 2, pipe version without process connection ② Type 2N, pipe version with screw-in nipple Length of measuring insert Type Axx: 41 (1.61) Type Bxx: 26 (1.02) ∅d External diameter of measuring insert... -
Page 160: Sitrans Ts500, Types 2G And 2F
Dimension drawings 12.5 SITRANS TS500 Figure 12-5 Dimensional drawings SITRANS TS500, types 2 and 2N - dimensions in mm (inch) 12.5.2 SITRANS TS500, types 2G and 2F ① Type 2G, pipe version with screw-in nipple and extension ② Type 2F, pipe version with flange and extension Length of measuring insert Type Axx: 41 (1.61) Type Bxx: 26 (1.02) -
Page 161: Sitrans Ts500, Type 3
Dimension drawings 12.5 SITRANS TS500 12.5.3 SITRANS TS500, type 3 Ød ØD3 ØD ØD1 ØD2 ① Type 3, fast pipe version without process connection Length of measuring insert (European) Height of head ∅d External diameter of measuring insert (6 (0.24)) H Type Axx: 41 (1.61) Type Bxx: 26 (1.02) ∅D... -
Page 162: Sitrans Ts500, Types 3G And 3F
Dimension drawings 12.5 SITRANS TS500 12.5.4 SITRANS TS500, types 3G and 3F Leitungs- einführung Ød Ød ØD3 ØD3 ØD ØD ØD1 ØD1 ØD2 ØD2 ① Type 3G, fast pipe version with screw-in nipple and extension ② Type 3F, fast pipe version with flange and extension Length of measuring insert (European) Type Axx: 41 (1.61) Type Bxx: 26 (1.02) -
Page 163: Sitrans Ts500, Types 4 And 4F
Dimension drawings 12.5 SITRANS TS500 12.5.5 SITRANS TS500, types 4 and 4F Ød ØD4 Ød M18x1,5 ØD4 ØD M18x1,5 ØD3 ØD3 ØD ØD2 ØD2 ① Type 4, full material version, with extension ② Type 4F, full material version, with flange and extension Length of measuring insert Thread dimension of process con‐... -
Page 164: Sitrans Ts500, Type St, Threaded Tapered Well (7Mc65
Dimension drawings 12.5 SITRANS TS500 Figure 12-9 Dimensional drawings SITRANS TS500, types 4 and 4F - dimensions in mm (inch) 12.5.6 SITRANS TS500, type ST, threaded tapered well (7MC65..) ØD Ød 6,604 (0.26) bore 6,35 (0.25) ØD2 ∅d External diameter of measuring insert Thread dimension of process connec‐... - Page 165 Dimension drawings 12.5 SITRANS TS500 Figure 12-10 Dimensional drawings SITRANS TS500, type ST, threaded tapered well - dimensions in mm (inch) SITRANS TS100/TS200/TS300/TS500/TSinsert/TSthermowell Operating Instructions, 08/2020, A5E47810090-AA...
-
Page 166: Sitrans Ts500, Type Sst, Threaded Tapered Well (7Mc55
Dimension drawings 12.5 SITRANS TS500 12.5.7 SITRANS TS500, type SST, threaded tapered well (7MC55..) Length of thermowell Length of insert ∅D1 External diameter of process connection Nominal length ∅D2 External diameter of tip Insertion length Unsupported length Extension Head bottom thickness: Type Axx = 41 (1.61) Type Bxx = 26 (1.02) Lag length... -
Page 167: Sitrans Ts500, Type Ss, Threaded Straight Well (7Mc65
Dimension drawings 12.5 SITRANS TS500 Figure 12-11 Dimensional drawings SITRANS TS500, type SST, threaded tapered well (7MC55…) - dimensions in mm (inch) 12.5.8 SITRANS TS500, type SS, threaded straight well (7MC65..) Ød 6,604 (0.26) bore ØD 6,35 (0.25) ∅d External diameter of measuring insert Thread dimension of process connec‐... - Page 168 Dimension drawings 12.5 SITRANS TS500 Figure 12-12 Dimensional drawings SITRANS TS500, type SS, threaded straight well - dimensions in mm (inch) SITRANS TS100/TS200/TS300/TS500/TSinsert/TSthermowell Operating Instructions, 08/2020, A5E47810090-AA...
-
Page 169: Sitrans Ts500, Type Ss, Threaded Straight Well (7Mc55
Dimension drawings 12.5 SITRANS TS500 12.5.9 SITRANS TS500, type SS, threaded straight well (7MC55..) Length of thermowell Lag length Head bottom thickness: Length of measuring insert Type Axx = 41 (1.61) Type Bxx = 26 (1.02) ∅D External diameter of process connection Nominal length Extension Insertion length... -
Page 170: Sitrans Ts500, Type Sr, Threaded Reduced Well (7Mc65
Dimension drawings 12.5 SITRANS TS500 12.5.10 SITRANS TS500, type SR, threaded reduced well (7MC65..) ØD Ød 6,604 (0.26) bore 6,35 (0.25) ØD2 ∅d External diameter of measuring insert Thread dimension of process connec‐ tion ∅D External diameter of process connection Nominal length ∅D2 External diameter of tip... -
Page 171: Sitrans Ts500, Type Sr, Threaded Reduced Well (7Mc55
Dimension drawings 12.5 SITRANS TS500 12.5.11 SITRANS TS500, type SR, threaded reduced well (7MC55..) ØD Ø6.5 Ø12.7 Head bottom thickness: Length of measuring insert Type Axx = 41 (1.61) Type Bxx = 26 (1.02) ∅D External diameter of process connection Nominal length Extension Insertion length... -
Page 172: Sitrans Ts500, Type Ft, Flanged Tapered Well (7Mc65
Dimension drawings 12.5 SITRANS TS500 12.5.12 SITRANS TS500, type FT, flanged tapered well (7MC65..) Weld 27 (1.063) Ød 6,604 (0.26) bore 15,875 (0.625) 6,35 (0.25) ∅d External diameter of measuring insert (6 (0.24)) N Nominal length Extension Mounting length Figure 12-16 Dimensional drawings SITRANS TS500, type FT, flanged tapered well - dimensions in mm (inch) SITRANS TS100/TS200/TS300/TS500/TSinsert/TSthermowell... -
Page 173: Sitrans Ts500, Type Fst, Flanged Tapered Well (7Mc55
Dimension drawings 12.5 SITRANS TS500 12.5.13 SITRANS TS500, type FST, flanged tapered well (7MC55..) Length of thermowell Length of measuring Insert ∅D1 External diameter of process connection Nominal length ∅D2 External diameter of tip Insertion length SITRANS TS100/TS200/TS300/TS500/TSinsert/TSthermowell Operating Instructions, 08/2020, A5E47810090-AA... - Page 174 Dimension drawings 12.5 SITRANS TS500 Extension length Head bottom thickness Type Axx = 41 (1.61) Type Bxx = 26 (1.02) Lag lenght Cone Length Figure 12-17 Dimensional drawings SITRANS TS500, type FST, flanged tapered well (7MC55…) SITRANS TS100/TS200/TS300/TS500/TSinsert/TSthermowell Operating Instructions, 08/2020, A5E47810090-AA...
-
Page 175: Sitrans Ts500, Type Fs, Flanged Straight Well (7Mc65
Dimension drawings 12.5 SITRANS TS500 12.5.14 SITRANS TS500, type FS, flanged straight well (7MC65..) Weld Ød 6,604 (0.26) bore 19.05(0.75) 6,35 (0.25) ∅d External diameter of measuring insert (6 (0.24)) N Nominal length Extension Mounting length Figure 12-18 Dimensional drawings SITRANS TS500, type FS, flanged straight well - dimensions in mm (inch) SITRANS TS100/TS200/TS300/TS500/TSinsert/TSthermowell Operating Instructions, 08/2020, A5E47810090-AA... -
Page 176: Sitrans Ts500, Type Fs, Flanged Straight Well (7Mc55
Dimension drawings 12.5 SITRANS TS500 12.5.15 SITRANS TS500, type FS, flanged straight well (7MC55..) ∅D External diameter of measuring insert Nominal length Extension Mounting length Lag length Lenght of measuring insert Head bottom thickness Figure 12-19 Dimensional drawings SITRANS TS500, type FS, flanged straight well (7MC55…) SITRANS TS100/TS200/TS300/TS500/TSinsert/TSthermowell Operating Instructions, 08/2020, A5E47810090-AA... -
Page 177: Sitrans Ts500, Type Fr, Flanged Reduced Well (7Mc65
Dimension drawings 12.5 SITRANS TS500 12.5.16 SITRANS TS500, type FR, flanged reduced well (7MC65..) Weld 19,05 (0.75) Ød 6,604 (0.26) bore 12,7 (0.5) 6,35 (0.25) ∅d External diameter of measuring insert (6 (0.24)) N Nominal length Extension Mounting length Figure 12-20 Dimensional drawings SITRANS TS500, type FR, flanged reduced well - dimensions in mm (inch) SITRANS TS100/TS200/TS300/TS500/TSinsert/TSthermowell... -
Page 178: Sitrans Ts500, Type Fr, Flanged Reduced Well (7Mc55
Dimension drawings 12.5 SITRANS TS500 12.5.17 SITRANS TS500, type FR, flanged reduced well (7MC55..) ∅D External diameter of measuring insert Nominal length Extension Mounting length Lenght of measuring insert Head bottom thickness Figure 12-21 Dimensional drawings SITRANS TS500, type FR, flanged reduced well (7MC55…) SITRANS TS100/TS200/TS300/TS500/TSinsert/TSthermowell Operating Instructions, 08/2020, A5E47810090-AA... -
Page 179: Sitrans Ts500, Type Swt, Socket Tapered Well (7Mc65
Dimension drawings 12.5 SITRANS TS500 12.5.18 SITRANS TS500, type SWT, socket tapered well (7MC65..) ØD Ød 6,604 (0.26) bore ØD2 6,35 (0.25) ∅d External diameter of measuring insert (6 (0.24)) N Nominal length ∅D External diameter of process connection Mounting length ∅D2 External diameter of tip Extension... -
Page 180: Sitrans Ts500, Type Swst, Socket Tapered Well (7Mc55
Dimension drawings 12.5 SITRANS TS500 12.5.19 SITRANS TS500, type SWST, socket tapered well (7MC55..) Length of thermowell Length of measuring insert ∅D1 External diameter of process connection Nominal length ∅D2 External diameter of tip Insertion length Extension length Head bottom thickness Type Axx = 41 (1.61) Type Bxx = 26 (1.02) Lag lenght... -
Page 181: Sitrans Ts500, Type Sws, Socket Straight Well (7Mc65
Dimension drawings 12.5 SITRANS TS500 12.5.20 SITRANS TS500, type SWS, socket straight well (7MC65..) ØD Ød 6,604 (0.26) bore 6,35 (0.25) ∅d External diameter of measuring insert (6 (0.24)) N Nominal length ∅D External diameter of process connection Mounting length ∅D2 External diameter of tip Extension... -
Page 182: Sitrans Ts500, Type Sws, Socket Straight Well (7Mc55
Dimension drawings 12.5 SITRANS TS500 12.5.21 SITRANS TS500, type SWS, socket straight well (7MC55..) ∅D External diameter of process connection Mounting length Length of measuring Insert Extension Head bottom thickness: Lag length Type Axx = 41 (1.61) Type Bxx = 26 (1.02) Nominal length Length of thermowell Figure 12-25... -
Page 183: Sitrans Ts500, Type Swr, Socket Reduced Well (7Mc65
Dimension drawings 12.5 SITRANS TS500 12.5.22 SITRANS TS500, type SWR, socket reduced well (7MC65..) ØD Ød 6,604 (0.26) bore 12,7 (.5) 6,35 (0.25) ∅d External diameter of measuring insert (6 (0.24)) N Nominal length ∅D External diameter of process connection Mounting length ∅D8 Internal diameter of tip... -
Page 184: Sitrans Ts500, Type Swr, Socket Reduced Well (7Mc55
Dimension drawings 12.5 SITRANS TS500 12.5.23 SITRANS TS500, type SWR, socket reduced well (7MC55..) Length of thermowell Nominal length ∅D External diameter of process connection Mounting length Length of measuring insert Extension Head bottom thickness: Lag length Type Axx = 41 (1.61) Type Bxx = 26 (1.02) Figure 12-27 Dimensional drawings SITRANS TS500, type SWR, socket reduced well (7MC55…) -
Page 185: Sitrans Ts500 For Installation In Existing Protective Tubes
Dimension drawings 12.5 SITRANS TS500 12.5.24 SITRANS TS500 for installation in existing protective tubes ① SITRANS TS500 for installation in existing protective tubes Ⓐ Extension tube, DIN G Ⓑ Extension tube, NPT Ⓒ Extension tube, NUN Ⓓ Extension tube, nipple Length of measuring insert Penetration depth ∅d... - Page 186 Dimension drawings 12.5 SITRANS TS500 NOTICE X Extension Please note for executions without extension but with sealing. To consider the height of the sealing screw please add this height to your specified insertion length. U = X + U specified G50 (M24x1,5): X = 12 mm (½...
-
Page 187: Sitrans Ts500, Type Gp, General Purpose, No Well
Dimension drawings 12.5 SITRANS TS500 12.5.25 SITRANS TS500, type GP, general purpose, no well Welded Spring Loaded Ød Ød Ød ① SITRANS TS500 type GP (welded) ② SITRANS TS500 type GP (Spring loaded) ③ SITRANS TS500 type GP (Extension) ∅d External diameter of measuring insert Nominal length Mounting length... -
Page 188: Sitrans Tsinsert - Measuring Inserts For Sitrans Ts500
Dimension drawings 12.6 SITRANS TSinsert - measuring inserts for SITRANS TS500 12.6 SITRANS TSinsert - measuring inserts for SITRANS TS500 Ø33 (1.30) Ø33 (1.30) NPT1/2 Ø42 (1.65) Ø42 (1.66) NPT1/2) 33 (1.30) Ø42 (1.65) Ød Ød ① American version ∅d External diameter of measuring in‐... -
Page 189: Product Documentation And Support
– "Download as html5, only PC": Open or save the manual in the HTML5 view on your PC You can also find manuals with the Mobile app at Industry Online Support (https:// support.industry.siemens.com/cs/ww/de/sc/2067). Download the app to your mobile device and scan the device QR code. Product documentation by serial number Using the PIA Life Cycle Portal, you can access the serial number-specific product information including technical specifications, spare parts, calibration data, or factory certificates. -
Page 190: Technical Support
Additional information on our technical support can be found at Technical Support (http:// www.siemens.com/automation/csi/service). Service & support on the Internet In addition to our technical support, Siemens offers comprehensive online services at Service & Support (http://www.siemens.com/automation/serviceandsupport). Contact If you have further questions about the device, contact your local Siemens representative at Personal Contact (http://www.automation.siemens.com/partner). -
Page 191: Remote Operation
Operating Manual 'Help for SIMATIC PDM'. The manual is delivered with SIMATIC PDM software. Once the SIMATIC PDM is installed on your computer you find the manual under: Start > All programs > Siemens Automation > SIMATIC > Documentation. Link at our website: SIMATIC PDM instructions and manuals (https://support.industry.siemens.com/cs/ww/en/ps/... -
Page 192: Updating The Electronic Device Description (Edd)
1. Check that the EDD revision match the Firmware revision in the device according to the table in section Product compatibility TH320/420 (Page 10). 2. Go to the support page Software downloads (http://www.siemens.de/ prozessinstrumentierung/downloads). 3. Enter the product name in the field "Enter search term...". -
Page 193: Index
Index ABS, 82 Edit view, 63 AVG, 82 ELECTR TEMP, 61 AVG B, 82 ETEMP, 82 BUTTON LOCK, 63 FO, 107 Fault current, 107 FUNCT SAFETY, 62 Functional safety ∼ cannot be activated, 106 C10 E, 76, 80 Fault current, 106 C100E, 76, 80 C1hG1, 76, 80 C1hG2, 76, 80... - Page 194 Index KOHM, 76, 80 N100D, 76, 80 N100G, 77, 81 N120D, 76, 80 N1k D, 76, 80 N50 D, 76, 80 Laws and directives N50 G, 77, 81 Disassembly, 13 Nameplate, 21 Personel, 13 NIX D, 76, 80 LED, 25 NIX G, 77, 80 LEDs, (See LED) NONE, 78, 81...
- Page 195 Index TYPE INPUT 2, 62 Recalibration, 115 Resistance thermometers UNITS, 62 Connecting, 40 UPPER RANGE, 62, 84 Functional principle, 20 USB driver Return procedure, 116 Installing, 55 Uninstalling, 112 User PIN, 91 Factory setting, 88 USER PIN, 63 Scope of delivery, 10 Service, 190 Service and support Internet, 190...
- Page 196 Index SITRANS TS100/TS200/TS300/TS500/TSinsert/TSthermowell Operating Instructions, 08/2020, A5E47810090-AA...
Need help?
Do you have a question about the SITRANS TS Series and is the answer not in the manual?
Questions and answers