
Related Manuals for SLEIPNER MOTOR AS SH 320/300 TC


Summary of Contents for SLEIPNER MOTOR AS SH 320/300 TC
- Page 1 - 320/300 TC Installation manual SLEIPNER MOTOR AS P.O. Box 519 N-1612 Fredrikstad Norway Document id: 5938 www.side-power.com Revision: Date: 2019 © Sleipner Motor AS 2019...
-
Page 2: Table Of Contents
Spare Parts................23 Warranty statement ............... 23 DECLARATION OF CONFORMITY MC_0020 Sleipner Motor AS P.O. Box 519, Arne Svendsensgt. 6-8 N-1612 Fredrikstad, Norway Declare that this product with accompanying standard control systems complies with the essential health and safety requirements according to:... -
Page 3: Planning Considerations And Precautions
(NB: These instructions are only general instruction. If you are not skilled to do this work, please contact professional installers for assistance.) All electrical work must be done by a licensed professional. IMPORTANT Faulty installation of the tunnel, thruster or panel will render all warranty given by Sleipner Motor AS void. MC_0038 Planning Considerations and Precautions MC_0113 •... -
Page 4: Thruster Measurements
Twin Propeller Propeller or gear leg must never extend out of the tunnel Tunnel centre line MG_0078 Thruster Measurements MC_0186 *320 Measurement Measurement description code inch Internal tunnel diameter 11.81 Tunnel thickness standard 0.39 Outside tunnel diameter 12.60 Minimum tunnel length 14.57 Recommended tunnel length 21.65... -
Page 5: Thruster Specifications
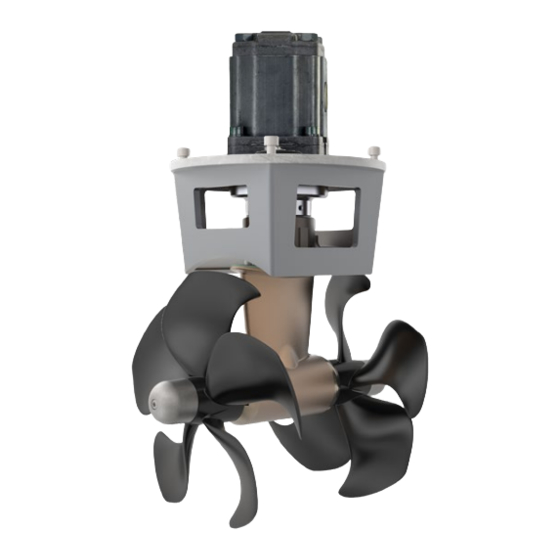
Thruster Specifi cations MC_0145 description * 320 light duty thrust up to (kg * lbs) 320kg * 705lbs Heavy duty thrust up to (kg * lbs) 270kg * 594lbs Typical Boat Size (m * ft) 13m - 23m * 42ft - 75ft Propulsion System Twin Counter Rotating Power (kw * Hp) -
Page 6: Positioning Of The Tunnel/ Thruster
Fig. 1 Pivot point important B = 10,0m A = 11,0m Fig. 2 Ø MG_0001 Positioning of the tunnel / thruster MC_0003 Aim to install the thruster as far forward as possible (Fig. 1) Due to the leverage eff ect around the boats’ pivot point. The relative distance diff erence from the boat pivots’ point to the thruster will determine the amount of real thrust for the boats, rotation. -
Page 7: Tunnel Length
Water flow must have space to "straighten" itself for best Ensure the top and bottom tunnel lengths are respectable performance. lengths from one another. It is important the propeller never extrudes from the tunnel ends. Cavitation STANDARD USE FLAT BOTTOM HULL HIGH-SPEED OPERATION Increase tunnel length to prevent... -
Page 8: Tunnel Installation In Sailboats
Fig. 1 Pos. A Pos. B MG_0004 Tunnel installation in sailboats MC_0003 Some sailboats have a racing hull which means they may have a fl at bottom and shallow draft in the bow section. This can make installing the thruster as far forward from the boats main pivot point diffi... -
Page 9: Water Deflection
Fig. 1 Fig. 2 Fig. 3 Fig. 4 High water force while underway High water force while underway from wave contact MG_0003 Water Defl ection MC_0003 A possible problem in sailboats or fast powerboats is that a non-rounded surface can generate drag from the back face of the tunnel, as it creates a “fl at”... -
Page 10: Tunnel Ends
Fig. 2 Fig. 1 R = 0,1 x D (10%) R = 0,1 x D (10%) Fig. 3 Fig. 4 MG_0002 Tunnel ends MC_0003 Rounded tunnel ends will maximise thrust and minimise noise. For best preformance round the tunnel connection to the hull-side as much as possible. The optimum rounding has a radius of 10% of the diameter of the tunnel. -
Page 11: Tunnel Installation
Fig. 1 Fig. 2 Fig. 3 Fig. 4 MG_0005 Tunnel installation MC_0003 IMPORTANT We recommend that a professional does the fi breglass fi tting of the tunnel. These instructions are only general instructions and do not explain in any way the details of fi breglass work. Problems caused by faulty installation of the tunnel, are the installers full responsibility. Find the position in the boat considering the information earlier in this manual and the applicable measurements for the thruster model you are installing. - Page 12 Fig. 1a Fig. 1c Fig. 1 Fig. 1b Fig. 1d Fig. 3 Fig. 2 R = D x 0,1 R = D x 0,1 MG_0006 Tunnel installation MC_0003 With tunnel installed and cast (Fig. 1) round the edges with a radius of 10% of the tunnel diameter (Fig. 1a) or make a slope with a length of 10-15% of the tunnel diameter (Fig.
-
Page 13: Stern Tunnel Installation
Stern Tunnel Installation MC_0003 Stern thruster installation has extra considerations and precautions and thruster installation procedures. See the attached manual supplied in the stern thruster kit SH 320 5938 2019... -
Page 14: Hydraulic Thruster Installation Considerations And Precautions
Hydraulic Thruster Installation Considerations and Precautions MC_0009 Before installation, The installer must read this guide to ensure necessary acquaintance with this product. • If the height of the room you are installing the Side-Power is limited, it can be installed horizontally or at any angle in-between. If the electromotor is positioned more than 30º... -
Page 15: Technical Specifications
Technical Specifi cations MC_0107 60 % 80 % 100 % Thruster model Motor type Flow Pressure Flow Pressure Flow Pressure L/min -Bar 18.8 21.7 24.2 USG-PSI 1494 1987 2494 L/min -Bar 25.5 29,9 32,3 SH 100 USG-PSI 1117 1494 1871 L/min -Bar 31.3 36.1... -
Page 16: Technical Requirements / Hydraulic Hose Connections To Motor
07.03.2014 07.03.2014 Hyd. motor 16 ccm Copyright All rights reserved Copyright All rights reserved Title Title Hyd. motor 16 ccm Hyd. motor 16 ccm SLEIPNER MOTOR AS Part nr Weight Size Scale Edition Sheet SLEIPNER MOTOR AS SLEIPNER MOTOR AS... -
Page 17: Gear Leg & Motor Bracket Installation
BOATS BOATS 2 - 4 CENTRELINE CENTRELINE ØC TUNNEL CENTRELINE TUNNEL CENTRELINE ØA MODEL ØA ØC 52 mm 48 mm 11 mm SH 320 2.05” 1.89” 0.43” IMPORTANT Ensure that there is some oil or grease on the O-rings in the motor bracket PORT STARBOARD before mounting it together with the... -
Page 18: Propeller Installation
DRIVE PIN PROPELLER WASHER LOCK NUT IMPORTANT ANODE SH240TC/SH320TC (COUNTER ROTATING PROPELLERS): Fit the propellers to the shafts with the LH marked propeller on the port side and the RH marked propeller on the starboard side. Apply Loctite 243 or similar ANODE HOLDING SCREW MG_0033... -
Page 19: Motor Installation
Fig. 1 IMPORTANT! Apply seawater resistant grease on both motor shaft Bolt tightening forces: Bolts (4x) holding motor to bracket: 33 Nm (24 lb/ft) MG_0149 Motor Installation MC_0109 ! Please refer to the graphic for special considerations relating to your model ! Remove the 4 bolts in the motor bracket. -
Page 20: S-Link Planning & Precautions
Example of the control wiring with You need: Control Panel S-link system for boats with one 2 x 6 1327 End terminators Wiring of S-link system 3 x 6 1326 T-connectors control position and one thruster. 1 x 6 1328 Power spur 2 x 6 1320-xxM Backbone cables 2 x 6 1321-xxM Spur cables Explaining S-link... -
Page 21: Control Panel Installation
4x SCREWS Ø 4.5 mm Ø 4.5 mm 75.7 mm 58 mm 67 mm GASKET Ø 4.5 mm Ø 4.5 mm Ø 4.5 mm External alarm / buzzer connection (S-link) Supply + 12V / 24V DC Internal fuse / relay External alarm buzzer 12V / 24V DC - max 0,5A MG_0063... -
Page 22: Checklist For Hydraulic Thrusters
Checklist for Hydraulic Thrusters MC_0049 ..Propeller is fastened correctly to the shaft... Propeller turns freely in tunnel... Lower-unit is fi lled with gearoil... Oil-drain screw is tightened and the copper seal is present... The anode holding screw is tightened well with thread glue... -
Page 23: Spare Parts
Warranty statement MC_0024 1. The equipment manufactured by Sleipner Motor AS (The “Warrantor”) is warranted to be free from defects in workmanship and materials under normal use and service. 2. This Warranty is in eff ect for of two years (Leisure Use) or one year (Commercial use) from the date of purchase by the user. Proof of purchase must be included, to establish that it is inside the warranty period. - Page 24 Norway The information given in the document was correct at the time it was published. However, Sleipner Motor AS can not accept liability for any inaccuracies or omissions it may contain. Continuous product improvement may change the product specifi cations without notice. Therefore, Sleipner Motor AS can not accept liability for any possi- ble differences between product and document.
Need help?
Do you have a question about the SH 320/300 TC and is the answer not in the manual?
Questions and answers