
Subscribe to Our Youtube Channel
Related Manuals for Vex Robotics Pro VersaChassis Mini

Summary of Contents for Vex Robotics Pro VersaChassis Mini
- Page 1 217-6327-752 VersaChassis Mini 4 Wheel Drive Assembly Instructions VersaChassis Mini 4 Wheel Drive Assembly Instructions vexpro.com Copyright 2018, VEX Robotics Inc. 2018-06-15...
-
Page 2: Table Of Contents
Part 2: Chassis Assembly ..................11 Part 3: VersaPlanetary Lite Assembly ................ 18 Part 4: VersaPlanetary Lite Installation ..............29 Part 5: Wheel Installation ..................35 Bill of Materials / Where to Get More ............... 42 Support........................ 45 vexpro.com Copyright 2018, VEX Robotics Inc. 2018-06-15... -
Page 3: Introduction
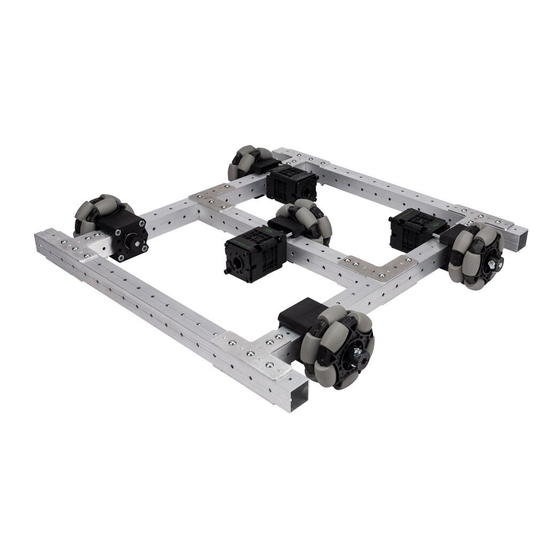
2 + 2 Drivetrain (Top Left), Mecanum Drive (Top Right), 4 Traction Wheel Drive (Bottom Left), 4 Omni-Directional Wheel Drive (Bottom Right) Once you’ve built your VersaChassis Mini, we recommend looking at the VersaChassis Mini Tips & Tricks Guide that you can use to improve and/or add functionality to your VersaChassis Mini. vexpro.com Copyright 2018, VEX Robotics Inc. 2018-06-15... -
Page 4: Required Tools
276-5236 T15 Screw Driver 276-5011 276-1382 11/32” Wrench 276-4350 Customer #1 Phillips Screw Driver Provided Customer Flat Head Screw Driver Provided Customer Pliers Provided Customer 7/8” Step Drill Provided Customer Power Drill Provided vexpro.com Copyright 2018, VEX Robotics Inc. 2018-06-15... - Page 5 217-6327-752 VersaChassis Mini 4 Wheel Drive Assembly Instructions Picture Name Included Customer Ruler or Measuring Tape Provided 5/32” or 11/64” Customer Drill Bit Provided Customer White Lithium Grease Provided vexpro.com Copyright 2018, VEX Robotics Inc. 2018-06-15...
-
Page 6: Part 1: Chassis Preparation
When completed with Part 1, you will end up with two 15.5” Long VersaFrame members with wheel holes and (optional) set screw access holes. See Step 2 for more information about set screw access holes. vexpro.com Copyright 2018, VEX Robotics Inc. 2018-06-15... - Page 7 VersaChassis Mini 4 Wheel Drive Assembly Instructions What You Will Need Picture Name 7/8” Step Drill Power Drill Ruler or Measuring Tape 15.5” Long 1” x 1” x 0.040” Wall 217-3426 VersaFrame Tube vexpro.com Copyright 2018, VEX Robotics Inc. 2018-06-15...
- Page 8 The instructions below allow teams to run both 3.25” and 4” wheels. If you wish to run wheels larger than 4”, you will need to move both holes closer to the center of the chassis side rail. vexpro.com Copyright 2018, VEX Robotics Inc. 2018-06-15...
- Page 9 As mentioned in the VersaChassis Mini User Guide, these set screws can vibrate loose over time. Drilling these holes in your chassis side rail allows you to check and tighten these screws without having to disassemble part of your drivetrain. vexpro.com Copyright 2018, VEX Robotics Inc. 2018-06-15...
- Page 10 VersaChassis Mini 4 Wheel Drive Assembly Instructions Step 3: Repeat on Second 15.5” Long VersaFrame Member Repeat Steps 1 and 2 on the second 15.5” Long VersaFrame Member. When finished, you should have two pieces that look like this: vexpro.com Copyright 2018, VEX Robotics Inc. 2018-06-15...
-
Page 11: Part 2: Chassis Assembly
If you are using rivets, you can still use this section as a guide for how to assemble your chassis. When completed with Part 2, you will end up with an assembled VersaChassis Mini frame. vexpro.com Copyright 2018, VEX Robotics Inc. 2018-06-15... - Page 12 17.5” Long 1” x 1” x 0.040” 217-3426 Wall VersaFrame Tube 15.5” Long 1” x 1” x 0.040” Wall VersaFrame Tube (With 217-3426 Wheel Holes) VersaChassis Gusset 217-3557 #8-32 Nyloc Nut 275-1028 #8-32 x 1.500” Star Drive 276-4998 Screws vexpro.com Copyright 2018, VEX Robotics Inc. 2018-06-15...
- Page 13 15.5” VersaFrame Members. Note: For this step, leave the screws and nuts finger tight. This will make it easier for the gussets to line up with the 17.5” Long VersaFrame Member. vexpro.com Copyright 2018, VEX Robotics Inc. 2018-06-15...
- Page 14 Slide the 17.5” Long VersaFrame Member between the VersaChassis Gussets attached to the 15.5” Long VersaFrame Members. The ends of the 17.5” VersaFrame Members should be 2” from the outer face of the 15.5” VersaFrame Member. vexpro.com Copyright 2018, VEX Robotics Inc. 2018-06-15...
- Page 15 T15 Star Drive Screwdriver and an 11/32” open wrench to tighten all the screws, including the 4 that are holding the VersaChassis Gusset to the 15.5” VersaFrame Member. vexpro.com Copyright 2018, VEX Robotics Inc. 2018-06-15...
- Page 16 Use a 5/32” or 11/64” drill bit to match drill 4 additional holes in the 15.5” VersaFrame Member. The location of these holes are indicated by the red arrows in the picture below. vexpro.com Copyright 2018, VEX Robotics Inc. 2018-06-15...
- Page 17 Step 4. These screws can be tightened all the way with the T15 Star Drive Screwdriver. When completed with Part 2, you will end up with an assembled VersaChassis Mini frame. vexpro.com Copyright 2018, VEX Robotics Inc. 2018-06-15...
-
Page 18: Part 3: Versaplanetary Lite Assembly
These steps will need to be performed for each of the VersaPlanetary Lite gearboxes being used with the VersaChassis Mini. When completed with Part 3, you will end up with four completed VersaPlanetary Lite gearboxes with a 1/4" Square shaft installed. vexpro.com Copyright 2018, VEX Robotics Inc. 2018-06-15... - Page 19 VersaPlanetary Lite Base Kit, 1:1, 217-5995 Universal Female Output Shaft VersaPlanetary Lite Ring Gear 217-5832 5:1 VersaPlanetary Gear Set 217-2819 4:1 VersaPlanetary Gear Set 217-2818 3” Long ¼” ThunderSquare Shaft 276-3522 White Lithium Grease vexpro.com Copyright 2018, VEX Robotics Inc. 2018-06-15...
- Page 20 VersaPlanetary Lite. For detailed instructions on how to prepare motors to be used with the VersaPlanetary Lite, please look at the guide XXXXXXXXXX vexpro.com Copyright 2018, VEX Robotics Inc. 2018-06-15...
- Page 21 Step 2: Mount Motor to Motor Mounting Plate Use a 2.5mm Hex Key and (2x) M3 x 8mm SHCS (Socket Head Cap Screws) to attach the motor to the VersaPlanetary Motor Mounting Plate. Step 2 Completed vexpro.com Copyright 2018, VEX Robotics Inc. 2018-06-15...
- Page 22 32 Set Screw is perpendicular to the split in the shaft adapter. This will maximize the clamping force of the shaft adapter. Lastly, make sure the motor shaft still spins freely and that the VersaPlanetary Input Coupler doesn’t drag or rub against the motor mounting plate. vexpro.com Copyright 2018, VEX Robotics Inc. 2018-06-15...
- Page 23 VersaChassis Mini 4 Wheel Drive Assembly Instructions Step 4: Attach Motor to Input Block Use a 9/64” Hex Key and (2x) #10-32 x 0.500” to attach the motor to the VersaPlanetary Input Block. Step 4 Completed vexpro.com Copyright 2018, VEX Robotics Inc. 2018-06-15...
- Page 24 Coupler. Once the 5:1 Gear Set is installed, slide the VersaPlanetary Lite Ring Gear over the 5:1 Gear Set. Make sure that the ring gear is seated all the way into the VersaPlanetary Input Block. Step 5 Completed vexpro.com Copyright 2018, VEX Robotics Inc. 2018-06-15...
- Page 25 Once the 4:1 Gear Set is installed, slide the VersaPlanetary Lite Ring Gear over the 4:1 Gear Set. Make sure that the ring gear is seated all the way into the 5:1 Gear Set’s VersaPlanetary Lite Ring Gear. Step 6 Completed vexpro.com Copyright 2018, VEX Robotics Inc. 2018-06-15...
- Page 26 Output Block is seated all the way into the 5:1 Gear Set’s VersaPlanetary Lite Ring Gear. Lastly, install use a 9/64” Hex Key and (2x) #8-32 x 1.875” SHCS (Socket Head Cap Screw) to hold the gearbox together. Step 7 Completed vexpro.com Copyright 2018, VEX Robotics Inc. 2018-06-15...
- Page 27 1/4” Square adapter and slide it into the VersaPlanetary Lite’s output shaft. Next, use a 7/64” Hex Key to install the #6-32 x 0.500” SHCS (Socket Head Cap Screw) through the 1/4" Square adapter and into the VersaPlanetary Lite’s output shaft. Step 8 Completed vexpro.com Copyright 2018, VEX Robotics Inc. 2018-06-15...
- Page 28 Slide the 1/4" Square Shaft into the 1/4" Square adapter. Next, install the #10-32 set screw into the 1/4" Square adapter. Tighten the set screw until the 1/4" Square Shaft cannot be pulled out. Step 9 Completed vexpro.com Copyright 2018, VEX Robotics Inc. 2018-06-15...
-
Page 29: Part 4: Versaplanetary Lite Installation
VersaChassis Mini ready for its wheels. Note: These steps should be performed for all 4 VersaPlanetary Lite gearboxes. When completed with Part 4, you will end up with a VersaChassis Mini frame with (4x) VersaPlanetary Lite gearboxes installed. vexpro.com Copyright 2018, VEX Robotics Inc. 2018-06-15... - Page 30 T15 Screw Driver 276-5011 Assembled VersaPlanetary Lite Gearboxes Assembled VersaChassis Mini Chassis Frame VersaBlock Mini 217-5995 .302” (1/4” ThunderSqaure) ID x 217-5830 0.875” OD Flange Bearing #8-32 x 1.500” Star Drive Screws 276-4998 vexpro.com Copyright 2018, VEX Robotics Inc. 2018-06-15...
- Page 31 217-6327-752 VersaChassis Mini 4 Wheel Drive Assembly Instructions Step 1: Install Bearings in VersaBlock Mini Push a 1/4” ThunderHex bearing into the half of a VersaBlock Mini. Step 1 Completed vexpro.com Copyright 2018, VEX Robotics Inc. 2018-06-15...
- Page 32 Step 2: Slide the VersaPlanetary into the 1/4” ThunderSquare Bearing Slide the 1/4” Square shaft through the VersaChassis Mini chassis and into the 1/4" ThunderSquare Bearing in the VersaBlock Mini. Step 2 Completed vexpro.com Copyright 2018, VEX Robotics Inc. 2018-06-15...
- Page 33 Use the T15 Star Drive Screw Driver to install (2x) #8-32 x 1.500” Star Drive Screw through the VersaBlock Mini and into a VersaPlanetary Lite. Tighten these screws until the assembly can no longer slide on the 15.5” VersaFrame Member. Step 3 Completed vexpro.com Copyright 2018, VEX Robotics Inc. 2018-06-15...
- Page 34 Step 4: Repeat for Each VersaPlanetary Lite Gearbox Repeat Steps 1-3 for the remaining 3 VersaPlanetary Lite Gearboxes. When completed with Part 4, you will end up with a VersaChassis Mini frame with (4x) VersaPlanetary Lite gearboxes installed. vexpro.com Copyright 2018, VEX Robotics Inc. 2018-06-15...
-
Page 35: Part 5: Wheel Installation
This step will need to be repeated for all 4 wheels. If you are using mecanum wheels, please refer to the “Mecanum Wheel Arrangement” section at the end of Part 5. When completed with Part 5, you will have a finished VersaChassis Mini. vexpro.com Copyright 2018, VEX Robotics Inc. 2018-06-15... - Page 36 276-3526 You can use: 4x of 276-3525 and/or 276-3526 276-6298 276-6299 4x of 276-6298 and/or 276-6299 276-1447 4x of 276-1447 High Strength Clamping Shaft Collar 276-3520 1/4” Long High Strength Shaft 276-3441 Spacer vexpro.com Copyright 2018, VEX Robotics Inc. 2018-06-15...
- Page 37 217-6327-752 VersaChassis Mini 4 Wheel Drive Assembly Instructions Step 1: Put Spacer on Shaft Slide a 1/4” Long High Strength Shaft Spacer onto the 1/4" Square shaft. vexpro.com Copyright 2018, VEX Robotics Inc. 2018-06-15...
- Page 38 VersaChassis Mini 4 Wheel Drive Assembly Instructions Step 2: Put Wheel on Shaft Slide a wheel onto the 1/4" Square shaft until it bottoms out against the 1/4" Long High Strength Shaft Spacer. vexpro.com Copyright 2018, VEX Robotics Inc. 2018-06-15...
- Page 39 Step 3: Install Clamping Shaft Collar Slide a High Strength Clamping Shaft Collar onto the 1/4" Square shaft until it bottoms out against the wheel. Then use a 3/32” Hex Key to tighten the shaft collar. vexpro.com Copyright 2018, VEX Robotics Inc. 2018-06-15...
- Page 40 217-6327-752 VersaChassis Mini 4 Wheel Drive Assembly Instructions Step 4: Repeat for Each Wheel Repeat Steps 1-3 for each wheel. When completed with Part 5, you will have a finished VersaChassis Mini. vexpro.com Copyright 2018, VEX Robotics Inc. 2018-06-15...
- Page 41 217-6327-752 VersaChassis Mini 4 Wheel Drive Assembly Instructions Mecanum Wheel Arrangement When using mecanum wheels, you must arrange the wheels properly for the wheels to work correctly. vexpro.com Copyright 2018, VEX Robotics Inc. 2018-06-15...
-
Page 42: Bill Of Materials / Where To Get More
1” x 1” x 0.040” Pre-Drilled 217-3426 VersaFrame Tubing (17.5”) VersaPlanetary Lite Base Kit, 1:1, with Universal Female Output 217-5995 Shaft VersaPlanetary 4:1 Gear Kit 217-2818 VersaPlanetary 5:1 Gear Kit 217-2819 VersaPlanetary Lite Ring Gear 217-5832 vexpro.com Copyright 2018, VEX Robotics Inc. 2018-06-15... - Page 43 High Strength Clamping Shaft 276-3520 Collar (10 Pack) .302” (1/4” ThunderSquare) ID x 0.875” OD x 0.280” WD (Flange 217-5830 Bearing) High Strength Shaft Spacer Kit 276-3441 #8-32 x 1.500” Star Drive Screw 276-4998 (50 Pack) vexpro.com Copyright 2018, VEX Robotics Inc. 2018-06-15...
- Page 44 217-6327-752 VersaChassis Mini 4 Wheel Drive Assembly Instructions Picture Name SKU( #8-32 Nylock Nut (100 Pack) 275-1027 T15 Star Screwdriver (5 Pack) 276-5236 Tool Kit 276-1382 VersaChassis Mini Sticker Pack vexpro.com Copyright 2018, VEX Robotics Inc. 2018-06-15...
-
Page 45: Support
217-6327-752 VersaChassis Mini 4 Wheel Drive Assembly Instructions Support Please send any questions, comments, or concerns to VEX Robotics: Sales: sales@vex.com Support: prosupport@vex.com Phone: 1-903-453-0802 Fax: 1-214-722-1284 Office Hours: 7am – 5pm CT vexpro.com Copyright 2018, VEX Robotics Inc. 2018-06-15...
Need help?
Do you have a question about the Pro VersaChassis Mini and is the answer not in the manual?
Questions and answers