Table of Contents
Advertisement
Quick Links
Advertisement
Table of Contents

Subscribe to Our Youtube Channel
Related Manuals for Sunrise Medical Breezy 600 Series


Summary of Contents for Sunrise Medical Breezy 600 Series
- Page 1 Breezy Series Wheelchair User Instruction Manual & Warranty 600 Series...
- Page 2 930300 Rev. E...
-
Page 3: Introduction
Please feel free to write or call us at the address and telephone number below: SUNRISE MEDICAL (US) LLC Customer Service Department 2842 Business Park Ave. -
Page 4: Table Of Contents
I I . T A B L E O F C O N T E N T S 1. INTRODUCTION .................. a. Sunrise Listens ..................11. TABLE OF CONTENTS ................ III. YOUR CHAIR AND ITS PARTS ............IV. NOTICE - READ BEFORE USE ............V. - Page 5 1 I . T A B L E O F C O N T E N T S D. Fasteners ....................23 E. Footrests ....................23 F. Pneumatic Tires .................. 23 G.Positioning Belts .................. 24 H. Power Drive ..................24 I.
-
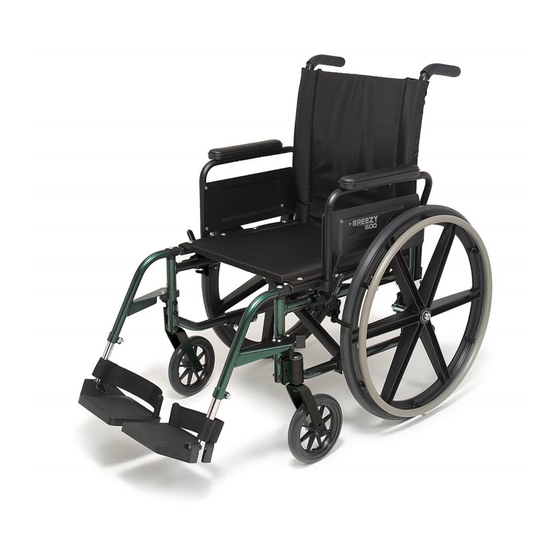
Page 6: Your Chair And Its Parts
I I I . Y O U R C H A I R A N D I T S P A R T S BREEZY 600 1. Flip-back armrest 11. Push handle backrest tube 2. Padded seat sling 12. Backrest 3. - Page 7 I I I . Y O U R C H A I R A N D I T S P A R T S Weight Axles/Axle Plate 28 lbs. (12.7 kg) Std - Offset Fixed Opt - Quick-Release Adjustments 1” (25 mm) Vertical Axle- Adjustment, Anti-Tip Tubes 2-Hole Fork Footrest Extension Opt - Rear Anti-Tip Tubes...
-
Page 8: Notice - Read Before Use
I V . N O T I C E — R E A D B E F O R E U S E A. CHOOSE THE RIGHT CHAIR & SAFETY OPTIONS Sunrise provides a choice of many wheelchair styles to meet the needs of the wheelchair rider. -
Page 9: General Warnings
V . G E N E R A L W A R N I N G S A. WEIGHT LIMIT NEVER exceed the weight limit of 250 pounds (113.6 kilograms), for combined weight of rider and items carried. If you do exceed the limit, damage to your chair, a fall, tip-over or loss of control may occur and cause severe injury to the rider or others. -
Page 10: Safety Checklist
V . G E N E R A L W A R N I N G S D. SAFETY CHECKLIST Before Each Use Of Your Chair: 1. Make sure the chair rolls easily and that all parts work smoothly. Check for noise, vibration, or a change in ease of use. -
Page 11: G.terrain
V . G E N E R A L W A R N I N G S G. TERRAIN 1. Your chair is designed for use on firm, even surfaces such as concrete, asphalt and indoor floors and carpeting. 2. Do not operate your chair in sand, loose soil or over rough terrain. This may damage wheels or axles, or loosen fasteners of your chair. -
Page 12: When You Need Help
V . G E N E R A L W A R N I N G S J. WHEN YOU NEED HELP For The Rider: Make sure that each person who helps you reads and follows all warnings and instructions that apply. For Attendants: Work with the rider’s doctor, nurse or therapist to learn safe methods best suited to your abilities and those of the rider. -
Page 13: Warnings: Falls & Tip-Overs
V I . W A R N I N G S : F A L L S & T I P - O V E R S A. CENTER OF BALANCE The point where this chair will tip forward, back, or to the side depends on its center of balance and stability. -
Page 14: C.obstacles
V I . W A R N I N G S : F A L L S & T I P - O V E R S C. OBSTACLES Obstacles and road hazards (such as potholes and broken pavement) can damage your chair and may cause a fall, tip-over or loss of control. -
Page 15: Moving Backward
V I . W A R N I N G S : F A L L S & T I P - O V E R S 5. DO NOT reach or lean over the top of the seat back. This may damage one or both backrest tubes and cause you to fall. -
Page 16: Ramps, Slopes & Side Hills
V I . W A R N I N G S : F A L L S & T I P - O V E R S F. RAMPS, SLOPES & SIDE HILLS Riding on a slope, which includes a ramp or side hill, will change the center of balance of your chair. -
Page 17: G.transfers
V I . W A R N I N G S : F A L L S & T I P - O V E R S G. TRANSFER It is dangerous to transfer on your own. It requires good balance and agility. Be aware that there is a point during every transfer when the wheelchair seat is not below you. -
Page 18: H.curbs & Steps
V I . W A R N I N G S : F A L L S & T I P - O V E R S H. CURBS & STEPS 1. Each person who helps you should read and follow the warnings “For Safe Use”... -
Page 19: Warnings: For Safe Use
V I I . W A R N I N G S : F O R S A F E U S E Before you assist a rider, be sure to read the warnings “For Attendants” (p. 16) and follow all instructions that apply. Be aware that you will need to learn safe meth- ods best suited to your abilities. -
Page 20: C.climbing Stairs
V I I . W A R N I N G S : F O R S A F E U S E C. CLIMBING STAIRS 1. Use at least two attendants to move a chair and rider up stairs. 2. - Page 21 V I I . W A R N I N G S : F O R S A F E U S E 930300 Rev. D...
-
Page 22: Warnings: Components & Options
V I I I . W A R N I N G S : C O M P O N E N T S & O P T I O N S A. ANTI-TIP TUBES (OPTIONAL) Anti-tip tubes can help keep your chair from tipping over backward in most normal conditions. -
Page 23: Fasteners
V I I I . W A R N I N G S : C O M P O N E N T S & O P T I O N S D. FASTENERS Many of the screws, bolts and nuts on this chair are special high-strength fasteners. Use of improper fasteners may cause your chair to fail. -
Page 24: G.positioning Belts
V I I I . W A R N I N G S : C O M P O N E N T S & O P T I O N S G. POSITIONING BELTS (OPTIONAL) Use positioning belts ONLY to help support the rider’s posture. Improper use of these belts may cause severe injury to or death of the rider. -
Page 25: Quick-Release Axles
V I I I . W A R N I N G S : C O M P O N E N T S & O P T I O N S J. QUICK-RELEASE AXLES (OPTIONAL) 1. Do not use this chair UNLESS you are sure that both quick-release rear axles are locked. -
Page 26: M.modified Seat Systems
V I I I . W A R N I N G S : C O M P O N E N T S & O P T I O N S M. MODIFIED SEAT SYSTEMS Use of a seat system not approved by Sunrise may alter the center of balance of this chair. -
Page 27: Chair Basics
I X . C H A I R B A S I C S TO MOUNT & REMOVE REAR WHEELS (QUICK RELEASE OPTION) Note: Axle is not locked until: a. The quick-release button pops out fully. (Fig. A) b. The ball bearings are fully visible on the outside of the sleeve. -
Page 28: To Fold & Unfold Chair
I X . C H A I R B A S I C S B. TO FOLD & UNFOLD CHAIR NEVER let your fingers come between the seat rail and the frame rail when you open or fold this chair. This may cause a pinch- or crush-type injury. Note: You can remove quick-release wheels before you fold chair (and re-mount them before you unfold chair). -
Page 29: Set-Up And Adjustments
X . S E T U P & A D J U S T M E N T A. SET-UP 1. Fasteners Use of improper fasteners may cause the chair to fail. Over or under-tightened fasten- ers may fail or cause damage to chair parts. If bolts or screws become loose, tighten them as soon as you can. -
Page 30: C.to Find And Correct A Problem
X . S E T U P & A D J U S T M E N T 2. Torque Wrench If you plan to adjust and maintain this chair yourself, Sunrise recommends that you use a torque wrench. Note: A torque setting is the optimum tightening which should be made on a particular fastener. - Page 31 1 1/2” to 2” (38 mm to 51 mm). You can obtain these from your authorized supplier. BREEZY 600 SERIES 1. Inserting Anti-Tip Tubes Into Receiver a. Press the rear anti-tip release lever on the anti-tip tube so that both release pins are drawn inside.
-
Page 32: Standard & Low Front Seat Heights
X . S E T U P & A D J U S T M E N T 3. Turning Anti-Tip Tubes Up Turn anti-tip tubes up when being pushed by attendant, overcoming obstacles or climbing curbs. a. Press the rear anti-tip tube release lever. b. -
Page 33: Caster Forks
X . S E T U P & A D J U S T M E N T F. CASTER FORKS Note: Two-hole caster forks allow you to adjust the seat height or seat angle. a. For a standard 18 1/2” (470 mm) front seat height: 1. -
Page 34: G.rear Wheel Locks
X . S E T U P & A D J U S T M E N T G. REAR WHEEL LOCKS The Breezy Series wheelchairs come with wheel locks. We install wheel locks at the factory unless you request otherwise. Note: Use a torque setting of 25-40 in./lbs. -
Page 35: H.flip-Back Armrests
X . S E T U P & A D J U S T M E N T b. Slide assembly toward rear wheel, until clamp embeds into tire, to prevent wheel movement when in locked position. H. FLIP-BACK ARMRESTS Note: Non-removable;... -
Page 36: Swing-Away Hangers & Footrests
X . S E T U P & A D J U S T M E N T J. SWING-AWAY HANGERS & FOOTRESTS (60º OR 70º) 1. Installation a. Place swing-away pivot saddle into the receiver on front frame tube with the footrest facing outward from the frame. -
Page 37: Articulating Legrest & Elevating Legrest
X . S E T U P & A D J U S T M E N T K. ARTICULATING LEGREST & ELEVATING LEGREST (Optional) 1. Installation a. Follow same steps as for swing-away hangers and footrests. (p. 40) 2. Adjustment a. -
Page 38: M.caster Mounting
X . S E T U P & A D J U S T M E N T M. CASTER MOUNTING 1. Forward or Rearward Placement a. Remove caster housing covers. b. Remove the two eccentric bolts from each caster. c. - Page 39 X . S E T U P & A D J U S T M E N T N O T E S 930300 Rev. E...
-
Page 40: Troubleshooting
X I . T R O U B L E S H O O T I N G You will need to adjust your chair from time to time for best performance (espe- cially if you alter the original settings). This chart gives you a first solution, then a second and a third if needed. -
Page 41: X11. Maintenance
X I I . M A I N T E N A N C E A. INTRODUCTION 1. Proper maintenance will improve performance and extend the useful life of your chair. 2. Clean your chair regularly. This will help you find loose or worn parts and make your chair easier to use. - Page 42 X I I . M A I N T E N A N C E B. MAINTENANCE 1. Axles & Axle Sleeves: Check axles and axle sleeves every six months to make sure they are tight. Loose sleeves will damage the axle plate and will affect performance. 2.
-
Page 43: Sunrise Limited Warranty
4. This warranty is not transferable and only applies to the first consumer purchase of this wheelchair through an authorized Sunrise Medical dealer. WHAT WE WILL DO Our sole liability is to repair or replace covered parts. This is the exclusive reme- dy for consequential damages. - Page 44 2842 Business Park Ave. • Fresno, CA • 93727 USA (800) 333-4000 Canada (800) 263-3390 Manufactured under one or more of the following patents: U.S. Patent # 5,062,677; 5,149,173; 5,211,446; 5,352,023; 5,407,248; plus other foreign patents © 2015, Sunrise Medical 10.15 930300 Rev. E...
Need help?
Do you have a question about the Breezy 600 Series and is the answer not in the manual?
Questions and answers