Advertisement
Quick Links
Advertisement

Subscribe to Our Youtube Channel
Related Manuals for H-KING TL2000


Summary of Contents for H-KING TL2000
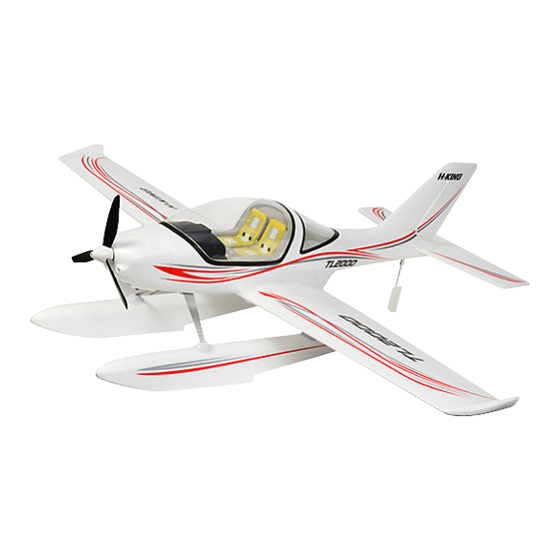
- Page 1 H-KING TL2000 Sports Plane with Floats or Wheels...
- Page 2 The wingspan is 1160mm so it can easily fit in your car for transport to your favorite flying areas. The TL2000 is built from tough EPO foam so it will take all the knocks and bangs in its stride.
-
Page 3: Safety Instructions
H-KING SAFETY INSTRUCTIONS 1. Please read this manual carefully and follow the instructions before you use this product. 2. This airplane is not a toy, due to it's advanced flying qualities it is only suitable for pilots with intermediate or higher experience. If you are a novice then please only operate with the assistance of an experienced pilot. -
Page 4: Specifications
TL 2000 Specifications: Wingspan: 1160mm Length: 888mm Motor: 2838-1500KV brushless outrunner ESC: 40A with 3A BEC brushless Servos: 4 x 9g digital Propeller: 8x4.5 3 blade Weight with Floats: 1020g Weight with Main Gear and Nosewheel: 940g Material: EPO Features: •... -
Page 5: Kit Contents
H-KING KIT CONTENTS... - Page 6 TL2000 Step 1: Apply a medium or slow setting CA glue to the slot in the rear of the fuselage for the horizontal stabilizer. Step 2: Slide the horizontal stabilizer into place ensuring it remains square and true to the fuselage while the glue sets. Once the glue has set run a small bead of glue around the joint to make sure of a strong assembly.
- Page 7 H-KING Step 3: If doing the float plane version then follow these steps. If fitting wheels go to Step 6. Centralize the rudder servo and fit the water rudder. Step 4: With the rudder servo central tighten the grub screw in the water rudder steering collet.
- Page 8 TL2000 Step 4: Attach the floats with the 4 supplied thumb screws Step 5: Finished float assembly.
- Page 9 TL 2000 Step 6: Put the M3 x 25mm screw through the hole in the bottom of the aluminum U/C and lock into place using a plain M3 nut. Repeat for the other side. Step 6: Slide the wheel over the M3 x 25mm screw and secure the wheel with a M3 locknut.
- Page 10 H-KING Step 7: Remove the battery hatch cover then remove the 2 M3 screws in the plywood undercarriage mount. Step 8: Using the M3 screws fit the aluminum undercarriage to the plywood mount. Note: Straight edge of undercarriage faces forward.
- Page 11 TL 2000 Step 9: Replace the battery hatch. Step 10: Centralize the rudder servo and fit the nosewheel into the steering collet.
- Page 12 H-KING Step 11: Lock the nosewheel into place using the grub screw and supplied hex wrench. Step 12: Slide the carbon wing tube through the hole in the fuselage, ensure that it is central.
- Page 13 TL 2000 Step 13: Feed the aileron servo connectors through the slots in either side of the wing roots. Step 14: Slide a wing onto the carbon wing tube, connect the aileron servo lead to aileron connector then push the wing fully home. As you do this carefully feed the connector back into the slot in the wing root.
- Page 14 H-KING Step 15: Retain the wings using the supplied 4 thumb screws. Step 16: Finished wing assembly.
- Page 15 TL 2000 Step 17: Fit the propeller and spinner assembly as shown above. Wheel version assembly finished.
- Page 16 H-KING Float version assembly finished. C of G: This is between 48mm and 60mm measured from the leading edge as shown. For your first flights we recommend aiming to be near the forward mark for improved stability.
- Page 17 Flying (with wheels). We shall not go too much into flying the TL2000 as it is not a model designed for beginners but for the model pilot who has flown low wing type aircraft before. Before flying first thing is to double check all the controls are moving in the correct direction and the control throws have been set to approximately the suggested movement.
- Page 18 H-KING Recommended Batteries.
- Page 19 TL 2000 Recommended Accessories. OrangeRx TX10i Full Range 2.4GHz DSMX/ Turnigy TGY-i6 AFHDS Transmitter and 6CH DSM2 Compatible 10CH Radio System Receiver (Mode 2) (Mode 2) International Version SKU: 9114000020-0 SKU: 9171001401-0 HobbyKing 2.4Ghz 4Ch Tx & Rx V2 (Mode Turnigy T6A-V2 AFHDS 2.4GHz 6Ch Transmitter w/Receiver V2 (Mode 2) SKU: HK-T4A-M2...
- Page 20 H-KING � CE :a l, MADE IN CHINA • .,...
Need help?
Do you have a question about the TL2000 and is the answer not in the manual?
Questions and answers