Advertisement
Advertisement
Table of Contents

Related Manuals for H-KING Radjet 800


Summary of Contents for H-KING Radjet 800
- Page 1 IN ST R UCT I O N MA NU AL...
- Page 2 • This is a radio controlled flying model and as such must always be flown with caution, this is NOT a toy. • The Radjet 800 brief was to design a model for intermediate to experienced pilots. • Always execise great caution when using the recommended battery to power this product.
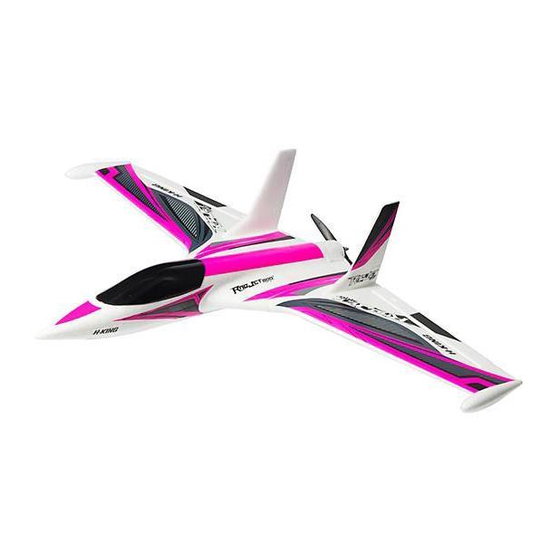
- Page 3 Plug and Fly, this brilliant model has no trouble earning the Radjet name. The Radjet 800 has been tested and flown to within an inch of its life and it performed flawlessly, not only in terms of light performance but also reliability...
- Page 4 SPECIFICATIONS: Wingspan: 800mm Length: 600mm Empty Weight: 370 grams Motor: 2010 1800KV brushless outrunner (included) ESC: 20amp brushless with BEC (included) Propeller: 6 x 4 (2 included) Servo: 2 x 9g metal geared digital servos (included) Recommended Battery (not supplied): 3S (11.1V 1300-1600mah 30C lipoly or similar Required: 2.4Ghz 4ch or more transmitter and receiver with programmable elevon mixing.
- Page 5 KIT CONTENTS:...
- Page 6 ASSEMBLE THE MODEL Step 1: Screw a control horn to each elevon using 2 PK screws in each horn only. Step 2: Center the elevon servos using either your radio or a servo tester and connect the pushrod as shown.
- Page 7 Step 3: Slide the carbon wing tube through the fuselage. Step 4: Apply some medium or slow setting CA glue to one wing root on the fuselage. Slide one wing panel onto the wing tube, ensure the wing tube stays central in the fuselage and hold tightly in place whilst the glue sets.
- Page 8 Step 5: Repeat the process for the other wing. Step 6: Connect the servo leads to the extension cable and tuck away the excess lead in the servo well. It is a good idea then to cover the lead with a piece of white self adhesive tape.
- Page 9 Step 7: Using a medium or slow setting CA glue, glue into place the plastic fuselage underpan. Step 8: Glue into place the servo covers using a medium CA glue.
- Page 10 Step 9: Apply medium CA glue to the slot for one of the vertical stabilizers. Step 10: Push the vertical stabilizer into the slot and hold until the glue sets. Please ensure it stays vertical as the glue sets.
- Page 11 Step 11: Repeat this process for the second vertical stabilizer. Step 12: Fit the propeller and hub to the motor shaft. Please make sure the propeller is facing the correct way, the leading edge of the propeller should be facing forwards.
- Page 12 Step 13: Using a medium CA glue the canopy to the battery hatch cover Step 14: Your RADJET 800 construction is now complete, you just need to add your receiver and battery and set up your radio.
- Page 13 RADJET 800 SET-UP: Connect one servo to the aileron output of your receiver and one servo to the elevator output, connect the ESC servo lead to the motor output. Now activate the ELEVON mixer on your transmitter. Before powering up your receiver with the flight battery you need to set the ESC.
- Page 14 C of G makes for a more lively flight envelope so proceed with caution moving the C of G back from the point shown. We hope you enjoy flying your H-KING RADJET 800 and if you haven't already tried out the others in our range then we recommend you visit our website at www.hobbyking.com and take a look at our ever...
Need help?
Do you have a question about the Radjet 800 and is the answer not in the manual?
Questions and answers