Table of Contents
Advertisement
Quick Links
Advertisement
Table of Contents

Summary of Contents for ResMed Nox T3s
- Page 1 How to use your Nox T3s ™ With Noxturnal version 6 ResMed.com/NoxT3s...
-
Page 2: Table Of Contents
Contents Nox T3s system ……………………………………………………………… page 3 Configure a recording ……………………………………………………… page 4 Patient hook-up …………………………………………………………… page 13 Interpret a recording Download data …………………………………………………………… page 22 Analyse data ……………………………………………………………… page 23 Generate a report ………………………………………………………… page 31 Open an existing recording ……………………………………………… page 33 Go further Create a new device profile ………………………………………………... -
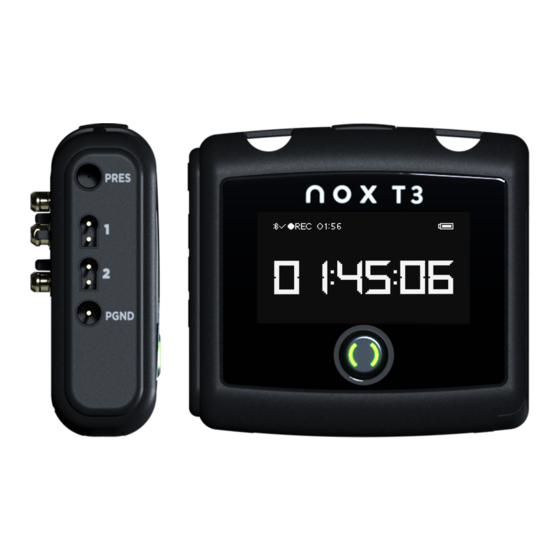
Page 3: Nox T3S System
Nox T3s system Display Pressure lock (labeled with “PRES”) – Connects to external nasal Battery lid – Covers the battery and the USB connector cannula/mask pressure tube Push button Channels 1 & 2 (labeled with “1” and “2”) – Bipolar touch proof inputs Indicator light for device status Reference ground input for channels 1 and 2 (labeled with “PGND”) -
Page 4: Configure A Recording
Configure a recording... - Page 5 • Connect the Nox T3s Open Noxturnal software on your computer. Open the battery lid of the Nox T3s using the opening tool provided and connect the device to the USB port of the computer. In Noxturnal software, click on Recording >...
- Page 6 Configure a recording • Step 1: Select a recording type and pair the oximeter Choose a suitable recording type from the drop-down list. Enter the BDA number shown on the back of your oximeter. Insert batteries into the oximeter (see page 11) and turn it on by pressing the grey activation button on top of the device.
- Page 7 Then press the grey activation button to turn on the device. Resume the pairing process. • Restart the Nox T3s by unplugging the Nox T3s from the computer and plugging it back in again. Resume the pairing process.
- Page 8 Configure a recording • Step 2: Schedule recording “Start Recording At” option is recommended. Select The number of nights The start time The date The duration Click on Next to continue.
- Page 9 Configure a recording • Step 3: Enter patient information Add information on the patient’s identity and physical characteristics. Add at least patient’s First and Last names or patient ID before finishing. The Tags fields can be used to link keywords to the patient in order to easily find him later in the recordings library.
- Page 10 • End configuration Click here to print hookup instructions for patient. Click on Finish to close this window and disconnect the device. You can now disconnect the Nox T3s and insert a new or fully recharged AA battery into the device.
- Page 11 Configure a recording BATTERIES FOR THE NOX T3s DEVICE: 1 AA BATTERY FOR THE NONIN 3150 OXIMETER: 2 AAA BATTERIES • Alkaline batteries last for up to 16h of recording. It is recommended to • Alkaline batteries last for up to 48h. It is recommended to replace them change them after each recording.
- Page 12 Check signals • Verify the configuration and the status of the device You can see information on the recording and the signals by pushing the button on the device. Verify the battery charge indicator, the Bluetooth connection with the oximeter and check that the start time of the recording is consistent with your configuration.
-
Page 13: Patient Hook-Up
Patient hook-up... - Page 14 Patient hook-up Video instructions on Nox T3s hook-up can also be found on www.resmed.co.uk/healthcare-professional/diagnostics/support-nox-t3s/ • Attach the device and the belts 1 - Clip the abdomen cable to the back 2 - Wrap the RIP belt around the patient’s thorax and snap it at the back of the of the device and snap the clips onto the patient’s pyjamas.
- Page 15 Patient hook-up • Attach the nasal cannula 1 - Gently place the nasal cannula into the nostrils with the nasal prongs facing inwards. 2 - Pull the cannula tubing over the ears. 3 - Slide the bolo up under the chin so it is snug but not too tight.
- Page 16 Patient hook-up • Attach the oximeter 1 - Place the oximeter on the patient’s left wrist 3 - Wrap tape around the finger to if they are right-handed or on their right wrist secure the sensor cable. if they are left-handed. 2 - Then place the probe on the index finger.
- Page 17 - 1 electrode on the 7 rib. - 1 electrode above the right clavicle. - Ground electrode cable plugged into the PGND input of the Nox T3s and the electrode on a neutral zone of the body (like the hip bone).
- Page 18 - Scrub the patient’s skin with NuPrep before placing the adhesive electrodes. - 1 electrode cable plugged into input 1 of the Nox T3s, 2 electrodes on the left tibia muscle - 1 electrode cable plugged into input 2 of...
- Page 19 Connect the pressure tubing to the mask and the Nox device 1 - Insert a filter into the pressure input of the Nox T3s, where you would usually insert the nasal cannula. 2 - Screw the male luer-lock connector of the pressure tubing into the filter.
- Page 20 2 - Connect the transparent part of the pneumoflow sensor to the patient tubing. 3 - Connect the red cable to input 1 or 2 of the Nox T3s. 4 - Connect the white cable to the black and red cable and plug it into the Airflow input of the differential pressure sensor.
-
Page 21: Interpret A Recording
Interpret a recording... -
Page 22: Download Data
Download data • Download a recording Connect the device to the computer using the USB cable and click on Download Recording. Noxturnal software automatically starts downloading and analysing data. Download and analysis progress is displayed. The process should take about 1 minute. -
Page 23: Analyse Data
Analyse data • Results page The recording results page is arranged as follows: Recording information and commands Patient information Severity indicator and Nox BodySleep ™* parameters Signal and events overview, including Nox BodySleep types Analysis parameters and signal quality * The Nox BodySleep signal and parameters will only show when the Nox BodySleep analysis has been run. - Page 24 Analyse data • Patient information Click on the patient icon to complete or modify patient information.
- Page 25 Analyse data • Define start and end of analysis Move the markers highlighted below to manually define the start and end of the analysis. Recording statistics on the right side are automatically adjusted after every modification. You will find the same markers on every signal sheet.
- Page 26 Analyse data • Exclude part of the recording Click and drag your mouse in the Signal Overview area and select Score Invalid Data. To delete an invalid data period, click on the red hatched area and click on Delete Period.
- Page 27 Analyse data • Check signal quality Information about the quality of recorded signals can be found on the right side of the page, underneath the analysis parameters. Good (85-100%) Questionable (60-85%) Bad (0-60%) Hover the mouse over these fields to see the exact percentages. On the upper right side of the page, the “Signal quality”...
- Page 28 Analyse data • Configure your workspace: select and arrange signals Click on one of the signal tabs to view the recorded signals in detail and start scoring. Click on the Signals & Data tab on the right side of your screen and check the boxes of the signals you want to display.
- Page 29 Analyse data • Configure your workspace: create a workspace layout Click on and select New Workspace Layout to create a personalised layout. Enter a name and click on OK. Your new workspace layout is now in the drop down list. You can load it, modify it and save the changes using the menu.
- Page 30 Analyse data • Score events To score an event, click and drag over the zone of interest and type the Keyboard shortcut Events letter of the event: Obstructive apnea Central apnea Mixed apnea Hypopnea Desaturation To delete or modify an event, use one of the following methods: - Click on the event and press the Delete key - Hold the Alt key and click on the event - Right click on the event and select the intended option...
-
Page 31: Generate A Report
Generate a report • Add a screenshot To take a screenshot of a recording, click on the Bookmark tab at the bottom left of your screen. Click on Add bookmark, enter a description of the screenshot and click on OK. If you don’t want this screenshot to appear in the report, uncheck the corresponding box or delete the bookmark. - Page 32 Generate a report • Write an interpretation and generate a report Click on the patient icon and then on Interpretation Notes to access the writing window. Once your interpretation is written, click on OK at the bottom right to confirm. Then go to the Report menu and select the appropriate report.
-
Page 33: Open An Existing Recording
Open an existing recording Click on Library to access existing recordings. Use the Search for… field to find your patients more quickly. -
Page 34: Go Further
Go further... -
Page 35: Create A New Device Profile
Create a new device profile Click on the menu Devices > Device Profiles… to edit or create new device profiles. Then select the different signals Click on New or New Based On to open Enter the name of the device profile and a description and the battery type the Device Profile Wizard. -
Page 36: Create A New Recording Type
Choose the appropriate device profile to record all the signals you want. The same recording types are used for the Nox T3 and the Nox T3s. Recording types that include the Nox BodySleep analysis will only be available for the Nox T3s. -
Page 37: Cleaning And Disinfection
Cleaning and disinfection... - Page 38 Dampen a lint-free cloth with the solution • Do not pour or spray any liquids on the Nox T3s Recorder • Do not allow any liquids to enter any openings on the Nox T3s Recorder • Do not immerse the cables in liquid •...
- Page 39 Cleaning and disinfection Cleaning and disinfecting the WristOx , model 3150 oximeter Wipe the device with a soft cloth dampened with a 10% bleach/90% water solution (household bleach [containing less than 10% sodium hypochlorite]). Do not use undiluted bleach or any cleaning solution other than those recommended here, as permanent damage could result.
- Page 40 If the clips are visibly contaminated, they should be replaced. * Equivalent validated disinfectant may be used if they are safe to use on gold plating, metals, and plastics. Similar disinfection wipes from PDI that are recommended to use with the Nox T3s System: Super Sani-Cloth Plus disinfection wipes and Sani-Cloth AF Universal - Alcohol free Disinfection wipes (from PDI).
-
Page 41: Troubleshooting
Troubleshooting... - Page 42 Troubleshooting For any issue not listed below, please contact your ResMed representative. My recording stopped prematurely Check the battery status in the Device Log. You will find it by clicking on the patient icon in the recording results page. Solution 1:...
- Page 43 Restart the oximeter by removing the batteries and inserting batteries again to the oximeter. Then press the grey activation button to turn on the device.Resume the pairing process. Restart the Nox T3s by unplugging the Nox T3s from the computer and plugging it back in again. Resume the pairing process.
- Page 44 If the Nox T3s display is turned off, press the button to turn it on. Press the button again to see the BDA number of the oximeter. Verify that the BDA number on the display matches the number on the back of the oximeter. If not, re-configure the device.
- Page 45 ID = 086BD71FD4C2. 06:13 Oximeter Battery Low, event Oximeter battery low. Oximeter batteries are almost empty The Nox T3s battery is almostempty (notification at 30, 00:45 Battery Status, event Battery status = 30%. 20, 10 and 0%) TheNox T3s battery went flat before the end of the 03:57 Low Battery, event Battery is empty! 1.
- Page 46 Follow the instructions below to find this file on the Nox T3s drive. Connect the Nox T3s to USB port of the computer. Open Windows File Explorer and click This PC. The Nox T3s will appear as two USB drives.
- Page 47 Troubleshooting: Reset a Nox T3s This procedure will erase all data on the device (patient information, BDA number of the oximeter). Connect the Nox T3s to a computer and open Noxturnal. In the Noxturnal software, click on Recording > Factory Reset to reset your device.
- Page 48 Troubleshooting: Reset a Nonin 3150 BLE oximeter If the Nonin 3150 oximeter does not perform as expected, it is recommended that you follow the reset process described below: Remove the two batteries and disconnect the probe from the oximeter. Wait for 1 minute and reinsert the batteries. Press and hold down the grey activation button for 3 seconds until the screen turns on.
- Page 49 Noxturnal toolbar Button Description Open the menu to add new sheets and to personalise your workspace layout Create a new workspace Open a recording Undo the last action Open the recording properties Change the time interval of your window Automatically adjust the size of signals to fit into the window Automatically adjust the scale of each signal Open the advanced menu of the sheet Activate audio playback of the recording...
-
Page 50: Consumables And Accessories
Consumables and accessories... - Page 51 7073744 Pneumoflow Straight Adapter (green part) Nox T3s Battery Lid 7078985 7073746 PT1 Hydrophobic Filters - x50 7078986 Nox T3s Clips - x2 7072092 Mask tubing - 180 cm 7073515 Battery lid key PLM and EKG option Cleaning and Disinfection...
- Page 52 DISTRIBUTED BY: See ResMed.com for ResMed locations worldwide. Nox are manufactured by Nox Medical, and distributed by ResMed. For information about the manufacturers of Nox devices, please contact ResMed, authorised distributor. Product availability may vary across regions. Specifications may change without notice. © 2020 ResMed Pty Ltd. 10112116/1 2020-08...
Need help?
Do you have a question about the Nox T3s and is the answer not in the manual?
Questions and answers