Table of Contents
Advertisement
Available languages
Available languages
317485_1904_aur_Funk-Temperaturstation_content_US.indd 3
............................................................................................................................................ Page
........................................................................................................................................................ Page
Intended use .......................................................................................................................................................... Page
Description of parts and features ......................................................................................................................... Page
Technical data....................................................................................................................................................... Page 13
Contents ................................................................................................................................................................ Page 14
General safety information .................................................................................................................................. Page 15
Safety warnings for batteries ............................................................................................................................... Page 17
General information ............................................................................................................................................. Page 21
Preparing to use the outdoor sensor .................................................................................................................... Page 22
Preparing the temperature station for use ........................................................................................................... Page 22
Temperature station .............................................................................................................................................. Page 25
Outdoor sensor ..................................................................................................................................................... Page 26
Setting the time format / zone / date / time / language / temperature unit manually ....................................... Page 28
Daylight saving time ............................................................................................................................................. Page 29
Setting the alarm ................................................................................................................................................... Page 30
Switching the alarm on / off ................................................................................................................................. Page 30
Using the snooze function .................................................................................................................................... Page 31
Displaying the temperature .................................................................................................................................. Page 32
Displaying the minimum / maximum values......................................................................................................... Page 32
Displaying the temperature trends ....................................................................................................................... Page 32
Battery indicator .................................................................................................................................................... Page 33
Replacing the batteries ......................................................................................................................................... Page 33
................................................................................................................... Page
4
5
6
6
7
US-EN
3
27.09.19 14:02
Advertisement
Chapters
Table of Contents

Related Manuals for Auriol HG05686A-US-RX


Summary of Contents for Auriol HG05686A-US-RX
-
Page 1: Table Of Contents
Description of signal words ........................Page Customer service ............................Page Introduction ................................ Page Intended use ................................Page Description of parts and features ......................... Page Technical data............................... Page 13 Contents ................................Page 14 Important safety notes ..........................Page 15 General safety information ..........................Page 15 Safety warnings for batteries .......................... -
Page 2: Description Of Signal Words
DESCRIPTION OF SIGNAL WORDS WARNING indicates a hazardous situation that, if not avoided, could result in death or serious injury. CAUTION indicates a hazardous situation that, if not avoided, could result in minor or moderate injury. NOTICE indicates information considered important, but not hazard related (e.g. -
Page 3: Customer Service
CUSTOMER SERVICE Call customer service at 1 (844) 543-5872 Visit the Website Customer Service Platform at www.lidl.com / contact-us Visit a LIDL store for further assistance. Please have your IAN 317485_1904 IAN number ready. US-EN 317485_1904_aur_Funk-Temperaturstation_content_US.indd 5 27.09.19 14:02... -
Page 4: Introduction
Wireless temperature station alarm clock Introduction Congratulations on your purchase. You have selected a quality product. The instructions for use are a part of the product. They contain important information about the safety, use and disposal of the product. Before using the product, please learn about all the safety information and usage instructions. -
Page 5: Description Of Parts And Features
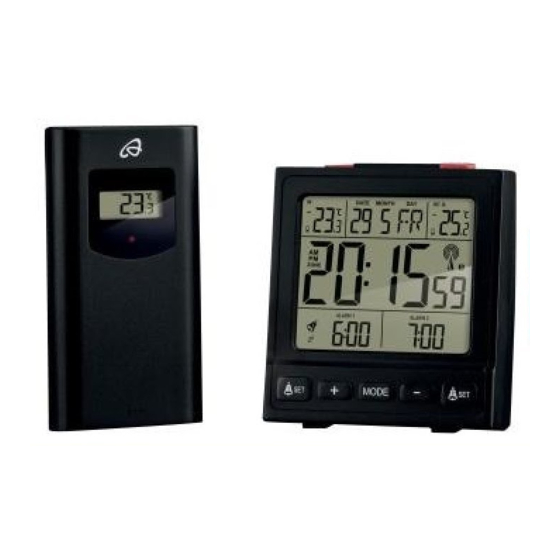
Description of parts and features Wireless temperature station alarm clock Indoor temperature Snooze function symbol MAX / MIN display (indoor (Alarm 2) temperature) Alarm time 2 Date SET button Month – button MODE button Low battery symbol + button (outdoor sensor) SET button Radio signal symbol Alarm time 1... - Page 6 Low battery symbol AL1 ON / OFF button (Temperature station) SNOOZE / LIGHT button Temperature trend (indoor AL2 ON / OFF button temperature) US-EN 317485_1904_aur_Funk-Temperaturstation_content_US.indd 8 27.09.19 14:02...
- Page 7 1 2 3 4 5 6 7 8 US-EN 317485_1904_aur_Funk-Temperaturstation_content_US.indd 9 27.09.19 14:02...
- Page 8 Battery compartment cover Wall anchor D 0.24 in Battery compartment (D 6 mm) RESET button Screw D 0.1 in (D 3 mm) Handing slot 10 US-EN 317485_1904_aur_Funk-Temperaturstation_content_US.indd 10 27.09.19 14:02...
- Page 9 Outdoor sensor RF radiation Outdoor temperature Low battery symbol US-EN 317485_1904_aur_Funk-Temperaturstation_content_US.indd 11 27.09.19 14:02...
- Page 10 Battery compartment cover Wall anchor D 0.24 in Battery compartment (D 6 mm) Handing slot Screw D 0.1 in (D 3 mm) 12 US-EN 317485_1904_aur_Funk-Temperaturstation_content_US.indd 12 27.09.19 14:02...
-
Page 11: Technical Data
Technical data Wireless temperature station alarm clock: Model No.: HG05686A-US-RX / HG05686B-US-RX FCCID: 2AJ9O-HG5686RX Temperature measurement range: +32 °F to +122 °F (0 °C to +50 °C) Note: If the temperature is ≤ 32 °F (0 °C), the LC display shows “LL.L”. -
Page 12: Contents
HF transmission signal: 433 MHz HF transmission range: max. 328.08 ft (100 m) (in open area) Batteries: 2 x AAA 1.5 V (direct current) Degree of protection: IPX4 (Splash-proof) / suitable for wet locations Contents 1 Wireless temperature station 2 Wall anchors alarm clock (D 0.24 in (D 6 mm)) 1 Outdoor sensor... -
Page 13: Important Safety Notes
IMPORTANT SAFETY NOTES READ ALL INSTRUCTIONS. KEEP FOR FUTURE REFERENCE. INCLUDE ALL DOCUMENTATION WHEN PASSING THIS PRODUCT ON TO OTHERS. General safety information Failure to observe the following warnings can result in death or serious injuries. This product is not intended for use by persons (including chil- dren) with reduced physical, sensory or mental capabilities or lacking experience and knowledge unless supervised or in- structed in safe product use by a person responsible for their... - Page 14 Changes or modifications to this product not expressly approved by the party responsible for compliance could void the user‘s authority to operate the product. Note: This product has been tested and found to comply with the limits for a Class B digital device, pursuant to part 15 of the FCC Rules.
-
Page 15: Safety Warnings For Batteries
• Connect the product into an outlet on a circuit different from that to which the receiver is connected. • Consult the dealer or an experienced radio / TV technician for help. • The RF Exposure Compliance distance is 0.78 in (0 mm). Do not expose the product to an extremely high electromagnetic field. - Page 16 Store batteries in a dry place at room temperature. Batteries are sensitive to high and low temperatures. Such thermal exposure may lead to leakage, fire, or explosion. Keep cells and batteries out of reach of children, especially small batteries. Ingestion may lead to choking or acute and serious personal injury.
- Page 17 Clean the battery contacts and also those of the product prior to battery installation. Keep the contacts clean. Remove batteries from the product that will not be used for an extended period of time (months or longer). Remove discharged batteries from product promptly to avoid possible damage from leakage.
- Page 18 Use only the power cord supplied with the product. The use of other cords may result in the batteries inside the product being charged. Do not open or mutilate a battery or cell. Electrolyte from the cell is corrosive and can cause damage to the eyes or skin. The cell contents can also be hazardous if ingested.
-
Page 19: Before Initial Use
Before initial use First activate the batteries inside the outdoor sensor, then inside the temperature station. Note: Remove all packaging material from the product. Note: Before initial use, remove the protective film from the LC display. General information When choosing where to position the product, make sure that it is not exposed to direct sunlight, vibration, dust, heat, cold or moisture. -
Page 20: Preparing To Use The Outdoor Sensor
Radio signal (WWVB): The WWVB radio signal (time signal transmitter) is made up of time pulses transmitted from one of the highest precision clocks in the world close to Fort Collins, Colorado. Preparing to use the outdoor sensor Remove the battery compartment cover from the back of the outdoor sensor. - Page 21 Connecting the temperature station with the outdoor sensor and the WWVB radio signal: After inserting the batteries, the temperature station will attempt to connect to the outdoor sensor. This process can take a few minutes. radio signal symbol flashes. Once the temperature sta- tion has successfully connected to the outdoor sensor, the radio signal symbol...
- Page 22 fails during initial set up, try changing the location (e.g. place the temperature station near a window). Reception may be considerably reduced by obstructions (e.g. con- crete walls) or sources of interference (e.g. other electrical devices). If the reception of the radio signal continues to be interrupted, you can turn on/off the automatic radio time receive function manually.
-
Page 23: Temperature Station
Wall-mounting the temperature station and / or the outdoor sensor: Note: This step requires an electric drill and a crosshead screwdriver. DANGER TO LIFE, RISK OF INJURY AND PROPERTY DAMAGE! Carefully read the instructions for use and safety notes for your drill. DANGER TO LIFE! Be careful that you do not hit electrical, gas or water lines when drilling into the wall. -
Page 24: Outdoor Sensor
Hang the temperature station by placing the hanging slot on the screw. 0.24 in (6 mm) Outdoor sensor Mark the location of the hole (D 0.24 in (D 6 mm)) on the wall. Note: Use the included drilling template intended for marking the drill holes. - Page 25 Using a crosshead screwdriver, screw the screw into the wall anchor. Hang the outdoor sensor by placing the hanging slot the screw. 0.24 in (6 mm) Note: Never immerse the outdoor sensor in water and protect from direct sunlight. Electronic devices may adversely affect the wireless signal reception.
-
Page 26: Setting The Time Format / Zone / Date / Time / Language / Temperature Unit Manually
Setting the time format / zone / date / time / language / temperature unit manually The reception of WWVB radio signal where the temperature station has been positioned may deteriorate or be interrupted. If this hap- pens you can set the product manually. 1. -
Page 27: Daylight Saving Time
current local time. If you are in a country where e.g. the local time is an hour ahead of Pacific Standard Time (PST), set the time zone to –8. The product is now still controlled by WWVB but shows the time as one hour ahead of PST. 5. -
Page 28: Setting The Alarm
Setting the alarm You can set two different alarms. 1. Press and hold the SET button SET button about 3 seconds. Note: If an alarm has already been set, the LC display will show the time the alarm was set to. If not, the display shows 0:00 or AM 12:00. -
Page 29: Using The Snooze Function
Note: The Alarm 1 symbol Alarm 2 symbol appears in the LC display. The alarm sounds at the set time. The alarm automatically stops after 2 minutes. Press up the AL 1 ON / OFF button OR AL 2 ON / OFF button to stop the alarm manually. -
Page 30: Displaying The Temperature
Displaying the temperature The LC display shows the indoor temperature and the outdoor temperature Displaying the minimum / maximum values The temperature station stores the maximum and minimum values of the outdoor sensor and of the temperature station itself. Press the + button to display the maximum values of the indoor and outdoor temperature. -
Page 31: Battery Indicator
You may see the following displays: = The temperature is rising. = The temperature is constant. = The temperature is falling. Battery indicator The low battery symbols appear in the temperature station’s and outdoor sensor’s LC displays if the batteries in the outdoor sensor or the temperature station are weak. -
Page 32: Troubleshooting
Troubleshooting Note: This product has delicate electronic components. This means that if it is placed near an object that transmits radio signals, it could cause interference. 34 US-EN 317485_1904_aur_Funk-Temperaturstation_content_US.indd 34 27.09.19 14:02... - Page 33 If the display indicates a problem, move such objects away from the temperature station / outdoor sensor or remove the batteries for a short while from the temperature station / out- door sensor and then replace them. Obstacles such as concrete walls can also interfere with reception. In this case, change the location (e.g.
-
Page 34: Cleaning And Maintenance
First activate the batteries inside the outdoor sensor, then inside the temperature station. -> The outdoor sensor will only need to be restarted if problems occur by holding the – button , or the temperature station needs to be restarted. To restart the temperature station, briefly remove and reinsert the batteries. - Page 35 Please note the package markings regarding waste separation, indicated by abbreviations (a) and numbers (b), meaning: 1–7: plastics / 20–22: paper and card- board / 80–98: composite materials. Contact your local waste management authority for addi- tional information on how to dispose of the used product. To help protect the environment, please dispose of the product prop- erly when it has reached the end of its useful life, do not throw in the garbage.
-
Page 36: Three Year Limited Warranty
Used batteries should therefore be disposed of through a local collection point. Three year limited warranty What does this warranty cover? The warranty covers: · Damage, breakage or inoperability due to defect. · Damage not caused by normal wear and tear or failure to follow the safety and maintenance instructions provided in the user manual. - Page 37 · Tampering with the product (such as removing cover, unscrewing screws etc.). Consequential and incidental damages are also not covered under this warranty. However, some states do not allow the exclusion or limitation of incidental or consequential damages, so this limitation or exclusion may not apply to you.
- Page 38 How to process the warranty? To initiate, please: · Call customer service at 1 (844) 543-5872 · Visit the Website Customer Service Platform at www.lidl.com/ contact-us · Visit a LIDL store for further assistance To ensure the quickest warranty return process, please have the following available: ·...
- Page 39 How does state law relate to this warranty? This warranty gives you specific legal rights, and you may also have other rights which vary from state to state. All implied warranties are limited by the duration and terms of this warranty. Some states do not allow limitations on how long an implied warranty lasts, so the above limitation may not apply to you.
- Page 40 Descripción de las palabras de advertencia ................ Página 43 Servicio al cliente ............................Página 44 Introducción ..............................Página 45 Uso apropiado ..............................Página 45 Descripción de las piezas y características ....................Página 46 Información técnica ............................Página 52 Alcance de suministro ............................Página 53 Notas importantes de seguridad ....................
-
Page 41: Descripción De Las Palabras De Advertencia
DESCRIPCIÓN DE LAS PALABRAS DE ADVERTENCIA ADVERTENCIA indica una situación peligrosa, que puede provocar la muerte o lesiones graves si no se evita. PRECAUCIÓN indica una situación peligrosa, que puede provocar lesiones leves o moderadas si no se evita. AVISO indica información que se considera importante, pero que no implica un peligro (p. -
Page 42: Servicio Al Cliente
SERVICIO AL CLIENTE Llame al Servicio de atención al cliente al 1 (844) 543-5872 Visite el Portal de atención al cliente en www.lidl.com/contact-us Visite una de nuestras tiendas LIDL en caso de cualquier inquietud. Por favor tenga su número IAN 317485_1904 IAN a la mano. -
Page 43: Introducción
Estación de temperatura y despertador inalámbrico Introducción Felicidades por la compra de su nuevo producto. Usted ha selec- cionado un producto de calidad. Las instrucciones de uso son parte del producto. Contienen información importante respecto a la seguridad, el uso y la eliminación. Antes de usar el producto, familiarícese con toda la información de seguridad y las instruc- ciones de uso. -
Page 44: Descripción De Las Piezas Y Características
funciones de alarma. El producto está diseñado solo para uso en un entorno residencial privado y no para uso comercial. Descripción de las piezas y características Estación de temperatura y despertador inalámbrico Temperatura interior Temperatura exterior Indicación de MAX / MIN Símbolo WWVB (temperatura interior) Símbolo de horario de... - Page 45 Símbolo de función de Tendencia de temperatura snooze (alarma 1) (temperatura interior) Símbolo de alarma 1 Botón de ENCENDIDO / Hora APAGADO de AL1 Indicación de zona Botón SNOOZE / LIGHT horaria Botón de ENCENDIDO / Símbolo de batería baja APAGADO de AL2 (estación de temperatura) US-ES...
- Page 46 1 2 3 4 5 6 7 8 48 US-ES 317485_1904_aur_Funk-Temperaturstation_content_US.indd 48 27.09.19 14:02...
- Page 47 Cubierta del compartimiento Ranura para colgar de las baterías Anclaje para pared de Compartimento de las baterías D 0.24 in (D 6 mm) Botón RESET Tornillo D 0.1 in (D 3 mm) US-ES 317485_1904_aur_Funk-Temperaturstation_content_US.indd 49 27.09.19 14:02...
- Page 48 Sensor exterior Radiación de RF Temperatura exterior Símbolo de batería baja 50 US-ES 317485_1904_aur_Funk-Temperaturstation_content_US.indd 50 27.09.19 14:02...
- Page 49 Cubierta del comparti- Anclaje para pared D 0.24 in miento de las baterías (D 6 mm) Compartimiento de Tornillo D 0.1 in (D 3 mm) las baterías Ranura para colgar US-ES 317485_1904_aur_Funk-Temperaturstation_content_US.indd 51 27.09.19 14:02...
-
Page 50: Información Técnica
Información técnica Estación de temperatura y despertador inalámbrico: N°. de modelo: HG05686A-US-RX / HG05686B-US-RX FCCID: 2AJ9O-HG5686RX Rango de medición de temperatura: +32 °F a +122 °F (0 °C a + 50 °C) Nota: si la temperatura es ≤ 32 °F (0 °C), la pantalla LC mostrará... -
Page 51: Alcance De Suministro
Rango de medición de temperatura: –4 °F a +140 °F (–20 °C a +60 °C) Señal de transmisión HF: 433 MHz Rango de transmisión HF: máx. 328.08 ft (100 m) (al aire libre) Baterías: 2 x AAA 1.5 V (corriente directa) Grado de protección: IPX4 (a prueba de salpicaduras) / apto para lugares húmedos... -
Page 52: Notas Importantes De Seguridad
NOTAS IMPORTANTES DE SEGURIDAD LEA TODAS LAS INSTRUCCIONES. GUARDAR PARA FUTURAS REFERENCIAS. AL CEDER ESTE PRODUCTO A OTRAS PERSO- NAS, ASEGÚRESE DE INCLUIR TODA SU DOCUMENTACIÓN. Información general de seguridad El incumplimiento de las siguientes advertencias puede provocar lesiones graves o la muerte. - Page 53 supervisadas o instruidas sobre el uso seguro del producto por una persona responsable de su seguridad. Los cambios o las modificaciones a este producto que no sean expresamente aprobados por la parte responsable del cum- plimiento podrían anular la autoridad del usuario a operar el producto.
- Page 54 • Oriente o localice de nuevo la antena receptora. • Aumente la separación ente el producto y el receptor. • Conecte el producto a la toma de corriente en un circuito distinto de aquél al que esté conectado el receptor. •...
-
Page 55: Advertencias De Seguridad Para Baterías
Advertencias de seguridad para baterías Cuando se usan correctamente, las celdas y baterías propor- cionan una fuente segura y confiable de energía portátil. Sin embargo, si se usan mal o se maltratan, se puede provocar fugas, quemaduras, incendio o explosión. Almacene la baterías en un lugar seco a temperatura ambiente. - Page 56 En caso de que el electrolito entre en contacto con la piel o los ojos, enjuague inmediatamente con agua fresca durante al menos 15 minutos y solicite atención médica. Almacene las baterías no usadas en su empaque original o en un lugar seguro y alejadas de objetos metálicos que puedan provocarles cortocircuito.
- Page 57 Siempre tenga cuidad de insertar la baterías correctamente, fijándose en las marcas de polaridad (+) y (-) en la batería y en el producto para el cual está diseñada. Se debe tener en cuenta la polaridad correcta para evitar daños al producto, al cargador o la baterías.
- Page 58 No abra o mutile una batería o celda. El electrolito de la celda es corrosivo y puede provocar lesiones en los ojos o la piel. El contenido de la celda puede ser peligroso si se ingiere. No deje caer ni someta la celda o la batería integrada a tensión mecánica intensa.
-
Page 59: Antes Del Uso Inicial
Antes del uso inicial Active las baterías primero en el sensor exterior y luego dentro de la estación meteorológica. Nota: retire todo el material de empaque del producto. Nota: antes de usarlo por primera vez, retire el plástico protector de la LC pantalla del dispositivo. Información general Al elegir una posición para el producto, asegúrese de que no esté... -
Page 60: Preparar El Sensor Exterior Para Su Uso
Señal de radio (WWVB): La señal de la WWVB (transmisor de señal de tiempo) consiste en pulsos de tiempo emitidos por uno de los relojes más precisos del mundo en Fort Collins, Colorado. Preparar el sensor exterior para su uso Retire la cubierta del compartimiento de las baterías de la parte trasera del sensor exterior. - Page 61 Conectar la estación meteorológica con el sensor exterior y la señal de radio de la WWVB: Después de insertar las baterías, la estación de temperatura tratará de conectarse con el sensor en el exterior. Este proceso puede tar- dar algunos minutos. El símbolo de señal de radio parpadeará.
- Page 62 Nota: no mueva la estación meteorológica mientras está recibiendo la señal. De lo contrario se puede interferir con la recepción. Si no es posible hacer la sincronización cuando la estación meteorológica se configura por primera vez, intente cambiarla de lugar (p. ej. coloque la estación meteorológica cerca de una ventana).
- Page 63 formato de hora / zona horaria / fecha / hora / idioma / unidad de temperatura manualmente”). Mantenga presionado nuevamente el botón - por 3 segundos. El símbolo WWVB desparece, la función de recepción del tiempo automáticamente por radio se activa. La estación de temperatura comenzará...
-
Page 64: Estación Meteorológica
Estación meteorológica Marque la posición del orificio (D 0.24 in (D 6 mm)) en la pared. Nota: utilice la plantilla de perforación diseñada para marcar los orificios. Perfore el orificio con un taladro eléctrico. Inserte el taquete en el orificio perforado. Usando un atornillador de cruz, inserte el tornillo en el taquete. -
Page 65: Sensor Exterior
Sensor exterior Marque la posición del orificio (D 0.24 in (D 6 mm)) en la pared. Nota: utilice la plantilla de perforación diseñada para marcar los orificios. Perfore el orificio con un taladro eléctrico. Inserte el taquete en el orificio perforado. Usando un atornillador de cruz, inserte el tornillo en el taquete. -
Page 66: Configurar El Formato De Hora / Zona Horaria / Fecha / Hora / Idioma / Unidad De Temperatura Manualmente
Nota: asegúrese de que el sensor exterior no se sumerja en agua y no esté expuesto a la luz directa del sol. Los dispositivos eléctricos pueden afectar la recepción de la señal inalámbrica. Configurar el formato de hora / zona horaria / fecha / hora / idioma / unidad de temperatura manualmente Es posible que la recepción de la señal de la WWVB de radio... - Page 67 botón, la pantalla LC regresa automáticamente a la indicación normal. 3. Presione el botón MODE para confirmar los valores. 4. Presione el botón + o el botón – para ajustar la zona horaria deseada para la segunda zona horaria (–12 horas a +12 horas).
-
Page 68: Horario De Verano
Nota: la indicación de segundos solo se puede restablecer a 00. 7. Presione el botón de + o el botón de – para activar o desactivar la función de horario de verano (ON / OFF). 8. Presione el botón MODE para confirmar los valores. 9. -
Page 69: Encender / Apagar La Alarma
Nota: si se estableció una hora de alarma antes, la pantalla LC mostrará la hora a la que se estableció la alarma. De lo contrario, la pantalla mostrará 0:00 o AM 12:00. 2. La indicación de hora parpadeará. Presione el botón + el botón –... -
Page 70: Usar La Función Snooze
La alarma suena a la hora establecida. La alarma se detiene automáticamente después de 2 minutos. Presione el botón de encendido/apagado de AL 1 O EL botón de encendido/apagado DE AL 2 para detener ma- nualmente la alarma. Usar la función snooze Presione el botón SNOOZE / LIGHT mientras suena la alarma para activar la función de snooze. -
Page 71: Indicación De Temperatura
presione este botón para activar la luz de fondo durante 10 segundos. Indicación de temperatura La pantalla LC muestra la temperatura interior y la temperatura exterior Indicación de los valores mínimos / máximos La estación de temperatura almacena los valores máximos y míni- mos del sensor exterior y de la estación de temperatura misma. -
Page 72: Indicación De Las Tendencias De Temperatura
Indicación de las tendencias de temperatura Después de conectarse exitosamente con el sensor exterior, la es- tación meteorológica puede mostrar la tendencia de temperatura (exterior) y la tendencia de temperatura (interior) Puede ver las siguientes indicaciones: = La temperatura está aumentando. = La temperatura permanece constante. - Page 73 Inserte dos baterías nuevas de 1.5 V (corriente directa) (AAA) en los compartimientos de las baterías. Nota: asegúrese de insertar las baterías en el sentido correcto (polaridad). Ésta se muestra en los compartimentos para la batería. Cierre los compartimientos de las baterías. US-ES 317485_1904_aur_Funk-Temperaturstation_content_US.indd 75 27.09.19 14:02...
-
Page 74: Resolución De Problemas
Resolución de problemas Nota: este producto dispone de componentes electrónicos delica- dos. Esto significa que podrían producirse interferencias si se coloca cerca de un objeto que transmite señales de radiofrecuencia. Si la pantalla indica un problema, aleje los objetos de la esta- ción meteorológica o el sensor exterior o retire las baterías de la estación meteorológica o el sensor exterior durante un periodo breve de tiempo y vuelva a colocarlas. -
Page 75: Limpieza Y Mantenimiento
El frío (temperatura exterior debajo de 32 °F (0 °C)) puede reducir la potencia de la batería del sensor exterior y, por tanto, afectar negativamente la transmisión de radio. Otro factor que puede provocar una interferencia son las baterías agotadas o a punto de agotarse en el sensor exterior. Reempláce- las con unas nuevas. -
Page 76: Eliminación
Por ningún motivo rocíe el sensor exterior, p. ej. con una manguera de jardín. El sensor exterior está protegido de salpicaduras de agua desde cualquier dirección. Eliminación Deshágase del empaque mediante sus instalaciones de reciclaje locales y de acuerdo con las regulaciones federales, estatales y locales. - Page 77 Para ayudar a proteger el medio ambiente, elimine el producto adecuadamente al final de su vida útil, no lo tire en la basura nor- mal. Puede obtener información de sus autoridades locales sobre los puntos de recolección y horarios de atención. ¡La eliminación inadecuada de las baterías puede causar daños ambientales! Las baterías no deben ser eliminadas con los desechos del hogar.
-
Page 78: Garantía Limitada De 3 Años
Garantía limitada de 3 años Lo que cubre la presente garantía La garantía incluye: · Daños, quebraduras o incapacidad para funcionar debido a defectos. · Daños que no hayan sido causados por el desgaste propio del uso o por no seguir las instrucciones de seguridad y mantención incluidas en el manual para el usuario. - Page 79 · Manipulación mal intencionada del producto (retirar la cubierta, tornillos, etc.). La presente garantía tampoco cubre daños indirectos o emergentes. Sin embargo algunos estados no permiten la exclusión o limitación de daños indirectos o emergentes, por lo que dicha exclusión o limi- tación pudiera no aplicarse en su caso.
- Page 80 ¿Cómo se tramita la garantía? Recomendamos que primero usted: · Llame al Servicio de atención al cliente al 1 (844) 543-5872. · Visite el Portal de atención al cliente en www.lidl.com/contact-us · Visite una de nuestras tiendas LIDL en caso de cualquier inquietud. A fin de acelerar el trámite de la garantía, tenga a bien contar con lo siguiente: ·...
- Page 81 ¿De qué manera influyen las leyes estatales con esta garantía? La presente garantía le otorga derechos legales específicos, y pudiera usted contar con otros derechos los cuales varían de un estado a otro. Todas las garantías implícitas se encuentran limitadas a la duración y términos de la presente garantía.
Need help?
Do you have a question about the HG05686A-US-RX and is the answer not in the manual?
Questions and answers