Table of Contents
Advertisement
Advertisement
Table of Contents

Related Manuals for Guldmann GH3


Summary of Contents for Guldmann GH3
- Page 1 GB/US . . . . GH3/GH3+ Ceiling Hoist Manual – vers . 19...
- Page 3 GH3 Lifting modules, configurations Options Configuration code (xxxxx) 0 - 1 - 2 • • 0 - 1 - 2 • • 0 - 1 - 2 • • • • • • • • • • • 0 - 1 - 2 •...
-
Page 4: Table Of Contents
1.08 ..Placing a new GH3 Hoist in an existing rail system .... - Page 5 8.02 ..Configuration of GH3 lifting module ......
-
Page 6: Gh3 Use
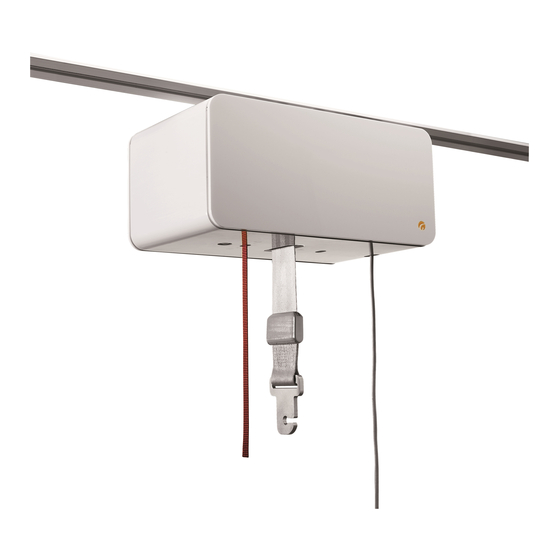
Conditions for use GH3 is a ceiling-mounted hoist that moves in a rail system. GH3 is designed to be used with a variety of lifting hangers and lifting slings. The use of the GH3 is subject to the following: •... -
Page 7: Important/Precautions
• The GH3 must not be used where there is a risk of it being splashed with water. • If a defect appears during use of the GH3, stop using the hoist and contact the Guldmann Service Team for repairs. -
Page 8: Unpacking And Preparation
Label for rail system 1 .08 Placing a new GH3 Hoist in an existing rail system Please notice that when, placing a new GH3 hoist in an existing rail system it must be ensured that: • The rated max load of the rail system, must be equal to or higher than the max load of the new hoist. -
Page 9: Power Supply
1 .09 Power supply GH3 is equipped with batteries that require regular recharging. The power supply for charging and the battery charging point must be connected by a qualified engineer or by Guldmann Service Team. The transformer supplied must always be used. -
Page 10: Installation Of The Lifting Hanger Before Use
1 .10 Installation of the lifting hanger before use Lifting hangers from other manufacturers Guldmann shall not be liable for faults or accidents that may occur as a result of using lifting hangers made by other manufacturers. If there is any doubt about the selec- tion or use of a lifting hanger, please Fig . -
Page 11: Lifting Sling
Slings made by other manufacturers Guldmann shall not be liable for faults or accidents that may occur as a result of using lifting slings made by other manufacturers. If there is any doubt about the selection or use of a lifting sling, please contact your supplier. - Page 12 Fig . 1b Lifting to and from a seated position When lifting a user from e.g. a wheelchair, move the GH3 towards the person to be lifted. The lifting hanger should be at the same height as the users chest and should be in approximately mid-thigh position.
- Page 13 Plan the move. Avoid leaving the user in the lifting sling unattended. Working with the GH3 The GH3 runs easily in the rail system and does not have any special requirements for space or power in connection with moving. Attention can thus be fully focused on the users functional level and the helpers technique.
-
Page 14: Swing Kit
1 .12 Swing kit The swing function is used in conjunction with a transfer e.g. through a door from one lifting module to another. Note: The swing adapter must be ordered separately. Fig . 1 Installation of swing adapter 1. Before starting a lift involving a swing transfer the swing adapter (Fig. -
Page 15: Using Swing Kit In Doorway
1 .13 Using swing kit in doorway 1. Bring the two hoists as close together as possible. Adjust the height of the lifting hanger on hoist B so that the transfer can be done without the user touching the floor during the transfer from one hoist to another. -
Page 16: Gh3 With Horizontal Drive Motor
It is possible to position the hoist with horizontal driving motor with a high degree of accuracy by a brief activation of the hand control. The GH3 with horizontal drive motor runs on its own power and it should not be pulled through the rail system. -
Page 17: Pictograms
Reset emergency stop Direction of travel (horizontal drive motor) denoted by grey arrow 2 .02 Indicator lamps and audio signals Status Indicator Audio signals Possible GH3 lamps Functions – stand by All OK Green No charging Yellow, 3 x Beep after 60 sec... -
Page 18: Operation
2 .03 Operation Hand control The GH3 is switched on automatically when a button on the hand control is pressed. The GH3 is switched off automatically after approx. 8 minutes without activation. 1. Lift 2. Lower 3. PDA interface (micro USB) GH3 with horizontal drive motor 1. - Page 19 Movement of the GH3 in the rail system The GH3 is manually pushed forward in the rail by the helper. The GH3 with 1 horizontal drive motor will run in the rail when the helper activates the hand control or IR remote control.
-
Page 20: Supplementary Modules, Gh3
2 .04 Supplementary modules, GH3+ There are various supplementary modules for the GH3+ • CLM module (GH3+ with statistical function for management use) • Service module (GH3+ with Service module) • Scale module (GH3+ with integrated scale) Scale • Class III Scale (GH3+ with integrated Class III Scale) •... - Page 21 Next service Setup 2019.07.01 Setup Units Language Language 4-8 Lifetime English Italianio total lifts Change Next Exit Change Change Units Language 1-8 Language 5-8 Lifetime Dansk Espanol heavy lifts Next Exit Change Change Change Language 2-8 Language 6-8 Last week Deutsch Francaise total lifts...
- Page 22 Menu structure, GH3+ with supplementary modules • Class III Scale • Trainer module • CLM module • Service module Scale Scale Info 1-2 Trainer Version 01.00 Start Next Start Scale Scale Info 2-2 Trainer 80.3 Changes Tare Exit Next Exit...
- Page 23 rainer Next service Setup 2019.07.01 Start Show Setup rainer Language Language 4-8 Lifetime English Italianio total lifts Exit Next Exit Change Change rainer Language 1-8 Language 5-8 Lifetime Dansk Espanol heavy lifts Exit Next Exit Change Change Language 2-8 Language 6-8 Last week Deutsch Francaise...
-
Page 24: Configuration Of Supplementary Modules, Gh3
2.05 Configuration of supplementary modules, GH3+ Before the GH3+ is put into use, the hoist must be configured. Configuration covers language (Scale module/CLM module/Service module) and the unit for specification of weight (Scale module). Factory setting: Language: English (UK) Unit of weight: Scale module: The weight unit can be set to kg or lbs. -
Page 25: Important Before Using The Scale Module And Class Iii Scale
Shock effects The GH3+ with scale module includes high-sensitive sensors to register mass corresponding to the nominal recommended load. The sensors are highly sensitive and can be damaged by the effects of shock, for example pulling the GH3+ at extreme speed into an end stop. -
Page 26: Scale Module (Gh3+ With Integrated Scale Module)
2 .07 Scale module (GH3+ with integrated scale module) The GH3+ with scale module (option) lets the helper determine the patients weight. Warning! If the scale is required to comply with the Non-automatic weighing instru- ments directive (EU Directive 2014/31/EU), a Class III scale must be used. - Page 27 1. Press any key on the hand control to activate the hoist. When the lifting module is activated, a display on the hand control is switched on and the Guldmann logo “G” appears. 2. Select “Menu” using the function key located immediately below the display.
- Page 28 Start Tare Exit 1. Always reset the GH3+ scale module before weighing takes place, see section entitled “Resetting the unit”. 2. Position the lifting sling on the user and attach it to the lifting hanger. 3. Lift the user with care.
-
Page 29: Class Iii Scale (Gh3+ With Class Iii Scale)
2 .08 Class III Scale (GH3+ with Class III Scale) Scale The GH3+ with scale module (option) provides the facility to determine the users weight. Start Description A Class III scale is a built-in digital scale that satisfies the requirements for... - Page 30 Tare Tare 1. Press any key on the hand control to activate the hoist. Guldmann logo “G” appears in the display. Select “Menu” using the function key located immediately below the display. 2. Then select until the “Scale” menu appears in the display.
- Page 31 Weighing with a Class III scale Scale Scale 80.3 Tare Tare Exit Exit 1. Always reset the scale module before weighing. See section ”Resetting of Class III scale”. 2. Lift the lifting sling off the hanger. Place the patient in the lifting sling before mounting it on the lifting hanger.
- Page 32 Screen utilised when using the Class III scale Start-up logo: Press ”menu” to select the function Menu Menu icon for ”scale”. Scale Press the left navigation button ”Start” to enter the menu. Start Scale (in the scale menu): the scale starts up and resetting occurs Scale automatically: - - -...
- Page 33 Changes (information screen 2 of 2 in scale menu): change counter Scale Info 2-2 • Counts changes in software parameters such as calibration and Changes values for G factor Next Exit Error notifications Scale - - - The scale is overloaded. Please follow the scale’s prescribed load (see identification label on Exit the hoist).
-
Page 34: Calibration/Verification Of Classe Iii Scale
2.09 Calibration/verification of Classe III Scale In order to maintain the medical approval the digital scale must be calibrated/ verified according to national regulatory requirements at an accredited testing institute. Software version and change counter are verified on the hand control’s dis- play. -
Page 35: Trainer Module
How do you use the Trainer Module? The Trainer Module is built into a GH3+ ceiling hoist, which may be installed in a hospital ward. This provides the opportunity to carry out training/rehabi- litation on the actual ward saving both time and resources, as the user does not need to be moved to an exercise room or physiotherapy. - Page 36 5. Mount the straps of the sling to the lifting hanger Training 1. When the user is ready to start training, activate the hoist by pressing any one button on the hand control, at which point the Guldmann logo will appear: Menu 2. Click the ” ” (Menu) button...
- Page 37 5. Once the weight relief has been selected, the training Trainer begins by pressing the left menu button ” ” Exit 6. Automatic weight relief is activated and the training Trainer begins. This is indicated by a yellow display. The user may now carry out the exercises with their weight relieved as selected in step 5.
- Page 38 Error notifications Dynamic weight relief overload. Allowed dynamic weight relief max 100 kg. Please reduce load to activate dynamic mode. Dynamic weight relief underload. Allowed dynamic weight relief min 5 kg. Please load strap to activate dynamic mode. Upper or lower limit has been reached. Please make sure nothing is activating the upper limit and that the strap has been fully unwound.
-
Page 39: Clm Module (Gh3+ With Statistical Function For Management Use)
(PDA/Net Book readouts requires a PDA/Net Book with Guldmann SIC/CLM software). The USB in the hand control is only intended for connection of PDA/Net Book and may only be used by Guldmann service team or by a Guldmann authori- zed person. Number of lifts, total... - Page 40 The CLM module includes an extended management menu which can be operated via a PDA/Net Book (with Guldmann SIC/CLM software installed). The PDA/Net Book is connected to the GH3+ hand control via a micro USB plug located in the base of the hand control (see section 2.04).
-
Page 41: Service Module (Gh3+ With Service Module)
2 .12 Service module (GH3+ with service module) The GH3+ with Service module (option) saves all of the information about time and indication of next safety/service inspection. The GH3+ with Service module specifies the date of the next safety/service inspection. - Page 42 Pop-Up’s for Service module (supplementary module) There are two different Pop-Up’s (brief messages on the display) on the GH3+ with Service module. These pop-up’s notify the user of upcoming and exceeded dates for service inspections. Both Pop-Up’s appear immediately after the hand control has been switched on.
-
Page 43: Safety Functions
Constant pull: Emergency lowering is activated. Emergency stop If the GH3 does not stop/react to the hand control when the GH3 is in use, pull the red strap and the lifting/lowering functions (except emergency lowering) are deactivated. When the emergency stop is activated, the hoist will not function. - Page 44 Emergency lowering function, electric If the GH3 fails, the electrical emergency lowering function is used to lower the user safely. The emergency lowering function is operated by a constant pull on the red strap that is used for the emergency stop.
-
Page 45: Charging/Connection
Note: A GH3 with a recommended load of more than 275 kg (600 lbs) has two lif- ting motors, and therefore two belt wheels to activate, one on each side. In case of a critical mechanical failure, the hoist contains a mechanical protective system that stops the strap reel. - Page 46 . Positioning lock The Positioning lock adds yet another option to the Guldmann GH3 ceiling hoist system for moving, treating, mobilising and rehabilitating people. Using the Positioning lock, it is possible to secure the lifting module and/or the traverse rail in a given position in the full-coverage rail system.
- Page 47 • In the event of an error while using the Combi-lock, discontinue its use. Contact the Guldmann Service Team or a certified technician to perform any necessary repairs. A defective Combi-lock can result in injury to the user and helper.
-
Page 48: Environmental Conditions
1500 ppm. If other chemicals and/or liquids with higher resolution should be used to clean or disinfect these products, please contact Guldmann providing the item´s safety sheet chemical composition for consideration. -
Page 49: Storage
Check the lifting sling for wear and damage before use. Do not use the lifting sling if it is damaged or defective. Do not use the GH3 if the lifting strap is damaged or defective. Contact your supplier and order a new lifting sling or a replacement of the lifting strap. -
Page 50: Safety/Service Inspections
In connection with the purchase Guldmann may offer a service agreement for this inspection. The GH3+ with service module may only be serviced by the Guldmann Service Team or by a qualified service technician with access to the PDA/Net Book with Guldmann software. -
Page 51: Classification
Remote control IP20 Transformer IP20 Examples of serial number label Lifting module GH3+ xxx xxx (xxxxx) max xxx kg / xxx lbs xxxxxx 33V AC, 2.5A, IP20 Duty cycle 2 min ON/18 min OFF x xx x x V. Guldmann A/S... -
Page 52: Certificates
Use within EU Lifting hanger Hand control Part no. xxx xxx GH Lifting Hanger Edition max xxx kg / xxx lbs Date xxxx-xx-xx V. Guldmann A/S IP44 Graham Bells Vej 21-23A xxxxxx xxxxxx DK-8200 Aarhus N yyyy-mm-dd Barcode 128C / GS1-128... -
Page 53: Technical Specifications
8 .01 Module label, quick info A module label on the strap relief indicates which optional modules are built into the specific GH3 lifting module together with a clear indication of the Safe Working Load. SWL 350 kg/770 lbs Service... - Page 54 • • • Drive motors are not compatible with UL xx) Not compatible with UL Example: GH3+ 350 122 (xxxxx) 2 horizontal drive motors 2 lifting motors 1 lifting strap Safe Working Load SWL: 350 kg Ceiling hoist, type GH3...
-
Page 55: Technical Specifications
Covers ..Impact-resistant UL 94 V-0 flame retardant recyclable plastic Digital Scale Specifications (Non medical). Optional for GH3+ Capacity ..........0 - SWL Accuracy . - Page 56 Dimensions A ..........580 mm (22.8 inch) B .
-
Page 57: Eu-Declaration Of Conformity
Electronics On/off ......Automatic when used. Soft start/stop Overload protection ........Automatic Low Battery protection . -
Page 58: Type Approval Certificate
Graham Bells Vej 21-23A, 8200 Aarhus N DENMARK In respect of Non-automatic weighing instrument designated GH3+ with variants of modules of load receptors and load cells. Accuracy class III, single-interval or multi range (dual) Maximum capacity, Max: From 200 kg to 700 kg... -
Page 59: Environmental Policy Statement - V . Guldmann A/S
Guidance and manufacturer’s declaration – electromagnetic emissions The GH3 is intended for use in the electromagnetic environment specified below. The customer or the user of the GH3 should assure that it is used in such an environment. Emissions test Compliance Electromagnetic environment –... - Page 60 Guidance and manufacturer’s declaration – electromagnetic immunity The GH3 is intended for use in the electromagnetic environment specified below. The customer or the user of the GH3 should assure that it is used in such an environment. IMMUNITY test IEC 60601...
- Page 61 Guidance and manufacturer’s declaration – electromagnetic immunity The GH3 is intended for use in the electromagnetic environment specified below. The customer or the user of the GH3 should assure that it is used in such an environment. IMMUNITY test IEC 60601 TEST...
-
Page 62: Warranty And Service Conditions
RF communications equipment and the GH3 The GH3 is intended for use in an electromagnetic environment in which radiated RF disturbances are con- trolled. The customer or the user of the GH3 can help prevent electromagnetic interference by maintaining a minimum distance between portable and mobile RF communications equipment (transmitters) and the GH3 as recommended below, according to the maximum output power of the communications equipment. -
Page 63: Service Or Repair
Guldmann Certified Technician. A Guldmann Certified Technician is a technician who has successfully completed Guldmann Service Training, and who holds a valid Service Training Certificate from Guldmann, and is in pos- session of a valid password to access Guldmann’s Service and Information Console (SIC). - Page 64 V . Guldmann A/S Corporate Office: Tel. +45 8741 3100 info@guldmann.com www.guldmann.com Guldmann Inc . Tel. 800 664 8834 Tel. 813 880 0619 Fax 813 880 9558 info@guldmann.net www.guldmann.net...
Need help?
Do you have a question about the GH3 and is the answer not in the manual?
Questions and answers