Advertisement
4
3
5
6
7
8
9
Operators Check List Before Use
• Make sure the lifter is moving freely on its castors.
• Operate the brakes (9) to make sure they are
working.
• Lift & lower the lifting boom (2) by pressing the
buttons via the hand control (3) and control
panel (14).
• Check the leg width adjustment is opening and
closing, via the hand control (3) and control
panel (14).
• Check the emergency lowering by pressing the
button on the control box (16) also check the
manual function by turn the red knob (12) in the
direction of the arrows.
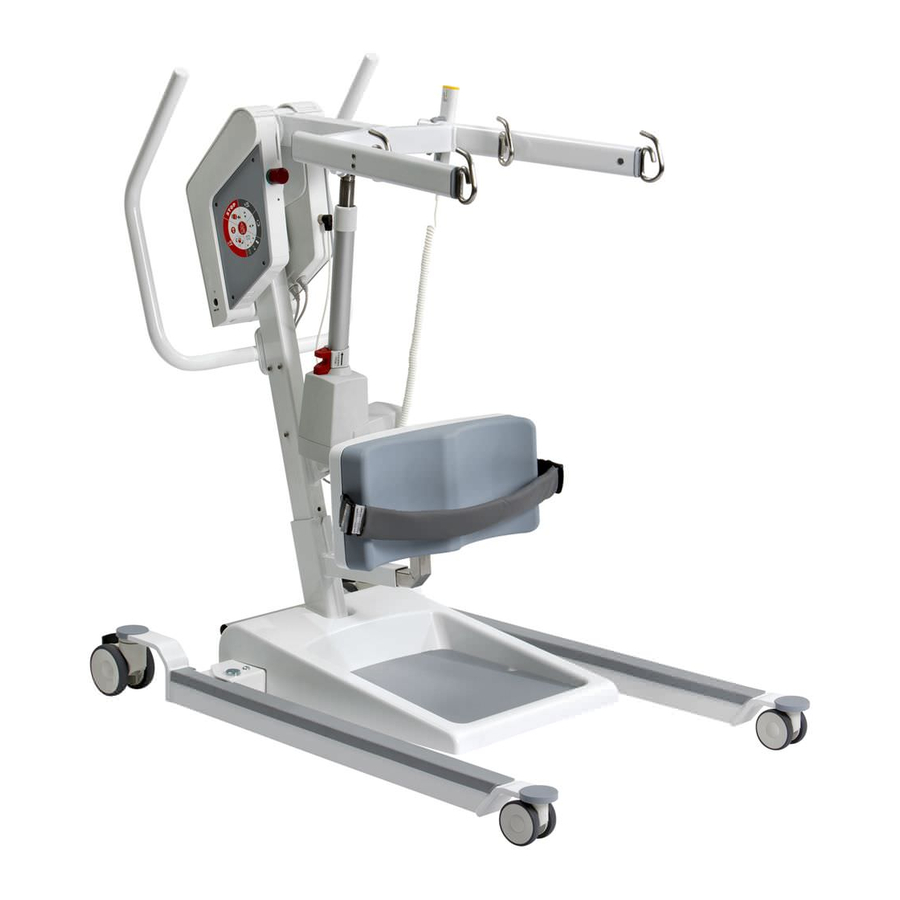
Quick Guide - GLS5 Active Lifter
2
1
12
11
10
13
14
15
16
1. S ling attachment hooks
2. Lifting boom
3. Hand control
4. Emergency stop
5. Electronic control box
6. Battery docking station
7. Push handle
8. Charger
9. Rear braked castor
1 0. Foot plate
1 1. Knee pad & adjustment knobs x 2
1 2. Emergency lowering manual
1 3. A udio and visual indicator for
low battery
1 4. Control panel
1 5. Visual service indicator
1 6. Emergency lowering electrical
• Check emergency stop button is working (4)
– depress and try the handset – turn the red
b utton in the direction of the arrows to release.
• Release Knee pad adjustment knobs x 2 (11)
the pad should move up / down and slide in /
out, tighten to lock.
• Make sure footplate (10) is secure and clean.
Charging Options
• Charge attached to the lifter (8) - simply wheel
and plug.
• Charge away from the lifter - remove battery
from docking station (6) & charger (8).
5
Advertisement
Table of Contents

Related Manuals for Guldmann GLS5


Summary of Contents for Guldmann GLS5
- Page 1 Quick Guide - GLS5 Active Lifter 1. S ling attachment hooks 2. Lifting boom 3. Hand control 4. Emergency stop 5. Electronic control box 6. Battery docking station 7. Push handle 8. Charger 9. Rear braked castor 1 0. Foot plate 1 1. Knee pad & adjustment knobs x 2 1 2. Emergency lowering manual 1 3. A udio and visual indicator for low battery 1 4. Control panel...
- Page 2 Accessories Sling attachment hooks You have the option to use either the outer hooks or inner hooks. (A risk assessment MUST be car- ried out before attempting a lift). Place the sling strap in the hooks, upon lifting check that the strap maintains its position. Daily cleaning and Lifting sling maintenance We only recommend using the designed slings for the “Active Lifter.” The sling must be checked Clean with a damp cloth and ordinary detergent. before every lift – (please see sling user manual for Do not use strong acids, bases or alcohol when guidance). Label must be intact and readable. cleaning. See user manual. Scan here for user manual, etc. concerning use of the GLS5. V. Guldmann A/S Graham Bells Vej 21-23A, DK-8200 Aarhus N Tel. +45 8741 3100, Fax +45 8741 3131 info@guldmann.com www.guldmann.com...
Need help?
Do you have a question about the GLS5 and is the answer not in the manual?
Questions and answers