Advertisement
Quick Links
WARNING: FIRE OR EXPLOSION HAZARD
Failure to follow safety warnings exactly could result in serious injury, death, or property damage.
- Do not store or use gasoline or other flammable vapors and liquids in the vicinity of this or any
other appliance.
- WHAT TO DO IF YOU SMELL GAS
• Do not try to light any appliance.
• Do not touch any electrical switch; do not use any phone in your building.
• Leave the building immediately
• Immediately call your gas supplier from a neighbor's phone. Follow the gas supplier's
instructions.
• If you cannot reach your gas supplier, call the fire department.
-
Installation and service must be performed by a qualified installer, service agency or the gas supplier.
A barrier designed to reduce the risk of burns from
the hot viewing glass is provided with this appliance
and shall be installed for the protection of children
and other at-risk individuals.
This appliance may be installed in an aftermarket, permanently located, manufactured home
(USA only) or mobile home, where not prohibited by local codes.
This appliance is only for use with the type of gas indicated on the rating plate. A conversion
kit is supplied with the appliance.
INSTALLER: Leave this manual with the appliance.
CONSUMER: Retain this manual for future reference.
Travis Industries, Inc.
Copyright 2019, T.I.
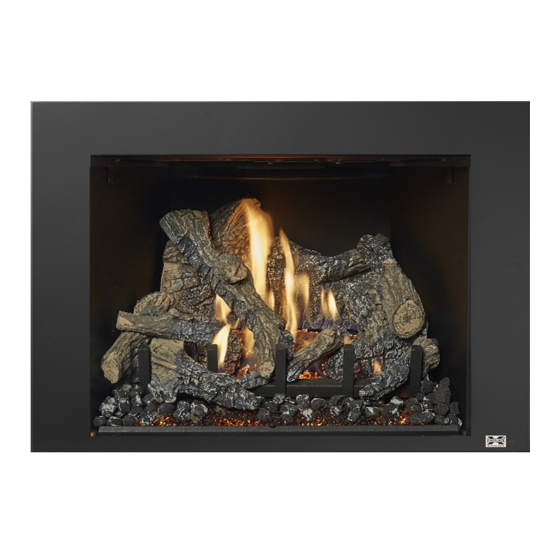
430 Ember-Glo™
GSR2 Insert
Owner's Manual
HOT GLASS WILL CAUSE
BURNS
DO NOT TOUCH GLASS
UNTIL COOLED
NEVER ALLOW CHILDREN
TO TOUCH GLASS
12521 Harbour Reach Dr., Mukilteo, WA 98275
$10.00
Direct Vent Fireplace Insert
Masonry or Factory-Built
Residential or Mobile Home
9/22/2020
Tested and Listed by
Report# G100518003PRT-002
ANSI Z21.88-2017
CSA 2.33-2017
(Metal) Wood-Burning
Fireplace
www.travisproducts.com
100-01521
Advertisement

Related Manuals for Travis Industries 430 Ember-Glo GSR2


Summary of Contents for Travis Industries 430 Ember-Glo GSR2
- Page 1 This appliance is only for use with the type of gas indicated on the rating plate. A conversion kit is supplied with the appliance. INSTALLER: Leave this manual with the appliance. CONSUMER: Retain this manual for future reference. Travis Industries, Inc. 12521 Harbour Reach Dr., Mukilteo, WA 98275 www.travisproducts.com Copyright 2019, T.I.
- Page 2 This appliance was listed by Intertek. The listing label is attached to the appliance near the gas control valve. A copy is shown on page 43. Massachusetts Approval This manual has been submitted to the Massachusetts Board of State Examiners of Plumbers and Gas Fitters. National Fireplace Institute © Travis Industries 9/22/2020 - 1521 430 EG GSR2...
- Page 3 Glass Frame Removal and Installation ..23 Driftwood Log Set Installation (sku# Steps for Finalizing the Installation ..... 24 94500953) ............62 Before You Begin ........... 27 © Travis Industries 9/22/2020 - 1521 430 EG GSR2...
- Page 4 Do not operate if any portion of the heater was submerged in water or if any corrosion occurs. Immediately call a qualified service technician to inspect the appliance and to replace any part of the control system and any gas control which has been underwater. © Travis Industries 9/22/2020 - 1521 430 EG GSR2...
- Page 5 Travis Industries, Inc. grants no warranty, implied or stated, for the installation or maintenance of your heater, and assumes no responsibility of any consequential damage(s).
- Page 6 This heater is shipped in natural gas (NG) configuration but may be converted to propane (LP) using the LP Conversion Kit (included) and the LP stepper motor (SKU 250-01463, sold separately). The sticker on top of the gas control valve will verify the correct fuel. © Travis Industries 9/22/2020 - 1521 430 EG GSR2...
- Page 7 8. Install the media (logs, stones - see instructions included with the media). 9. Install the surround panel (see instructions included with surround panel). 10. Follow the instructions under “Finalizing the Installation.” © Travis Industries 9/22/2020 - 1521 430 EG GSR2...
- Page 8 Masonry Fireplace Hearth Requirements A panel trim kit is available for this appliance. When using the kit, the appliance will sit forward of the fireplace opening 1-1/4” (32mm). WARNING: A non‐combustible hearth is not required in front of the appliance. However, if the heater is installed next to the floor, we recommend a hearth to protect the flooring surface from discoloration or other negative impacts from the heater. © Travis Industries 9/22/2020 - 1521 430 EG GSR2...
- Page 9 A non-combustible hearth is not required in front of the appliance. However, if the heater is installed next to the WARNING: floor, we recommend a hearth to protect the flooring surface from discoloration or other negative impacts from the heater. © Travis Industries 9/22/2020 - 1521 430 EG GSR2...
- Page 10 If it does, it is considered a mantel and must meet the mantel requirements listed in this manual. Maximum Mantel Depth 35"(889mm) 34"(864mm) 33"(839mm) Mantel Height 32"(813mm) Above B as e of Ins ert (n) 31"(788mm) © Travis Industries 9/22/2020 - 1521 430 EG GSR2...
- Page 11 This heater includes front and rear leveling legs to accommodate fireplaces with a step-down firebox. Loosen the (4) bolts and adjust the legs down until the insert is properly supported and level. © Travis Industries 9/22/2020 - 1521 430 EG GSR2...
- Page 12 Installation (for qualified installers only) Electrical Requirements Travis Industries manufactures a wiring kit specifically for inserts (sku 97200315). This kit allows installers to wire 120 volt AC power into a fireplace directly to the insert, eliminating the need for an external power cord.
- Page 13 The supply regulator (the regulator that attaches directly to the residence inlet or to the propane tank) should supply gas at the suggested input pressure listed above. Contact the local gas supplier if the regulator is at an improper pressure. © Travis Industries 9/22/2020 - 1521 430 EG GSR2...
- Page 14 3. Attach the included gas shutoff valve to the end of the flex tube and gas inlet as shown below. Position so the valve handle is on the right as shown. Leak-test all gas line connections. © Travis Industries 9/22/2020 - 1521 430 EG GSR2...
- Page 15 (variations may occur depending upon installation parameters). Many factors may negatively influence the draft of the appliance. Travis Industries will not be responsible for improper draft due to factors such as trees, hills, buildings, obstructions, excessive wind, extreme hot or cold outdoor temperatures, restrictive vent terminations, or influence from mechanical systems.
- Page 16 Inlet (3" 76mm) Sections May Be Added Approved (support as needed) Exhaust Inlet Exhaust (3" 76mm) Exhaust Inlet For optimum performance, keep the vent as straight as possible (no 90 bends). © Travis Industries 9/22/2020 - 1521 430 EG GSR2...
- Page 17 Failure to adjust the air shutter properly may lead to improper combustion which can create a safety hazard. Consult your dealer or installer if you suspect an improperly adjusted air shutter. © Travis Industries 9/22/2020 - 1521 430 EG GSR2...
- Page 18 Remove Screw 1/4" Nutdriver 2. Stretch the liners to their full length. Attach the flex liners to the cap (secure with screws). Route the flex vent through the chimney from above. © Travis Industries 9/22/2020 - 1521 430 EG GSR2...
- Page 19 4. Slide the insert into place while guiding the vent connector into the guides on top of the insert. Secure the vent connector to the appliance using the screw removed in step 1. Re-install Screw 1/4" Nutdriver © Travis Industries 9/22/2020 - 1521 430 EG GSR2...
- Page 20 16 Feet (Min.) 15 Feet Back of Firebox In this example, the restrictor is set in the #5 position. Tighten the screws to secure the restrictor. 10 Feet 5 Feet 0 Feet © Travis Industries 9/22/2020 - 1521 430 EG GSR2...
- Page 21 DuraVent manufactures a vent kit for horizontal that allows for terminating horizontally when installed in a masonry fireplace (not for use with ZC fireplaces). The DuraVent kit (46DVA-HCL33 and 46DVA HCL34) is approved for use with Travis Industries gas inserts. These kits can be purchased from your Travis Industries dealer. Application DuraVent Part # For inserts that use 3”...
- Page 22 (wood). - All additional requirements in the manual for the installation Max. 40’ must be met. (12.2M) - Refer to the vent manufacturer’s instructions for further details. © Travis Industries 9/22/2020 - 1521 430 EG GSR2...
- Page 23 NOTE: Replace the tool in this location after removing the glass frame. 2. Remove the glass frame as shown below. The glass frame is held in place with three tabs inserted into three slots at the bottom of the insert. © Travis Industries 9/22/2020 - 1521 430 EG GSR2...
- Page 24 The flames should burn off of each burner hole. If the heater does not work correctly, contact your Travis dealer for a remedy. 12. Give this manual to the homeowner for future reference and fully explain the operation of this heater. © Travis Industries 9/22/2020 - 1521 430 EG GSR2...
- Page 25 If the flames are too tall or sooty on the If the flames are all blue and base, yellow-orange on the top. ends, open the air shutter. short, close the air shutter. © Travis Industries 9/22/2020 - 1521 430 EG GSR2...
- Page 26 4. Remove the (2) media tray attachment screws and lift the media tray up and out of the firebox. Remove (2) Media Tray Screws 5. Install the firebacks. See the firebacks installation instructions for details. 6. Reverse the previous steps to replace the burner and grate assembly. © Travis Industries 9/22/2020 - 1521 430 EG GSR2...
- Page 27 "SET" = selected Make sure to keep the on/off button depressed mode enabled. during this process. Release the on/off button to complete "CLR" = selected programming. mode disabled. © Travis Industries 9/22/2020 - 1521 430 EG GSR2...
- Page 28 PRG (Program) button for 10 seconds. The pilot will start to spark repeatedly, signifying all system memory has been cleared. The system will return to its original configuration: a remote will need to be synchronized; and, the system will operate under continuous pilot mode. © Travis Industries 9/22/2020 - 1521 430 EG GSR2...
- Page 29 If you wish to adjust the mode settings use the transmitter mode button to adjust the settings. The thermostat and burner on/off operating functions will not work on the transmitter. © Travis Industries 9/22/2020 - 1521 430 EG GSR2...
- Page 30 IPI/CPI. NOTE: This icon appears when the appliance is in CPI mode. Press the "UP" button Press the "DOWN" button to activate CPI mode. to activate IPI mode. Figure 4 © Travis Industries 9/22/2020 - 1521 430 EG GSR2...
- Page 31 NOTE: When the batteries start to get low, the IFC will beep twice whenever a button is pressed. When IFC Batteries the batteries are nearly depleted, the IFC will no longer beep. See “ ” on page 35). © Travis Industries 9/22/2020 - 1521 430 EG GSR2...
- Page 32 Figure 9 NOTE: If the transmitter batteries go dead while in thermostat setting (standard or smart), the appliance will shut off after approximately 24 hours. © Travis Industries 9/22/2020 - 1521 430 EG GSR2...
- Page 33 When in Manual Mode the blower will remain on, even if the burner is turned off and the heater cools. Either manually turn the blower off, or turn off the heater by pressing the On/Off button. © Travis Industries 9/22/2020 - 1521...
- Page 34 Display Fahrenheit or Celsius With the system in the “OFF” position, press both the MODE and THERMOSTAT buttons simultaneously to toggle between Fahrenheit (F) and Celsius (C). © Travis Industries 9/22/2020 - 1521 430 EG GSR2...
- Page 35 The remote will work if household current (AC power) is disconnected. The batteries inside the battery box will continue to power the heater but the accent light and blower will not operate. © Travis Industries 9/22/2020 - 1521 430 EG GSR2...
- Page 36 This appliance has several areas that reach high temperatures. Dust or other particles in these areas may burn and create an odor. This is normal during start-up. You may notice the smell is more acute if the appliance was left idle for a long period. © Travis Industries 9/22/2020 - 1521 430 EG GSR2...
- Page 37 The upper accent light assembly drops down to expose the accent light. When replacing the assembly, carefully insert the wiring into this cavity to ensure the wiring is not pinched. The upper accent light may now be accessed. © Travis Industries 9/22/2020 - 1521 430 EG GSR2...
- Page 38 1. Lift the media tray skirt upward and remove it from the firebox. 2. Remove the (2) media tray attachment screws and lift the media tray up and out of the firebox. Remove (2) Media Tray Screws © Travis Industries 9/22/2020 - 1521 430 EG GSR2...
- Page 39 (NOTE: Take care to not touch the replacement bulbs with your fingers – use foam packing or paper towel to hold the bulb) 7. Return the fireplace to its correct configuration. © Travis Industries 9/22/2020 - 1521 430 EG GSR2...
- Page 40 After 15 minutes the flames should be orange/yellow and not touch the top of the firebox. If the pilot or main burners do not burn correctly, contact your dealer for service. Monitor blower operation © Travis Industries 9/22/2020 - 1521...
- Page 41 The accent light fuse may be blown..... Replace the fuse. See fuse location below. Not Work Location of fuses (3 amp) in lower right corner under the firebox: Lights Optional power Ember-Glo cord location Lights © Travis Industries 9/22/2020 - 1521 430 EG GSR2...
- Page 42 (Manual On/Off) Replacement Parts Caution: Use only Travis Industries replacement parts. Do not use substitute materials. Warning: Do not operate appliance with the glass front removed, cracked, or broken. Replacement of the glass should be done by a licensed or qualified service person.
- Page 43 Safety Label Safety Label The safety (listing) label is attached to the operating tag (chained to the heater near the gas control valve). A copy is shown below. © Travis Industries 9/22/2020 - 1521 430 EG GSR2...
- Page 44 2. Travis Industries has the option of either repairing or replacing the defective component. 3. If your dealer is unable to repair your appliance’s defect, he may process a warranty claim through TRAVIS INDUSTRIES, INC., including the name of the dealership where you purchased the appliance, a copy of your receipt showing the date of the appliance’s purchase, and the serial number on your appliance.
- Page 45 LP. The kit contains the stepper motor (regulator) and Torx wrench. 1. Access the firebox. 2. Remove the burners (see “Remove the Burner,” in the owner's manual). 3. When using LP, remove and discard the two existing orifice gaskets (see below). © Travis Industries 9/22/2020 - 1521 430 EG GSR2...
- Page 46 5. Install the LP (propane) orifices. ORIFICE SIZE (ID) Natural Gas LP (Propane) Front Burner Orifice #48 DMS #60 DMS Rear Burner Orifice #50 DMS 1.2mm DMS Rear Orifice Front Orifice © Travis Industries 9/22/2020 - 1521 430 EG GSR2...
- Page 47 9. Restore the appliance to the correct configuration. Make the gas line connection, bleed the gas line (if applicable), start the heater, and thoroughly leak-test all gas connections and the gas control valve. © Travis Industries 9/22/2020 - 1521 430 EG GSR2...
- Page 48 The black painted firebacks will fully cure under heat. Run the appliance on low for several hours to cure the paint. The firebacks may be touched-up using Forrest “Metallic Black” paint. © Travis Industries 9/22/2020 - 1521 430 EG GSR2...
- Page 49 3. Place the rear fireback inside the firebox as shown below. Make sure the Tuck the fireback behind the baffle on the firebox ceiling. © Travis Industries 9/22/2020 - 1521 430 EG GSR2...
- Page 50 5. Replace the left fireback clip to secure the right fireback in place 6. Install the right fireback and secure using the fireback clip. The firebox should now look like the photo below. © Travis Industries 9/22/2020 - 1521 430 EG GSR2...
- Page 51 NOTE: The tray may not fit unless the firebacks are all the way against the fireback walls. 8. Replace the burner. Secure it with the 2 screws removed earlier. NOTE: The burner may not fit unless the firebacks are all the way against the fireback walls. © Travis Industries 9/22/2020 - 1521 430 EG GSR2...
- Page 52 Right Top Log Back Log 250-05240 250-05237 Left Log 250-05243 Right Bottom Log 250-05244 Center Left Twig 250-05238 Center Twig Front Ember Chunk Left Twig 250-05242 250-05246 250-05241 Front Left Log 250-05245 © Travis Industries 9/22/2020 - 1521 430 EG GSR2...
- Page 53 Right Top Log 250-05250 Back Log 250-05247 Left Log Right Bottom Log 250-05253 250-05254 Center Left Twig 250-05248 Center Twig Left Twig 250-05252 Front Ember Chunk 250-05251 Front Left Log 250-05256 250-05255 © Travis Industries 9/22/2020 - 1521 430 EG GSR2...
- Page 54 Push the log backward until it is in contact with the sloped area between the front and rear burner. NOTE: Make sure the log does not obstruct any burner holes. © Travis Industries 9/22/2020 - 1521 430 EG GSR2...
- Page 55 Stack ember chunks over any portion of the perforated metal along the front of the unit that IS NOT over the Ember-Glo lights (see picture below to the right). Do not cover Ember-Glo lights © Travis Industries 9/22/2020 - 1521 430 EG GSR2...
- Page 56 Do not use the entire bag of rockwool. Use only a small amount and save the remainder. Over-use of rockwool will diminish the glow and may cause sooting or other adverse conditions. NOTE: Remove all rockwool from the pilot area (see below). © Travis Industries 9/22/2020 - 1521 430 EG GSR2...
- Page 57 NOTE: If power is supplied, turn the rheostat until the embers have a realistic and aesthetically pleasing appearance. Use the remote to turn the Ember-Glo lights on and off. © Travis Industries 9/22/2020 - 1521 430 EG GSR2...
- Page 58 10. The right top log has two slots on the back that fit over the pins on the rear and right log (see pictures below). © Travis Industries 9/22/2020 - 1521 430 EG GSR2...
- Page 59 12. The center log rests on a pin on the left end of the rear log and the on the left end of the center twig. There is a notch in the end of the log that rests against the grate. © Travis Industries 9/22/2020 - 1521...
- Page 60 13. Place the right ember chunk as shown below. 14. The left twig sets on the left most pin on the front left log and the top rests on the left log. © Travis Industries 9/22/2020 - 1521 430 EG GSR2...
- Page 61 15. Place the center-left twig over the remaining pin on the front left log. The burnt end of the log should rest on (or near) the grate. 16. Place any remaining ember chunks on the ember glass and grate to create a realistic appearance. © Travis Industries 9/22/2020 - 1521 430 EG GSR2...
- Page 62 9. Install the surround panel (see instructions included with surround panel). 10. Replace the glass. 11. Install the face (see instructions included with the face). 12. Follow the instructions under “Finalizing the Installation”. © Travis Industries 9/22/2020 - 1521 430 EG GSR2...
- Page 63 (250-05396) Log #2 Log #7 (250-05392) (250-05397) (3) Large Log #3 Stones (250-05393) (250-05404) (8) Small Log #4 Stones (250-05394) (250-05404) Left (4L) and Log #5 Right (4R) Log (250-05395) Brackets © Travis Industries 9/22/2020 - 1521 430 EG GSR2...
- Page 64 2. Remove the log grate from the burner tray. The grate is secured by (2) 1/4” screws (one on each side of the grate). Keep the (2) screws and discard the log grate. Top View of Left Side of Burner Remove the screws securing grate to burner © Travis Industries 9/22/2020 - 1521 430 EG GSR2...
- Page 65 4. Place the right log bracket on the lower-left corner of the burner as shown below. The upper portion of the bracket fits over a stud attached to the burner. Secure the lower portion of the bracket to the burner using one of the screws from step 2. © Travis Industries 9/22/2020 - 1521 430 EG GSR2...
- Page 66 6. Place Log #1 as shown below. The two slots on the bottom of the log sit over the pins on the burner. With the rear log in place, push it all the way back Bottom View of Log © Travis Industries 9/22/2020 - 1521 430 EG GSR2...
- Page 67 1 on the bottom. The 2 holes on the back are clearance holes allowing proper fitment over screw heads. The hole on the bottom fits over the stud on the log bracket. © Travis Industries 9/22/2020 - 1521 430 EG GSR2...
- Page 68 The top edge of Log #2 rests in a groove on the left end of Log #1 and should be pushed all the way back. Top edge of Log #2 rests in this groove on Log #1. © Travis Industries 9/22/2020 - 1521 430 EG GSR2...
- Page 69 NOTE: Save some ember chunks for final detailing of the firebox © Travis Industries 9/22/2020 - 1521 430 EG GSR2...
- Page 70 Do not use the entire bag of rockwool. Use only a small amount and save the remainder. Over- use of rockwool will diminish the glow and may cause sooting or other adverse conditions. NOTE: Remove all rockwool from the pilot area (see below). © Travis Industries 9/22/2020 - 1521 430 EG GSR2...
- Page 71 14. Place (3) of the large stones on the Ember-Glo glass. There is no set placement for the large stones. Place them anywhere on the ember-glass bed as long as placement does not interfere with log placement, installing the glass frame assembly or encroaches on the burner creating flame impingement. © Travis Industries 9/22/2020 - 1521 430 EG GSR2...
- Page 72 The lower end of Log #7 rests on the far left branch of Log #5. 17. Add any additional ember chunks and rockwool needed to create a realistic appearance. 18. Return the insert to its proper configuration. © Travis Industries 9/22/2020 - 1521 430 EG GSR2...
- Page 73 Optional Equipment (for qualified installers only) © Travis Industries 9/22/2020 - 1521 430 EG GSR2...
- Page 74 Want to know more? Scan this code with a QR reader on your cell phone or use the URL below to watch a video of how to use the GreenSmart® remote. https://vimeo.com/84052701 © Travis Industries 9/22/2020 - 1521 430 EG GSR2...
Need help?
Do you have a question about the 430 Ember-Glo GSR2 and is the answer not in the manual?
Questions and answers