Ispring RCC7 Installation Instructions & Owner's Manual
Reverse osmosis water filtration systems
Hide thumbs
Also See for RCC7:
- User manual ,
- Installation instructions & owner's manual (28 pages) ,
- Installation instructions & user manual (136 pages)

Related Manuals for Ispring RCC7


Summary of Contents for Ispring RCC7
- Page 1 Reverse Osmosis Water Filtration Systems INSTALLATION INSTRUCTIONS & OWNER’S MANUAL Ver 02/2020 Copyright ©2005-2020 ISPRING WATER SYSTEMS, LLC. All rights reserved.
- Page 2 NSF/ANSI Standard 58 for the reduction of TDS, as verified and substantiated by test data. Please review the attached iSpring RO System WQA Gold Seal Certification or the WQA website for details. Please keep this owner’s manual for future reference.
-
Page 3: Table Of Contents
Step 7: Tubing Hook Up ..................11 Step 8: System Start Up ..................13 Owner's Manual Section 1: iSpring RO System Maintenance ............15 Section 2: Troubleshooting Guide for Newly Installed Systems ......19 Section 3: Glossary and Terms to Know .............. 21 Warranty Warranty ....................... -
Page 4: System Installation
Open the box and remove all of the components. Inspect them to ensure nothing was damaged during shipping. If any part is cracked or broken, please immediately contact iSpring Customer Support for replacement. Identify and get familiar with the components. Note, the RO membrane is a “wet” type, and it is vacuum sealed with pure water. -
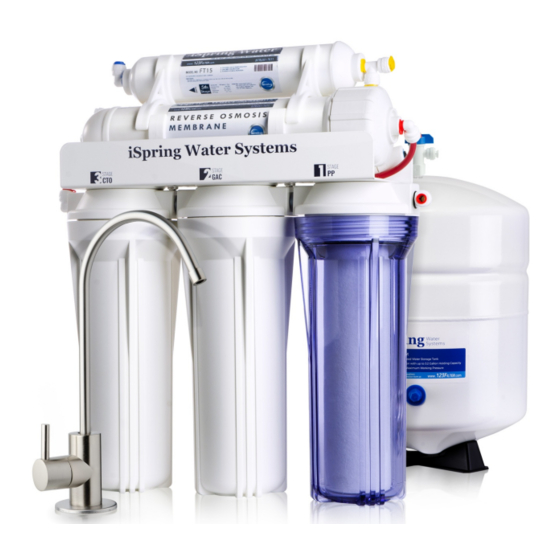
Page 5: Component Identification
Component Identification ‘Wet’ RO Membrane RO Machine Head w/ Pump 3 Pre-Filter Housings and * (membrane not yet installed) (Vacuum sealed in moisture) Cartridges Storage Tank RO faucet with installation kit Feed Water Adapter (AFW43) 4-Color Tubing Set Drain Saddle ¼ Tank Valve Housing Wrenches Plumbers Tape... - Page 6 Understanding the Booster Pump and RO Process 1) Source water enters the system and passes through the stage 1, 2, and 3 pre- filters. Located between the pre-filters is the Low Pressure Switch. This switch turns on when the incoming water pressure is 7 PSI or greater.
-
Page 7: Installation Tips
Installation Tips How to use the Quick-Connect fittings Figure 1 To connect: 1. See Figure 1. Check and cut the tubing end squarely and cleanly with utility knife or scissors. 2. Make a ⅝” mark at the end of the tube so you will be able to confirm when the tube is inserted fully into the fitting. - Page 8 To disconnect: 1. See Figures 2 and 3. Remove the blue lock clip from the fitting. 2. With the blue lock clip removed, use your thumb and index finger to hold down the lock sleeve. This will release the metal teeth holding the tube in place. While holding the lock sleeve down with that hand, use your other hand to remove the tube from the fitting.
-
Page 9: Installation Steps
Installation Steps Before you begin the installation, it is highly recommended that you watch the video “iSpring Reverse Osmosis Installation” on YouTube. Note: If you plan on mounting/hanging the system, it is highly recommended to include supports under each of the bottom three housings. Supports under the housings will take the water weight off the housing threads, and ensure the thread strength does not decay over the years. -
Page 10: Step 1: Installing The Feed Water Adapter
Step 1: Installing the Feed Water Adapter (AFW43) (The bushing can convert 3/8” comp. to ½” NPT. Refer to AFW43 user manual) 1.1 See Figure 5. Turn off the Cold Water Line via the Cold Water Supply Valve (CWSV) under the sink. Open the kitchen faucet to release any pressure and make sure the water has stopped before proceeding to the next step. -
Page 11: Step 3: Installing The Drain Saddle
Note: The installation instructions below are for your reference only. An air gap faucet is not included with this system. • Drill a hole in the kitchen sink or countertop if there isn't already a spare one. Refer to the manual of the faucet when determining the size. -
Page 12: Step 4: Installing The Vertical Filters: Stages 1, 2, And 3
Step 4: Installing the Vertical Filters: Stages 1, 2, and 3 4.1 Make sure the O-ring is seated inside the groove on top of the filter housing. (Figure 10). A light amount of food-grade silicone jelly may be used to help the O-ring seal better, but is not required. -
Page 13: Step 7: Tubing Hook Up
6.5 Before twisting the housing cap back on, make sure the O-ring is seated at the end of the membrane housing as shown in figures 8 and 9. This is very important to avoid leaking and damage to the O-ring. 6.6 Place the membrane housing cap back on and hand tighten it, then use the housing wrench to tighten it another ¼-½”... -
Page 14: Step 8: System Start Up
7.1 See figure Sample Installation and figures of system top view, and note connection points A-B, C-D, E-F, and G-H. 7.2 Facing the front of the system, 1st stage is the see through housing located on the right hand side. Connect the tubing Feed Water Adapter (AFW43) (point A) to the stage 1 elbow fitting (point B). - Page 15 8.9 The TDS (total dissolved solids) of the water should be tested periodically to verify that the system is performing properly. iSpring RO systems have earned WQA GOLD SEAL by exceeding the minimum requirements for NSF/ANSI standard 58 and should be giving an average TDS reduction rate of 90%+, so if your tap water is 100ppm you should be getting 10ppm or less from the RO water (200/20>, 400/40>...
-
Page 16: Owner's Manual
Section 1: iSpring RO System Maintenance All iSpring RO systems are designed with ease of use and low maintenance in mind. If the filter cartridges are changed on schedule as suggested, the system will work properly for years to come. - Page 17 Note: Stages 6 and/or 7 only exist on certain models. Stage 1 – 3 Pre-Filters Replace every 6 months or sooner if you notice a decrease in water flow or quality. The replacement frequency depends on your water usage and source water quality. To protect the RO membrane from chlorine and other damaging contaminants, it is important to change the pre-filters according to schedule.
- Page 18 How to Change the Reverse Osmosis Membrane Figure 11 Figure 12 1. The RO membrane typically lasts about 2 – 3 years. The membrane life span depends on the source water quality, your water usage, and how often the three pre-filters are replaced. To ensure the system’s performance and water purity, it is important to replace the pre-filter cartridges on schedule.
- Page 19 Optional Add-Ons Ice Maker Kit (ICEK) The Ice Maker Kit (model#: iSpring ICEK) can be purchased separately to feed RO water to your refrigerator for crystal clear ice cubes and great tasting water. If you choose to hook up the system to your refrigerator output, it can take the place of primary output over the RO faucet.
-
Page 20: Section 2: Troubleshooting Guide For Newly Installed Systems
Section 2: Troubleshooting Guide for Newly Installed Systems w/ Booster Pump Zero output water from RO faucet Water supply is closed. Open the water supply to the system so the valve is in line with the red tubing. Incorrect installation. Verify all tubing connections. The pump is not running, therefore not allowing water through. - Page 21 There should be at least 8-10 wraps of Teflon tape to ensure a proper seal. If you have done this and it continues to leak, contact iSpring customer support for a replacement. Water from the system tastes the same as tap water Incorrect installation.
-
Page 22: Section 3: Glossary And Terms To Know
Auto Flush Solenoid Valve (#ASOF7): Automatically flushes the RO membrane to preserve membrane life and efficiency Booster Pump (#PMP5): 24 volt booster pump used by residential iSpring RO systems Check Valve (#ACV1K): One way valve that does not allow water back into the membrane housing. Looks like a standard elbow fitting and is located on the RO water port of the membrane housing CTO Carbon Block Filter (#FC15): 3rd stage. - Page 23 TDS Meter (#TDS3): Handheld meter used to measure water quality Transformer for Booster Pump (#ATRF5): Power supply used for the PMP5 booster pump on residential iSpring RO systems Tubing (#T14B / #T14W): ¼” food grade tubing used on the system UV Replacement Bulb* (#UVB11): Replacement bulb for the UV filter UV Transformer/Ballast* (#UVT11A/UVT11B): Power supply for the UV filter.
-
Page 24: Warranty
Warranty This Limited Warranty extends to the original purchaser of the system only. This warranty covers all Manufacturer- supplied items only that prove to be defective in material, workmanship, or factory preparation. This warranty covers parts only; all labor is excluded from this warranty, including, but not limited to, services related to the removal, replacement, installation, adjustment, maintenance, and/or repair of the unit or its components items. -
Page 25: Warranty Registration
Warranty Registration 123filter.com To register your product for the warranty, visit our website at and go to the “Warranty Registration” tab. We provide a 30-day money back guarantee, a 1 year manufacturer warranty, and lifetime tech support for all of our products. However, we do not have the order information from websites other than 123Filter.com (Amazon, Home Depot, etc.), so please be sure to fill in that information upon registration of your system. - Page 27 3020 Trotters Parkway Alpharetta, GA 30004, USA 123Filter.com For questions, comments, or technical support, please contact us support@123filter.com (678) 261-7611 Monday-Friday 8:30 a.m. - 5:30 p.m. EST...
Need help?
Do you have a question about the RCC7 and is the answer not in the manual?
Questions and answers