Table of Contents
Advertisement
Advertisement
Table of Contents

Subscribe to Our Youtube Channel
Related Manuals for EPH Controls IMC


Summary of Contents for EPH Controls IMC
- Page 1 Immersion Controller Installation and Operation Guide...
-
Page 2: Table Of Contents
Table of contents Installation Instructions Factory Default Settings Speci cations LCD Symbol / Button Description Mounting & Installation Installation Drawing Wiring Operating Instructions Setting the date & time and programming mode Operating Switch Programming Modes Factory Program Settings Programming Timed Mode Keypad Lock Function Menu Function P01 - Backlight Function... -
Page 3: Installation Instructions
Installation Instructions... -
Page 4: Factory Default Settings
Factory Default Settings RFRP-OT Room Thermostat Clock: 24 hour Daylight saving: Backlight: Auto Keypad lock: PIN lock: Programming mode:... -
Page 5: Speci Cations
Speci cations Power supply: 230Vac 50-60Hz Power consumption: 10mA Ambient temperature: 0…45°C Admissible ambient humidity: 5-95%RH Dimensions: 170 x 116 x 63 mm Contact rating: 13A / 250Vac Program memory backup: Internal Battery: LIR 2032 Backlight : White IP rating: IP20 Pollution degree: Pollution Degree 2... -
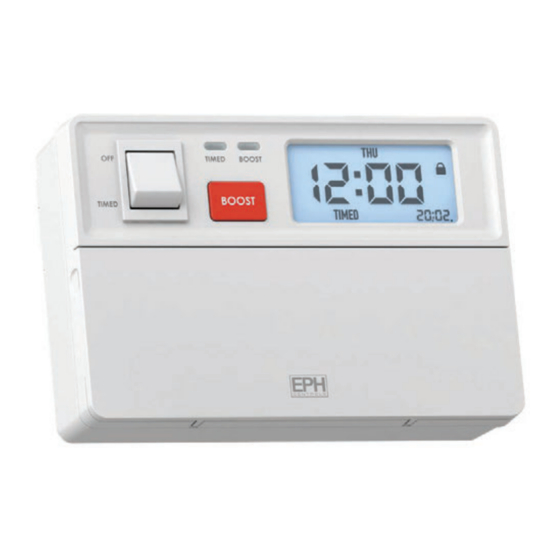
Page 6: Lcd Symbol / Button Description
LCD Symbol / Button Description LCD Display Current day of the week Keypad Lock (Solid) Time PIN Lock (Flashing) Holiday Mode Date / Program setting is enabled Timed Mode Boost Mode Holiday is enabled is active end date Button Description Timed Mode Boost Mode Indicator... -
Page 7: Mounting & Installation
Isolate mains supply before commencing installation and ensure the unit is properly earthed The IMC is supplied with its own surface mounting box, which can be mounted over a single or double gang ush wall box. It should not be mounted on an unearthed metal surface. - Page 8 Use a cable with a minimum conductor size of 1.5mm for a 3kW heater to connect the element(s) ƒ to the IMC controller. When wiring is complete ensure that all terminal screws, including the earth terminal screws are ƒ securely tightened.
-
Page 9: Installation Drawing
Installation Drawing 169.50 Immersion Controller... -
Page 10: Wiring
Wiring Timed Boost Peak Load Load Mains Supply Caution! Mains voltage output only ƒ Terminal Connections Terminal 1 Live In Terminal 2 Neutral In Terminal 3 Neutral Out Terminal 4 Boost Load Terminal 5 Timed / O Peak Load... - Page 11 Connect the short element (Boost Load) to Terminal 4. Connect the long element (Timed/O Peak Load) to Terminal 5. Note: The 3 core exible cable from the immersion heater to the IMC controller should be heat resistant ƒ and rated to 85˚C.
-
Page 12: Operating Instructions
Operating Instructions... -
Page 13: Setting The Date, Time And Programming Mode
Setting the date, time and programming mode Press once, the year will begin ashing. Press to select the year. Press Press to select the month. Press Press to select the day. Press Press to select the hour. Press Press to select the minute. Press Press to adjust from 24H to 5/2 day... -
Page 14: Operating Switch
Operating Switch This function allows you to change the operating mode of the controller. There are two selections ‘OFF’ and ‘Timed’ . Setting Controller to OFF Use the Operating Switch to set the controller to OFF. The controller will not operate when the switch is set to OFF. Setting Controller to TIMED Use the Operating Switch to set the controller to TIMED. -
Page 15: Programming Modes
Programming Modes The IMC Controller has the following the following programming modes available: 24 Hour mode Programming all 7 days as one block with the same times. 5/2 Day mode Programing Monday to Friday as one block and Saturday and Sunday as a 2nd block. -
Page 16: Factory Program Settings
Factory Program Setting 24 Hour P1 ON P1 OFF P2 ON P2 OFF P3 ON P3 OFF Everyday 02:15 07:15 12:00 12:00 18:00 18:00 5/2 Day P1 ON P1 OFF P2 ON P2 OFF P3 ON P3 OFF Mon-Fri 02:15 07:15 12:00 12:00... -
Page 17: Programming Timed Mode
Programming Timed Mode Adjusting the program settings in 24H Mode There are three On/O times per day possible, represented by P1, P2 and P3. Press the once. The day(s) of the week being programmed will appear at the top of the screen, the di erent modes (5/2 d, 7 d &... - Page 18 Programming Timed Mode (Continued) Adjusting the program settings in 5/2D Mode Press the once. MON – FRI will appear at the top of the screen. Press to adjust the P1 ON time. Press Press to adjust the P1 OFF time. Press Repeat this process for P2 and P3 On / O times.
- Page 19 Adjusting the program settings in 7D Mode Press the once. MON will appear at the top of the screen. Press to adjust the P1 ON time. Press Press to adjust the P1 OFF time. Press Repeat this process for P2 and P3 On / O times. TUE will appear on the screen, repeat this process for the remaining days of the week.
-
Page 20: Keypad Lock Function
Keypad Lock Function Unlocked The Keypad Lock function allows the user to prevent changes being made by disabling the buttons. Locking the keypad To lock the keypad, press and hold both the together for 10 seconds. will appear on the screen. Keypad is now locked. Unlocking the keypad To unlock the keypad, press and hold both the together for 10... -
Page 21: Menu Function
Menu Function This menu allows the user to adjust additional functions on the controller. P01 - Backlight Function Auto There are two settings for selection, the factory default setting is AUTO. AUTO: On pressing any button the backlight stays on for 10 seconds. Backlight is permanently ON. -
Page 22: P02 - Backlight Function
Menu Function (Continued) P02 - Holiday Function This function lets the user set the controller to the o position for a set duration. To access the Holiday function. Press ‘P01’ will be ashing on the screen. Press ‘P02’ will be ashing on the screen. Press ‘HOLIDAY’... -
Page 23: P03 - Pin Lock
P03 - PIN lock The PIN lock function lets the user lock the controller with a PIN number to prevent changes to the programming. To access the PIN lock function. Press ‘P01’ will be ashing on the screen. Press ‘P02’ will be ashing on the screen. Press ‘P03’... - Page 24 Menu Function P03 - PIN lock (Continued) ‘COnF’ will appear on the screen, the user needs to re-enter the PIN to con rm. Enter your PIN number again by using Note When the PIN is con rmed, the PIN lock is activated immediately. ƒ...
-
Page 25: P05 - Reset Function
P05 - Reset Function The Reset function lets the user reset the controller to factory default settings. Press ‘P01’ will be ashing on the screen. to scroll to ‘P05’ . Press ‘No’ and ‘rst’ will appear on the screen. to scroll to ‘YES’ . Press Device will now restart and revert to its original factory settings. - Page 26 Notes...
- Page 27 Notes Immersion Controller...
- Page 28 EPH Controls IE sales@ephcontrols.com www.ephcontrols.com T +353 21 434 6238 F +353 21 454 5890 EPH Controls UK sales@ephcontrols.com www.ephcontrols.com T +44 1933 626 396 F +44 1933 626 218...
Need help?
Do you have a question about the IMC and is the answer not in the manual?
Questions and answers
Hi i forgot pin to my controller is any chance to reset some how ?
To reset the PIN on an EPH Controls IMC controller, follow these steps to perform a factory reset, which will remove the PIN:
1. Press the button until ‘P01’ flashes on the screen.
2. Use the arrow buttons to scroll to ‘P05’.
3. Press the button again. ‘No’ and ‘rst’ will appear on the screen.
4. Use the arrow buttons to scroll to ‘YES’.
5. Press the button to confirm.
The device will restart and return to its factory default settings, including removal of the current PIN.
This answer is automatically generated