Table of Contents
Advertisement
Quick Links
Advertisement
Table of Contents

Subscribe to Our Youtube Channel
Related Manuals for EPH Controls RF16


Summary of Contents for EPH Controls RF16
- Page 1 RF16 16 Zone RF Controller Installation and Operating Guide...
-
Page 2: Table Of Contents
Wiring Diagram Speci cations Mounting & Installation LCD Display Operating Instructions Quick introduction to your RF16 Controller How your programmable eTRV and eTRV-HW works Setting the Date, Time and Programming Mode Programming Modes Factory Program Settings Adjust the Program Setting in 5/2 Day Mode... - Page 3 Master Reset Menu P01 ’rF Cn’ Connecting an eTRV or eTRV-HW to the RF16 Controller P02 ‘gAtE’ Connecting the Gateway to the RF16 Controller P03 ‘HOL’ Holiday Mode P04 ‘bL’ Backlight Mode Selection P05 ‘bStL’ Boost Levels P06 ‘rFdn’ Disconnecting an eTRV from the RF16 Controller P07 PIN Lock P08 ‘SEIZ’...
-
Page 4: Installation Instructions
16 Zone RF Controller Installation Instructions... -
Page 5: Important Notes
The eTRV and eTRV-HW detect temperature and communicate on cycles every 4 minutes to conserve battery power. When buttons are pressed on the eTRV and eTRV-HW it will save these changes but may not communicate immediately to the RF16. It will communicate these changes on the next communication cycle. -
Page 6: Factory Default Settings
0…50˚C Pollution degree: 2 (Resistance to voltage Dimensions: 142 x 95 x 27.8 mm surge 2000V; as per Contact Rating: 5(1)A EN60730) Backlight: White Software Class: Class A IP Rating: IP20 Frequency: 868.35 MHz Battery: 3VDC Lithium LIR2032 RF16 Controller... -
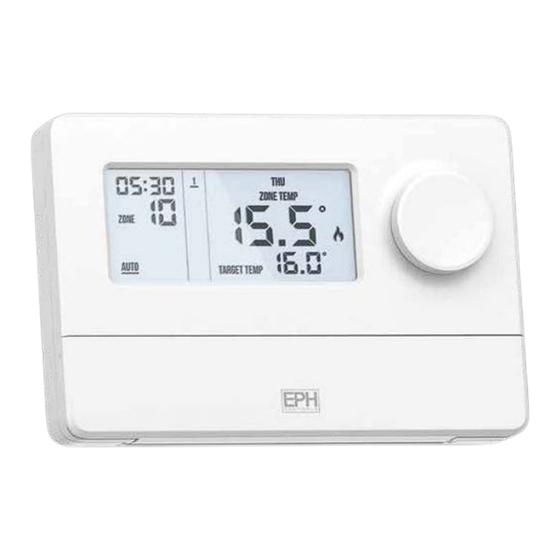
Page 7: Lcd Display
LCD Display Displays current time. Displays when a zone is calling for heat. Displays current program. Displays current Target temperature. Displays current day. Displays current mode. Displays zone temperature. Displays current zone. EPH Controls Ltd. -
Page 8: Button Description
Button Description Button Description Hand Wheel Menu Button Boost button BOOST • Master Reset Mode Button MODE Copy Button COPY Program Button Time Button PROG TIME RF16 Controller... -
Page 9: Wiring Diagram
Wiring Diagram 200-240Vac CONTACT RATING: 250Vac~/7A 50Hz-60Hz If mains voltage output is required, terminal L & 1 must be electrically linked. The cable link is provided with this controller. EPH Controls Ltd. -
Page 10: Mounting & Installation
Prior to setting the controller, it is necessary to complete all required settings described in this ƒ section. Before commencing installation, the controller must be rst disconnected from the mains. ƒ This RF16 can be surface mounted or mounted to a recessed conduit box. 34.5 27.8 RF16 Controller... - Page 11 EPH Controls Ltd.
- Page 12 Wire the backplate as per the wiring diagram on page 7. Sit the RF16 onto the backplate making sure the controller pins and the backplate contacts are making a sound connection, push the controller ush to the surface and tighten the screws of the backplate from the bottom.
- Page 13 16 Zone RF Controller Operating Instructions...
- Page 14 Quick introduction to your RF16 Controller The EPH RF16 is a central controller for the eTRV range. It will allow a wireless connection of up to 16 eTRV or eTRV-HW and allow the user to control and program these products.
- Page 15 60˚C. - See Page 30 for instructions on how to set the boost and hot water temperatures. MANUAL mode: The eTRV & eTRV-HW will constantly work to the temperature that has been set. OFF mode: The eTRV & eTRV-HW will be OFF, Frost protection will be active in this mode. EPH Controls Ltd.
- Page 16 5/2d to 7d or 24h mode. Press Rotate to turn DST (Day Light Saving time) ON or OFF. Rotate Press MENU and the controller will return to normal operation. Note: Please see page 15 for descriptions of Programming Modes. RF16 Controller...
- Page 17 5/2 Day mode Programming Monday to Friday as one block and Saturday and Sunday as a 2nd block of days. 7 Day mode Programming all 7 days individually. 24 Hour mode Programming all 7 days as one block. EPH Controls Ltd.
- Page 18 14:00 17:30 22:00 Mon-Fri 21˚C 10˚C 10˚C 10˚C 21˚C 10˚C 07:30 10:00 12:00 14:00 17:30 23:00 Sat-Sun 21˚C 10˚C 10˚C 10˚C 21˚C 10˚C 24 Hour 06:30 08:00 12:00 14:00 17:30 22:00 Everyday 21˚C 10˚C 10˚C 10˚C 21˚C 10˚C RF16 Controller...
- Page 19 1. To change from 5/2d to 7D or 24H programming, refer to page 14, Setting the Date, Time and Programming mode. 2. If you don’t wish to use one or more of the daily programs then simply set the temperature to a low level as per default setting on P3 & P4 as shown on Page 16. EPH Controls Ltd.
- Page 20 Rotate to select ON or OFF. Press Repeat this process to adjust P2 to P6 times. Press to return to normal operation. MENU Note: 1. Temperature for the hot water zone can only be set on the eTRV-HW. RF16 Controller...
- Page 21 Reviewing the Program Settings Press PROG Rotate to view zones and press to select. Press to jump to the next program. PROG Press to jump to the next day (block of days). TIME Press to return to normal operation. MENU EPH Controls Ltd.
- Page 22 Copy Function The RF16 can copy the programs from a zone to another zone and it can also copy from one day to another in the programming menu when set to 7d mode. 1. To Copy programs from a zone to another zone: Press to enter the programming mode.
- Page 23 The day will appear solid on the screen. To skip this day rotate to the left. The day will disappear from the screen. Press and the selected days will be copied. You will return to normal operation. EPH Controls Ltd.
- Page 24 A line will appear under the mode, AUTO, OFF or MAN will show on the screen, Rotate to select the required mode. Press to select. You will return to select another zone. Press to exit at any point. RF16 Controller...
- Page 25 To deactivate a zone that is boosting Rotate to the zone and press BOOST To deactivate all zones that are boosting Press MODE and select ALL zones by pressing Rotate to change the mode to AUTO, OFF or MAN. Press to con rm. EPH Controls Ltd.
-
Page 26: Master Reset
(see page 6) Use a ballpoint pen to press the Master Reset button and release it. The controller will reboot. The controller will restart and revert to its factory de ned settings. Note: The paired eTRV/ eTRV-HW will stay connected. RF16 Controller... -
Page 27: Menu
This menu allows the user to adjust additional functions. To access the menu, press MENU P01 ‘rF Cn’ Connecting an eTRV or eTRV-HW to the RF16 Controller Note: The GW04 should be connected before pairing the eTRV / eTRV-HW see page 27. - Page 28 Menu continued P01 ‘rF Cn’ Connecting an eTRV or eTRV-HW to the RF16 Controller On the eTRV / eTRV-HW: Press and hold for 5 seconds. ‘nOE’ will appear on the screen followed by ‘ - - ’ The eTRV will display ‘r ‘ followed by the zone number.
-
Page 29: P02 'Gate' Connecting The Gateway To The Rf16 Controller
‘P02 & gAtE’ appears on the screen. Press to select. ‘CONNECT’ will ash on the screen momentarily and the RF16 will return to normal operation. The GW04 and RF16 will now pair. The white light on the GW04 will stop ashing and will become solid. -
Page 30: P03 'Hol' Holiday Mode
‘TO’ and the date and time will appear on the screen. The year will begin to ash. Rotate to adjust the year. Press Rotate to adjust the month. Press Rotate to adjust the day. Press Rotate to adjust the hour. Press RF16 Controller... -
Page 31: P04 'Bl' Backlight Mode Selection
, ‘P01 & rF Cn’ will appear on the screen. Rotate until ‘P04 & BL’ appears on the screen. Press Rotate to select between ON, OFF or Auto. Press to con rm selection and return to normal operation. EPH Controls Ltd. -
Page 32: P05 'Bstl' Boost Levels
, ‘P01 & rF Cn’ will appear on the screen. Rotate until ‘P05 & bS tL’ appears on the screen. Press Rotate to select ‘Htg’ or ‘HOt’ . Press Rotate to select the required default temperature for boost. Press Press to return to normal operation. MENU RF16 Controller... -
Page 33: P06 'Rfdn' Disconnecting An Etrv From The Rf16 Controller
P06 ‘rFdn’ Disconnecting an eTRV from the RF16 Controller To Disconnect all zones: To Disconnect individual zones: MENU , ‘P01 & rF Cn’ will appear on the screen. MENU , ‘P01 & rF Cn’ will appear on the screen. Press... -
Page 34: P07 Pin Lock
If the veri cation PIN is entered incorrectly the user is brought back to the rst digit. When the PIN lock is active the Lock symbol will ash every second on the screen. When the RF16 is PIN locked, pressing the menu will take the user to the PIN unlock screen. RF16 Controller... - Page 35 ‘P06 & PIn’ appears on the screen. Press ‘ON’ will appear on the screen. Rotate to select ‘OFF’ . Press ‘0000’ will ash on the screen. Enter the PIN. Press The PIN is now disabled. Press to return to normal operation. MENU EPH Controls Ltd.
-
Page 36: P08 'Seiz' Anti Seize Function
, ‘P01 & rF Cn’ will appear on the screen. Press Rotate until ‘P08 & SEIZ’ appears on the screen. Press to select. Rotate to select ON or OFF. Press to con rm selection and return to normal operation. RF16 Controller... -
Page 37: P09 'Frst' Frost Protection
When an eTRV or eTRV-HW is set to the OFF mode and the temperature of the eTRV or eTRV-HW drops below 5°C then the zone will activate until the temperature reaches 5°C. will be displayed on the RF16, it will only show on the speci c zone which has dropped below 5°C. MENU , ‘P01 &... -
Page 38: P10 'Ot' Opentherm® Menu
Menu continued P10 ‘Ot’ OpenTherm® Menu If OpenTherm® is connected, the OpenTherm® menu will display automatically. Setting DHW temperature DHOP OpenTherm® Information Set OpenTherm® Parameters Exit RF16 Controller... -
Page 39: Dhop
This menu allows the installer to change the DHW temperature of the boiler. The temperature can be set in 0.5°C increments by rotating Press to select the desired temperature. This menu is only available when the controller is connected to OpenTherm® and dHOP is ON. EPH Controls Ltd. -
Page 40: Opentherm® Information
Flue gas temperature Dependent on boiler tESt Outdoor temperature Dependent on boiler nOdU Modulation percentage FLOr Water ow This is only visible if DHOP is On (P09 OT Installer menu) HOUr Burner on time PrES Water pressure Dependent on boiler RF16 Controller... -
Page 41: Set Opentherm® Parameters
This is the target setpoint for your CH ow temperature. HHbO t-5 >=ID57 85˚C Note: this value must be within the range of HHCH and LLCH. >=LLCH Min Exit Press OK button to turn back to main interface. EPH Controls Ltd. -
Page 42: Exit
Menu continued P09 Installer menu OpenTherm® Instructions Set OpenTherm® Parameters Climatic Curve Exit Press to exit menu. Press at anytime to return to normal operation. MENU RF16 Controller... -
Page 43: P11 'Rst' Resetting The Rf16 Controller
‘P11 & rSt’ appears on the screen. Press ‘nO’ will ash on the screen. Rotate until ‘YES’ ashes on screen. Press The RF16 will reset to factory default. Note: The paired eTRV / eTRV-HW will stay connected. EPH Controls Ltd. - Page 44 EPH Controls IE technical@ephcontrols.com www.ephcontrols.com/contact-us +353 21 471 8440 Cork, T12 W665 EPH Controls UK technical@ephcontrols.co.uk www.ephcontrols.co.uk/contact-us +44 1933 322 072 Harrow, HA1 1BD...
Need help?
Do you have a question about the RF16 and is the answer not in the manual?
Questions and answers