
Related Manuals for Bioneer ExiPrep 16 Plus


Summary of Contents for Bioneer ExiPrep 16 Plus
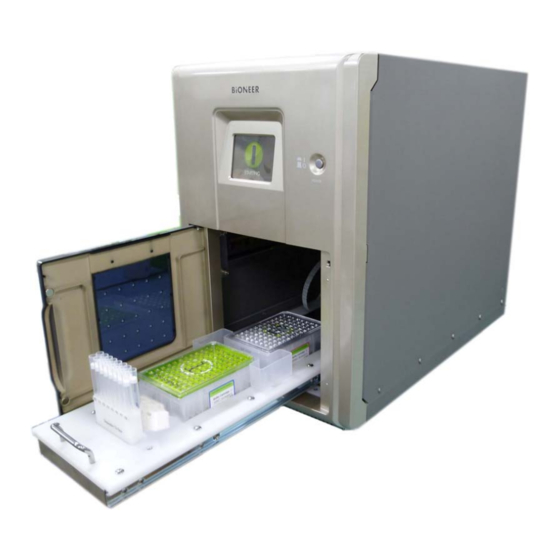
- Page 1 User Manual (Ver. 1.1) ExiPrep™16 Plus Fully Automated Nucleic Acid Extraction System...
-
Page 2: Table Of Contents
Controlling System Configuration ..........................23 Administrator Management .............................. 24 ExiPrep VII. Updating the 16 Plus ....................... 26 VIII. DNA/ RNA Extraction Program Number List ..................29 Troubleshooting ............................33 Warranty ..............................37 Copyright © 2010 by Bioneer Corporation. All rights reserved. -
Page 3: Getting Started
Bioneer Corporation. ▪ Bioneer Corporation reserves the right to alter, modify and otherwise make changes to the instrument and manuals without prior notice. ▪ You must be used carefully UV Lamp. Detail can be found in Safety warning and Precautions. -
Page 4: Safety Warnings And Precautions
II. Safety Warnings and Precautions The warnings and precautions stated below are for the correct and safe operation of the instrument. Please heed all information for your safety. Bioneer Corporation does not assume responsibility for non-compliance with the safety warnings and precautions stated below. - Page 5 ExiPrep 16 Plus Fully Automated Nucleic Acid Extraction System 8) Do not install near sources of flammable or corrosive gas. If there is a gas leak, do not touch the power plug but open a window to circulate fresh air. Sparks from the power plug can cause fire and explosions.
- Page 6 ExiPrep 16 Plus Fully Automated Nucleic Acid Extraction System Do not use powerful detergents or solvents to clean the outside of the instrument as this may cause discoloration. If such chemicals are spilled on the instrument, immediately clean with a soft cloth. Do not keep the instrument in an environment with high humidity.
-
Page 7: System Components And Specifications
ExiPrep 16 Plus Fully Automated Nucleic Acid Extraction System III. System Components and Specifications 1. System Components Part Name Cat. No. Qty. Check □ ExiPrep™16 Plus A-5030 1 ea □ User’s manual 1 ea □ Waste tray 1 ea □ Elution tube rack 1 ea □... -
Page 8: Specifications
ExiPrep 16 Plus Fully Automated Nucleic Acid Extraction System 2. Specifications Dimensions (mm) 320 (W) x 487 (H) x 535 (D) Weight 22 kg Operating temperature 15 – 30°C Operating humidity 20 - 80%, no condensation Operating system Stand-alone Electrical (Voltage / Frequency) 100-240 V, 50/60 Hz Network support TCP/IP protocol... -
Page 9: Installing The Exiprep™16 Plus
ExiPrep 16 Plus Fully Automated Nucleic Acid Extraction System IV. Installing the ExiPrep™16 Plus - Clean the area where the ExiPrep™16 Plus will be installed. - Open the instrument door and remove the tie wrap from the belt. - Make sure that all components are included. Refer to the list of components on page 1. - Page 10 8. Open the door and remove the Sponge block (F) from the Base Plate after initialization. ※ If the instrument does not start even when power was supplied properly but initialization does not complete in approximately 5 minutes, please contact Customer Service or your local Bioneer distributor immediately.
-
Page 11: Dna/ Rna Extraction
ExiPrep 16 Plus Fully Automated Nucleic Acid Extraction System DNA/ RNA Extraction 1. Contamination shield installation From the ‘Menu’ screen, click ‘MISC SET’. Pull out the Syringe block all the way front (outside) Contamination shield. CAUTION! In order to use contamination shield, this must be installed on the Base plate accessory. -
Page 12: Sample Preparation
ExiPrep 16 Plus Fully Automated Nucleic Acid Extraction System V. DNA/ RNA Extraction (continued) 2. Sample Preparation 1. Set the Setup Tray (A) on a flat laboratory surface. 2. Insert the Elution Tube Rack (B), Disposable Tip Rack (C), and Buffer Cartridge ① (D) into the Setup Tray. The Elution Tube Rack and Disposable Tip Rack are included with the instrument. - Page 13 ExiPrep 16 Plus Fully Automated Nucleic Acid Extraction System V. DNA/ RNA Extraction (continued) 2. Sample Preparation (continued) 5. Punch holes in the sealing film of Buffer Cartridge ① corresponding to the relative location and number of tubes and tips, using the 6-Hole punch tool. 6.
-
Page 14: Run
ExiPrep 16 Plus Fully Automated Nucleic Acid Extraction System V. DNA/ RNA Extraction (continued) 3. RUN 1. Press the ‘START’ button to access the PREP SETUP screen. 2. Refer to the code list within this Manual or purchased Kit Manual to select the three-digit code applicable to your desired nucleic acid and sample source type. - Page 15 ExiPrep 16 Plus Fully Automated Nucleic Acid Extraction System ※ Setup process according to the CHECK LIST 8a. Insert Buffer Cartridge ② on the Base plate. Make sure the Buffer Cartridge fits snugly and exactly into its place. Misplacement of the Buffer Cartridge may result in instrument break down and malfunction.
- Page 16 ExiPrep 16 Plus Fully Automated Nucleic Acid Extraction System V. DNA/ RNA Extraction (continued) 3. RUN (continued) 9. Verify the name of the target nucleic acid type and sample source type (two-letter code: XX/XX) on the Running Mode screen, and press the ‘RUN’ button. Progress of the extraction run can be checked through the progress bar on the lower portion of the LCD touchscreen.
-
Page 17: Exiprep™16 Plus Setup
Once the initialization has completed successfully, the LCD touchscreen will display the MENU as shown below. Please contact Bioneer Customer Service or your local sales representative if the initialization progress bar does not change for over 5 minutes during initialization or if the MENU screen does not appear after initialization. - Page 18 ExiPrep 16 Plus Fully Automated Nucleic Acid Extraction System VI. ExiPrep 16 Plus Setup (continued) 1. Main Menu (continued) 1) PREP SETUP MENU screen PREP SETUP screen Selecting ‘Start’ from the Main Menu will bring up the ‘PREP SETUP’ screen where you can enter the three-digit code for the extraction and sample source type.
- Page 19 ExiPrep 16 Plus Fully Automated Nucleic Acid Extraction System VI. ExiPrep 16 Plus Setup (continued) 1. Main Menu (continued) 2) UV sterilization (UV lamp) Main Menu screen UV Sterilization screen Use the built-in UV-lamp to sterilize the internal cavity of the instrument. Press the ‘UV lamp’...
- Page 20 ExiPrep 16 Plus Fully Automated Nucleic Acid Extraction System VI. ExiPrep 16 Plus Setup (continued) 1. Main Menu (continued) 3) System setup menu (SETUP) Main Menu Screen Setup Screen Description Icon User registration menu You may create new accounts through this menu. Details on account creation can be found in page System configuration menu...
-
Page 21: Registering A New User
ExiPrep 16 Plus Fully Automated Nucleic Acid Extraction System VI. ExiPrep 16 Plus Setup (continued) 2. Registering a New User ExiPrep 16 Plus provides a user login option restricting the use of the instrument to registered users only. Enabling the user login option will limit non-user access to the instrument. Do not forget your user ID if you have enabled the user login option Press the ‘Setup’... -
Page 22: Viewing Run History
ExiPrep 16 Plus Fully Automated Nucleic Acid Extraction System VI. ExiPrep 16 Plus Setup (continued) 3. Viewing Run History If the login option is enabled, the user ID, process type and run status of each run is saved. Up to 99 most recent runs are saved in memory. -
Page 23: Managing The Login Mode
ExiPrep 16 Plus Fully Automated Nucleic Acid Extraction System VI. ExiPrep 16 Plus Setup (continued) 4. Managing the Login Mode The instrument provides a login mode for restricting non-registered use. Without a user ID, you would have limited access to instrument functions. Do not forget your user ID. Press the ‘Setup’... -
Page 24: Managing The Automatic Uv-Sterilization Mode
ExiPrep 16 Plus Fully Automated Nucleic Acid Extraction System VI. ExiPrep 16 Plus Setup (continued) 5. Managing the Automatic UV-Sterilization Mode The instrument provides an automatic UV-Sterilization mode to sterilize the instrument after every DNA/ RNA extraction run. Press the ‘Setup’ button to access the SETUP menu. Press the ‘Config’... -
Page 25: Controlling System Configuration
ExiPrep 16 Plus Fully Automated Nucleic Acid Extraction System VI. ExiPrep 16 Plus SETUP (Continued) 6. Controlling System Configuration Only the single user with a registered administrator ID is able to configure the system. Do not forget the administrator ID. Press the ‘Config’... -
Page 26: Administrator Management
ExiPrep 16 Plus Fully Automated Nucleic Acid Extraction System VI. ExiPrep 16 Plus Setup (continued) 7. Administrator Management 1. Press the ‘Admin’ button from the System Config menu to access the Admin Access menu. Enter the 6-digit administrator ID using the keypad on the LCD touchscreen. - Page 27 ExiPrep 16 Plus Fully Automated Nucleic Acid Extraction System VI. ExiPrep 16 Plus Setup (continued) 7. Administrator Management (continued) Administrator ID change menu Enter a new 6-digit administrator ID using the keypad in the middle of LCD touch screen and press ‘Enter’ button to save. Press the ‘ok’...
-
Page 28: Updating The Exiprep Tm 16 Plus
16 Plus Improve the functions of the instrument or install the up-to-date protocol for DNA/ RNA extraction. Please refer to the FAQ in Bioneer homepage or contact Bioneer Service Center if updating does not progress or you have the questions. - Page 29 ExiPrep 16 Plus Fully Automated Nucleic Acid Extraction System VII. Updating the ExiPrep 16 Plus (continued) If the connection fails, the ‘connect fail’ prompt will be displayed. In this case, reboot the instrument and network hub, and verify that the network cable is connected correctly.
- Page 30 ExiPrep 16 Plus Fully Automated Nucleic Acid Extraction System ※ If the PC fails to connect to the instrument, try the following steps. Select ‘Local Area Connection’ from the control panel. Right-click the connection and select ‘Properties’. iii. Select ‘Internet Protocol (TCP/IP)’. iv.
-
Page 31: Dna/ Rna Extraction Program Number List
ExiPrep 16 Plus Fully Automated Nucleic Acid Extraction System VIII. DNA/ RNA Extraction Program Number List Target Sample source Target Sample source 1 01 Genomic DNA Whole blood 2 01 Total RNA Whole blood 1 02 Genomic DNA Animal tissue 2 02 Total RNA Animal tissue... - Page 32 ExiPrep 16 Plus Fully Automated Nucleic Acid Extraction System <continued> Target Sample source Target Sample source 3 01 mRNA Whole blood 4 01 viral DNA Whole blood 3 02 mRNA Animal tissue 4 02 viral DNA Animal tissue 3 03 mRNA FFPE tissue 4 03...
- Page 33 ExiPrep 16 Plus Fully Automated Nucleic Acid Extraction System <continued> Target Sample source Target Sample source 5 01 viral RNA Whole blood 6 01 viral DNA/ RNA Whole blood 5 02 viral RNA Animal tissue 6 02 viral DNA/ RNA Animal tissue 5 03 viral RNA...
- Page 34 ExiPrep 16 Plus Fully Automated Nucleic Acid Extraction System <continue> Target Sample source Target Sample source 7 01 Plasmid DNA endA(+) strain 9 01 Protein His-Tag 7 02 Plasmid DNA endA(-) strain Target Sample source Fragment DNA Gel slice 8 21 Fragment DNA PCR product 8 22...
-
Page 35: Troubleshooting
ExiPrep 16 Plus Fully Automated Nucleic Acid Extraction System IX. Troubleshooting Error Solution Instrument does not turn on. 1. Verify that the power connector is inserted into a power socket. 2. Verify that the power adapter line is connected to the instrument. 3. - Page 36 ExiPrep 16 Plus Fully Automated Nucleic Acid Extraction System The front door does not close. 1. Verify that the Base Plate is correctly secured. 2. Open the door and let go to verify that the door closes by the door spring. 3.
- Page 37 ExiPrep 16 Plus Fully Automated Nucleic Acid Extraction System 7. Request service from your dealer. The Syringe Block inserted the 1. Verify that the front door is completely closed. tips as expected but does not 2. Visually inspect the Syringe Block to verify the absence of foreign move.
- Page 38 ExiPrep 16 Plus Fully Automated Nucleic Acid Extraction System The instrument smells like its 1. Immediately disconnect the power and stop usage of the burning. instrument. 2. Request service from your dealer. The UV Lamp does not work. 1. Verify that the front door is completely closed. 2.
-
Page 39: Warranty
ExiPrep™16 Plus is warranted by Bioneer against manufacturing defects in materials and workmanship for a limited warranty period of one year from the date you received your product. Bioneer will either (1) repair the product at no charge if a hardware defect arises or (2) exchange the product if the same hardware defect arises more than three times during the limited warranty period.
Need help?
Do you have a question about the ExiPrep 16 Plus and is the answer not in the manual?
Questions and answers