Advertisement
Quick Links
Your new tool has been engineered and manufactured to WEN's highest standards for dependability,
ease of operation, and operator safety. When properly cared for, this product will supply you years
of rugged, trouble-free performance. Pay close attention to the rules for safe operation, warnings,
and cautions. If you use your tool properly and for intended purpose, you will enjoy years of safe,
reliable service.
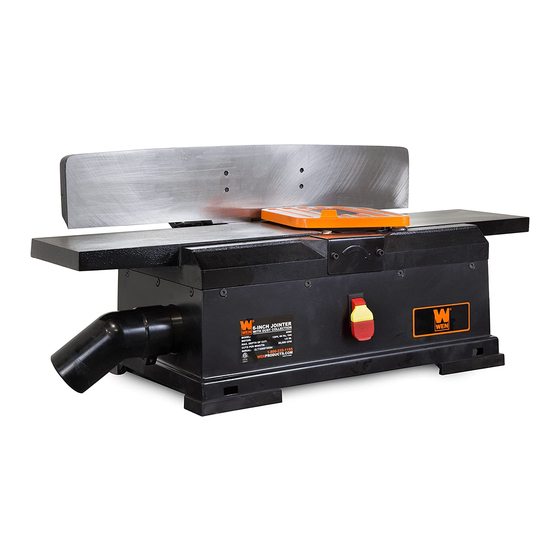
6-INCH BENCHTOP
IMPORTANT:
NEED HELP? CONTACT US!
Have product questions? Need technical support?
Please feel free to contact us at:
800-232-1195
techsupport@wenproducts.com
WENPRODUCTS.COM
JOINTER
Model # 6560
bit.ly/wenvideo
(M-F 8AM-5PM CST)
Advertisement

Related Manuals for Wen 6560


Summary of Contents for Wen 6560
- Page 1 IMPORTANT: Your new tool has been engineered and manufactured to WEN’s highest standards for dependability, ease of operation, and operator safety. When properly cared for, this product will supply you years of rugged, trouble-free performance. Pay close attention to the rules for safe operation, warnings, and cautions.
- Page 2 Electrical Information Know Your Jointer Assembly and Adjustments Operation Maintenance Troubleshooting Exploded View and Parts List Warranty TECHNICAL DATA 6560 Model Number: 120 V, 60 Hz, 10A Motor: 10,000 RPM Rotations Per Minute: Max Width of Cut: 6-1/8 inch 2 blades...
- Page 3 GENERAL SAFETY RULES Safety is a combination of common sense, staying alert and knowing how your item works. SAVE THESE SAFE- TY INSTRUCTIONS. WARNING: To avoid mistakes and serious injury, do not plug in your tool until the following steps have been read and understood.
- Page 4 GENERAL SAFETY RULES 15. DO NOT OVERREACH. Keep proper footing and balance at all times. Wear oil-resistant rubber-soled foot- wear. Keep the floor clear of oil, scrap, and other debris. 16. MAINTAIN TOOLS PROPERLY. ALWAYS keep tools clean and in good working order. Follow instruc- tions for lubricating and changing accessories.
- Page 5 SPECIFIC RULES FOR THE JOINTER 9. Do not joint material shorter than 8-1/8”, narrower than 3/4”, or thinner than 1/4”. 10. Never make jointing cut deeper than 1/8”. 11. Support the workpiece adequately at all times during operation; maintain control of the workpiece. 12.
- Page 6 ELECTRICAL INFORMATION WARNING: This tool is for indoor use only. Do not expose to rain or use in damp locations. Guidelines for using extension cords Make sure your extension cord is in good condition. When using an extension cord, be sure to use one heavy enough to carry the current your product will draw.
- Page 7 KNOW YOUR JOINTER Fence Outfeed Table Crank Handle Blade Guard Dust Port Power Switch Infeed Table ASSEMBLY AND ADJUSTMENTS UNPACKING 1fi Check to make sure all above items are accounted for before attempting to assemble and operate your jointer. 借(通)用件登记 爆炸图序号...
- Page 8 ASSEMBLY AND ADJUSTMENTS ATTACHING THE FENCE SUPPORT ASSEMBLY 1. Attach the fence support (Fig. A - 3) to the jointer with socket head bolts and lock washers. 2. Insert the locking plate assembly (Fig. A - 4) into the support. Position the plate so that pins are against the bottom edge of the support.
- Page 9 ASSEMBLY AND ADJUSTMENTS Fig. D Fig. G Fig. F Fig. E INSTALLING THE DUST CHUTE Slide the dust chute (Fig. D - 1) onto the end of the chip exhaust (Fig. D - 2). Tighten the pan head screw. INSTALLING THE HALF BAG DUST COLLECTION SET The half bag dust collection set is designed to provide dust collection for woodworking tools using the 2.5-inch diameter dust exhaust port.
- Page 10 OPERATION WARNING: Do not connect the jointer to the power source until all assembly steps have been completed. Jointing is a surfacing operation in which a small amount of wood is removed from the edges and faces of boards to smooth and straighten surfaces. This way, the two edges from differing boards can fit together to form a perfect seamless joint.
- Page 11 OPERATION TESTING THE BLADE HEIGHT The blades have been adjusted at the factory to assure proper operation and theoretically should require no adjustment. However, shipping and handling may have cause slight misalignment. For accurate cutting, the blades must be as high as the outfeed table when positioned at the highest point.
- Page 12 OPERATION FEEDING WORK Feed rate refers to the rate at which wood is passed over the blades. An even feed produces a uniform finish. To feed the work piece: 1. Hold the work piece firmly down on the feed table and against the fence.
- Page 13 MAINTENANCE CHECK FOR WORN BLADES The condition of blades will affect the precision of the cuts. Observe the quality of the cut that the jointer pro- duces to check the condition of the blades. Dull blades will tear, rather than sever wood fibers and produce fuzzy appearances.
- Page 14 EXPLODED VIEW AND PARTS LIST No. Part Number Part Description No. Part Number Part Description No. Part Number Part Description 6560-001 Hex Nut 6560-043 Ball Bearing 6560-085 Jack Screw 6560-002 Block 6560-044 Retaining Ring 6560-086 Set Screw 6560-003 Shaft 6560-045...
- Page 15 EXPLODED VIEW AND PARTS LIST...
- Page 16 LIMITED TWO YEAR WARRANTY WEN Products is committed to building tools that are dependable for years. Our warranties are consistent with this commitment and our dedication to quality. LIMITED WARRANTY OF WEN CONSUMER POWER TOOLS PRODUCTS FOR HOME USE GREAT LAKES TECHNOLOGIES, LLC (“Seller”) warrants to the original purchaser only, that all WEN con- sumer power tools will be free from defects in material or workmanship for a period of two (2) years from date of purchase.
Need help?
Do you have a question about the 6560 and is the answer not in the manual?
Questions and answers