Table of Contents
Advertisement
For replacement parts visit
WENPRODUCTS.COM
Your new tool has been engineered and manufactured to WEN's highest standards for dependability, ease
of operation, and operator safety. When properly cared for, this product will supply you years of rugged,
trouble-free performance. Pay close attention to the rules for safe operation, warnings, and cautions. If
you use your tool properly and for its intended purpose, you will enjoy years of safe, reliable service.
NOTICE: Please refer to wenproducts.com for the most up-to-date instruction manual.
PNEUMATIC NAILER
IMPORTANT:
NEED HELP? CONTACT US!
Have product questions? Need technical support?
Please feel free to contact us at:
800-232-1195
techsupport@wenproducts.com
WENPRODUCTS.COM
COIL ROOFING
(M-F 8am-5pm CST)
MODEL 61783
Advertisement
Table of Contents

Related Manuals for Wen 61783


Summary of Contents for Wen 61783
- Page 1 WENPRODUCTS.COM IMPORTANT: Your new tool has been engineered and manufactured to WEN’s highest standards for dependability, ease of operation, and operator safety. When properly cared for, this product will supply you years of rugged, trouble-free performance. Pay close attention to the rules for safe operation, warnings, and cautions. If you use your tool properly and for its intended purpose, you will enjoy years of safe, reliable service.
-
Page 2: Table Of Contents
Operation ..................12 Maintenance .................14 Troubleshooting Guide ..............15 Exploded View & Parts List ............16 Warranty Statement ..............17 SPECIFICATIONS Model Number 61783 Operating Pressure Range 70 PSI to 120 PSI Air Inlet Size 1/4” - 18 NPT Fastener Length 3/4" to 1-3/4"... -
Page 3: Introduction
INTRODUCTION Thanks for purchasing the WEN Coil Roofing Nailer. We know you are excited to put your tool to work, but first, please take a moment to read through the manual. Safe operation of this tool requires that you read and understand this operator’s manual and all the labels affixed to the tool. -
Page 4: Pneumatic Nailer Safety Rules
PNEUMATIC NAILER SAFETY RULES Safety is a combination of common sense, staying alert and knowing how your item works. SAVE THESE SAFETY INSTRUCTIONS. WARNING: To avoid mistakes and serious injury, do not use your tool until the following steps have been read and understood. LEARN the tool’s applications, limitations, and possible hazards. WORK AREA SAFETY 1. - Page 5 PNEUMATIC NAILER SAFETY RULES AIR SUPPLY SAFETY 1. USE ONLY CLEAN, DRY, AND REGULATED AIR. Condensation from an air compressor can rust and damage the internal workings of the tool. Regularly drain water and contaminants out from the compressor. An in-line filter is recommended to remove most of these contaminants and prolong the life of the tool the compressor.
- Page 6 PNEUMATIC NAILER SAFETY RULES TOOL OPERATION & MAINTENANCE SAFETY 1. DO NOT FORCE THE TOOL to do a job for which it was not designed. 2. INSPECT TOOL BEFORE USE. Do not operate if any portion of the tool, trigger, or safety bracket is dam- aged, inoperable, disconnected, or altered.
-
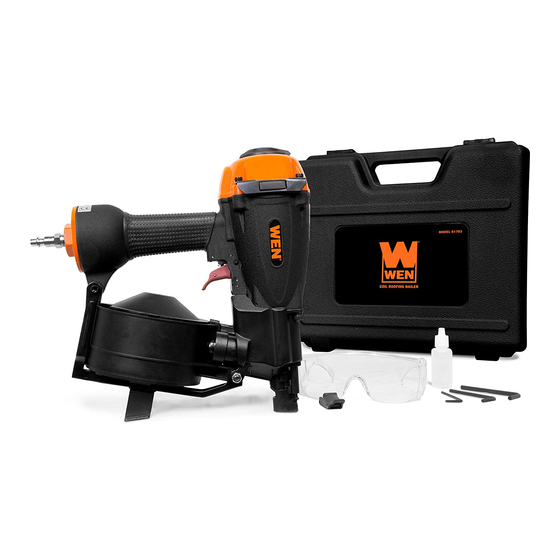
Page 7: Know Your Nailer
KNOW YOUR NAILER Carefully unpack the tool and all accessories from the packaging. Check your tool against the graph below. If any part is damaged or missing, please contact our customer service at (800) 232-1195, M-F 8-5 CST or email us at techsupport@wenproducts.com. Directional Exhaust Deflector Trigger... -
Page 8: Preparation & Adjustments
PREPARATION & ADJUSTMENTS WARNING: To prevent injury from accidental operation, make sure the tool disconnected from the air supply before assembly and making adjustments. Always wear Z87.1-approved safety glasses and hearing protection during assembly, operation, and maintenance of the tool. STEP 1: LUBRICATING THE TOOL (FIG. - Page 9 PREPARATION & ADJUSTMENTS Quick Connector Lubricator Filter Air Supply Air Hose Regulator Fig. 2 STEP 3: CONNECTING TOOL TO THE AIR SUPPLY WARNING: To reduce the risk of misfiring, connect the air supply BEFORE loading fasteners. Make sure the nailer magazine is empty when connecting to the air supply to prevent misfire. Never aim the tip of the nailer towards yourself or others.
- Page 10 PREPARATION & ADJUSTMENTS STEP 4: LOADING THE FASTENERS (FIG. 3 TO 5) WARNING: Always load the fasteners after connecting the air supply. Never aim the tip of the nailer at a person or animal in case of misfire. 1. Open the magazine. Pull down the door latch (Fig. 3) and swing door Fig.
- Page 11 PREPARATION & ADJUSTMENTS TYPES OF TRIGGERS Because we’re nice people, we have included two different triggers that you can use with the WEN Coil Roof- ing Nailer depending on the task at hand. Single Sequential Trigger (Black Trigger): This trigger prevents the nailer from being able to bump fire. To fire a nail, first press down the safety bracket and then pull the trigger.
-
Page 12: Operation
OPERATION WARNING: Before each use, check the nailer, compressed air connections and air lines. If any part is missing or damaged, do not operate this tool until part is repaired and replaced. Failure to do so could possibly result in a serious personal injury. WARNING: User must wear proper eye and hearing protection when operating this tool. - Page 13 OPERATION ADJUSTING THE DRIVING DEPTH (FIG. 9) WARNING: To reduce risk of serious injury from accidental actuation when attempting to adjust depth, disconnect air supply and remove fasteners from magazine before adjustments. The depth adjustment wheel located at the nose of the nailer controls the depth that the fastener will be driven.
-
Page 14: Maintenance
MAINTENANCE WARNING: Disconnect tool from air supply and empty fasteners from the magazine before per- forming any cleaning or maintenance. LUBRICATION Routine lubrication of the tool is required for best performance. An automatic in-line oiler is recommended. If tool is used without an in-line oiler, place 4 to 5 drops of pneumatic tool oil into the air inlet of the tool at the beginning of each workday or after about 1 hour of continuous use. -
Page 15: Troubleshooting Guide
TROUBLESHOOTING GUIDE WARNING: Stop using the tool immediately if any of the following problems occur. Repairs and replacements should only be performed by an authorized technician. For any questions, please contact our customer service at (800) 232-1195, M-F 8-5 CST or email us at techsupport@wenproducts.com. Problem Common Causes Solution... -
Page 16: Exploded View & Parts List
EXPLODED VIEW & PARTS LIST EXPLODED VIEW AND PARTS LIST... - Page 17 EXPLODED VIEW & PARTS LIST Part No. Description Part No. Description Part No. Description 61782B-001 Screw M5x20 61782B-036 Adjuster 71 61782B-071 61782B-002 Bushing 61782B-037 Bracket Assembly 72 61782B-072 O ring 24.3x2.8 61782B-003 Exhaust Cover 61782B-038 Nut M3 73 61782B-073 Feed Hook 61782B-004 Washer 61782B-039...
-
Page 18: Warranty Statement
WARRANTY STATEMENT WEN Products is committed to building tools that are dependable for years. Our warranties are consistent with this commitment and our dedication to quality. LIMITED WARRANTY OF WEN CONSUMER POWER TOOLS PRODUCTS FOR HOME USE GREAT LAKES TECHNOLOGIES, LLC (“Seller”) warrants to the original purchaser only, that all WEN consumer power tools will be free from defects in material or workmanship for a period of two (2) years from date of purchase. - Page 20 THANKS FOR REMEMBERING...
Need help?
Do you have a question about the 61783 and is the answer not in the manual?
Questions and answers