
Related Manuals for Vacmaster V12


Summary of Contents for Vacmaster V12
- Page 1 Use & Care Guide ROBOT VACUUM CLEANER MODEL NO. V12 www.vacmaster.com Cleva North America, Inc. Greenville, SC 29607 (866) 384-8432 Made in China...
-
Page 2: Table Of Contents
Operating Instructions......................17 Maintaining Your Vacuum........................22 Troubleshooting...........................29 ® Thank you for purchasing this Vacmaster vacuum cleaner. With it you are obtaining a high quality product that is engineered for optimal performance. FOR YOUR SAFETY Read and understand this manual before use. -
Page 3: Important Safety Instructions
IMPORTANT SAFETY INSTRUCTIONS When using an electrical appliance, basic precautions should always be followed, including the following: READ ALL INSTRUCTIONS BEFORE USING THIS ROBOT VACUUM CLEANER. Failure to follow the warnings and instructions may result in electric shock, fire and/or serious injury. WARNING - To reduce the risk of fire, electric shock, or injury: •... - Page 4 • Use only the charging dock specially equipped by the manufacturer. • Under abusive conditions, liquid may be ejected from the battery; avoid contact. If contact accidentally occurs, flush with water. If liquid contacts eyes, additionally seek medical help. Liquid ejected from the battery may cause irritation or burns.
- Page 5 NOTE: This equipment has been tested and found to comply with the limits for a Class B digital device, pursuant to Part 15 of the FCC Rules. These limits are designed to provide reasonable protection against harmful interference in a residential installation.
-
Page 6: Warranty
WITH PROOF OF SALE, a defective appliance will be replaced free of charge. For warranty coverage details to obtain free replacement, visit the web page: www.vacmaster.com or call (866) 384-8432. • This warranty does not cover filters, which are expendable parts that can wear out from normal use within the warranty period. -
Page 7: Getting To Know Your Vacuum
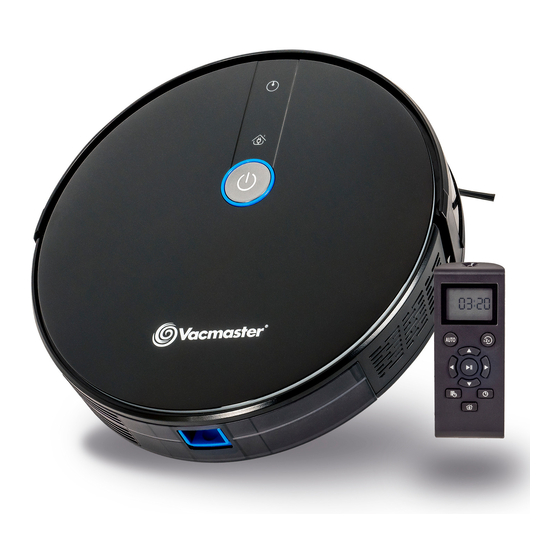
GETTING TO KNOW YOUR VACUUM Included in the Box: Robot Vacuum Cleaner Dust Bin Charging Dock Remote Control with 2 AAA Batteries Charging Adapter High Efficiency Side Brush (x2 sets) Cleaning Tool Filter (x2) Use & Care Guide Quick Start Guide... - Page 8 About Your Robot Vacuum Front Robot Front Bumper Power Indicator Light Quick Start Power Button Docking Indicator Light Dust Bin Release Button Back Robot Anti-Drop Cliff Sensors Side Brushes Drive Wheels Dust Bin & Filter Charging Contacts Front Swivel Wheel Battery Cover Brushroll Brushroll Cover...
- Page 9 Dust Bin & Filter High Efficiency Filter Filter Door Filter Basket Dust Bin Door Charging Dock Charging Dock Indicator DC Socket Charging Pins Remote Control Screen Display Select Cleaning Mode:Spot Cleaning Mode,Single Room Cleaning Mode, Start Cleaning Session Edge Cleaning Mode Start / Pause Cleaning Session Control Cleaning Direction Manually Clock Set-Up...
- Page 10 Cleaning Tool 611002103 Brushroll 611002105 Brushroll Cover 611002109 Front Swivel Wheel 611002110 Charging Dock 611002119 Charging Adapter 611002112 Battery 611002120 Dust Bin 611002111 Boundary Strip 611002130 (not included, but available on Vacmaster.com) Available online at www.vacmaster.com or call (866) 384-8432. -10-...
-
Page 11: Installation Instructions
INSTALLATION INSTRUCTIONS Important Tips Before Use 1. Remove power cords and other obstructions to prevent your robot from getting entangled or trapped. You can use cable ties to organize your wires and power cords. 2. Fold tasseled edges of area rugs underneath to prevent these from getting entangled or trapped. - Page 12 4. Prevent your robot from vacuuming wet areas as this could damage your vacuum. 5. Remove any objects less than 0.6 inches (15mm) in height as robot may climb over. 6. Anti-drop cliff sensors prevent the robot from tumbling down stairs and steep drops.
- Page 13 NOTE: Place physical barriers or boundary strips (sold separately) in front of fireplaces and areas that you do not want the robot to enter. To order boundary strips, please visit www.vacmaster.com or call us at (866) 384-8432. 7. Use Boundary Strips (Sold Separately) The boundary strips allow you to keep your robot from entering an area or picking up an item that the robot should not clean.
- Page 14 4. Install Side Brushes ® Your Vacmaster robot comes with two side brushes that need to be installed on the bottom of the vacuum. Each side brush is installed on a specific side of the robot and indicated with an L or R on the front of the side brush.
- Page 15 Option 1 – Manually Connect Robot to Charging Dock Align the charging pins on the bottom of the robot with the charging pins on the dock. When the robot is successfully connected to the charging dock, an audible tone will activate. The docking indicator light on the robot will flash to indicate the robot is charging.
- Page 16 Option 2 – Remote Control Charging Press on the remote control to return the robot to the charging dock. During the cleaning process, the robot can sense when battery power is low and automatically converts to recharging mode to start its return to the charging dock.
-
Page 17: Operating Instructions
OPERATING INSTRUCTIONS CAUTION: Operate robot at room temperature between 39.2°F (4°C) and 104°F (40°C) in order to ensure its safety and normal function. Make sure the dust bin is installed before use. General Operating Instructions · Turn On Robot Wake up robot by pressing on the robot. - Page 18 Suction Control Button 2. Spot Cleaning Mode Press on the robot or on the remote control to start cleaning in Smart Cleaning Mode. Then press the button one time on the remote control to start the robot in Spot Cleaning Mode. The Spot Cleaning icon will display on the remote control screen.
- Page 19 Single Room Cleaning Icon 4. Edge Cleaning Mode Press on the robot or on the remote control to start cleaning in Smart Cleaning Mode. Then press the button three times on the remote control to start the robot in Edge Cleaning Mode. The Edge Cleaning icon will display on the remote control screen.
- Page 20 Move forward Turn left Turn right Move backward Set Up Clock 1. Insert the included 2 AAA batteries into the remote control. 2. Press on the remote control. The time will blink on the display screen. 3. Use the directional arrows on the remote to set the “hour”...
- Page 21 Schedule a Cleaning Session You can schedule the robot to start cleaning at a specified time. NOTE: The robot will automatically turn on once you connect the robot to the charging dock. 1. Within a couple feet of the robot and with no obstacles between you and the robot, point the remote control directly at the robot and press on the remote control.
-
Page 22: Maintaining Your Vacuum
MAINTAINING YOUR VACUUM Regular Maintenance For optimal performance, follow the instructions below to clean and maintain the robot. Reference the table below as a guide for how often you should be cleaning and replacing parts of your robot. NOTE: The cleaning and/or replacement frequency will depend on your usage of the robot. - Page 23 2. Holding the dust bin upright, snap the back panel open and empty contents into receptacle. To re-install, snap panel back into dust bin. 3. Open the high efficiency filter cover and take out the filter and filter basket. 4. Clean the dust bin and filters with the included cleaning tool. NOTE: Do not wash the high efficiency filter.
- Page 24 6. With the filter removed, close filter door and clean out dust bin with a dishcloth. Do not allow water into the vent. Vent NOTE: Do not wash the dust bin. 7. Dry the dust bin, filter basket and filter completely. Keep the inside of the robot dry to ensure the life of the vacuum.
- Page 25 9. Close the dust bin door and slide the dust bin into the robot. Cleaning the Brushroll 1. Press the two release tabs to unlock the brushroll cover. 2. Lift the brushroll to remove. 3. Clean the brushroll with the provided cleaning tool. Make sure that you remove any hair wrapped around the edges of the brushroll.
- Page 26 4. Reinstall the brushroll by inserting the fixed protruding end first and then clicking into place. 5. Align cover into place on the robot and then press down until you hear a ‘click’ indicating the cover is securely installed. Cleaning and Replacing the Side Brushes 1.
- Page 27 2. Carefully unwind and pull off any hair or string that is wrapped between the main unit and the side brushes. 3. Use a cloth dampened with warm water to remove dust from the brushes. NOTE: Only use the side brushes when completely dry. 4.
- Page 28 Anti-drop Cliff Sensors 3. Hair and dust can become tangled in the front swivel wheel. Remove the swivel wheel from the unit and clean. NOTE: Reinstall the wheel onto the robot after cleaning and ensure it is fully and securely locked into place. Boundary Strip Installation Instructions 1.
-
Page 29: Troubleshooting
TROUBLESHOOTING Should you have any problem(s) with your robot vacuum cleaner, review the table below for solutions to minor performance issues. If the issues cannot be solved, please try to turn off the robot vacuum cleaner and restart. PROBLEM POSSIBLE CAUSE SOLUTION The robot vacuum Press the power button to turn the... - Page 30 Remove any entangled objects The side brushes are or string/hair wrapped around jammed. brushes. Remove any entangled objects and The wheels are clean wheel housing by rotating jammed. wheel while dusting. Robot vacuum The battery may be Charge the battery as instructed on cleaner stops depleted.
- Page 31 Empty dust bin. Follow filter cleaning instructions on Filter needs cleaning. page 22. Filter needs to be Purchase online at www.vacmaster. replaced. com or call (866) 384-8432. The battery may be Charge the battery as instructed on Suction power is depleted.
- Page 32 Solid Yellow Docking Indicator Light ERROR TONE CAUSE SOLUTION Charge the robot. Alert Sound Only Battery level is low. Follow instructions on page 14. For further questions, please visit us at www.vacmaster.com or call our support team at (866) 384-8432. -32-...
Need help?
Do you have a question about the V12 and is the answer not in the manual?
Questions and answers