Advertisement
Quick Links
Lock Case
Assembly
Dial Assembly
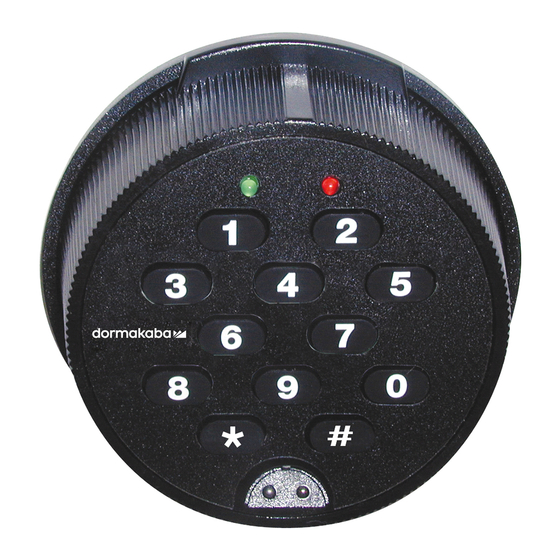
Keypad Assembly
with Decal
Figure 1 - Swing Bolt Lock Parts
The installation instructions are the basis for Security Agency Approvals. The lock installation must be done in accordance to
these instructions in order to maintain the labeled approval level.
In order to maintain VdS Class 2/EN 1300 Class B lock approval levels in a container where multiple locks are required, special
considerations must be observed. The Auditcon 2 Series lock must be the first one secured by the boltworks. Check the locked
status of the container with the handle of the boltworks.
Design Parameters for Auditcon 2 Series Locks
1. Bolt dimensions (nominal): .313 inches x .900 inches/7.95 x 22.8mm
2. Bolt movement (nominal): .475 inches/12.07mm
3. Bolt extension: .475 inches/12.07mm
4. Maximum load movable by the bolt: None
NOTE: Auditcon 2 swing bolt locks must be installed in such a way that no side or counter acting load affects the bolt and the
bolt can move freely.
5. Maximum load against bolt when thrown (all directions): 224.8 lbs.(1kN)
6. The lock can be fitted to safes or vault doors of any material.
NOTE: As is the case with all mechanical and electronic locking devices, the container and boltworks must be designed to
protect the lock.
Figure 2 - Swing Bolt Clearances and Positioning
(P/N) 3118.0210 Rev C 06/18 • © copyright 2010-2018
AUDITCON
MODELS 52, T52, 252, 552 - ROUND HOUSING SWING BOLT
INSTALLATION INSTRUCTIONS
Cable
Lock Case
Mounting
Screws (3)
Dial Assembly
Mounting
Screws (2)
2 SERIES LOCKS
®
Basic Tools and Materials Needed
• Medium Phillips head screwdriver (#2) (recommend
magnetized tip)
• 6/64" Allen Wrench
• ESD wrist band
Recommended, but not required:
• Torque screwdriver (30 inch-pounds/3.4 newton-meters
capacity)
• Loctite
262 (Red) for use on lock case mounting screws
®
WARNING: dormakaba locks are protected from 25,000
V Electrostatic Discharge (ESD) damage when correctly
installed. Follow these precautions to avoid ESD damage
when installing the lock:
• Handle the keypad assembly by the outer edge only.
• Use an ESD wrist band grounded to the lock or container
during installation.
dormakaba USA Inc.
Page 1 of 4
Advertisement

Related Manuals for Dormakaba AUDITCON 2 Series


Summary of Contents for Dormakaba AUDITCON 2 Series
- Page 1 In order to maintain VdS Class 2/EN 1300 Class B lock approval levels in a container where multiple locks are required, special considerations must be observed. The Auditcon 2 Series lock must be the first one secured by the boltworks. Check the locked status of the container with the handle of the boltworks.
- Page 2 12. If the lock operation tested successfully, unplug the RJ11 end of the cable from the lock case and lay the case aside. 13. Verify that none of the cables will be pinched and snap the keypad assembly into place. (P/N) 3118.0210 Rev C 06/18 • © copyright 2010-2018 dormakaba USA Inc. Page 2 of 4...
- Page 3 NOTE: To remove any excess cable or if you choose not to use the Battery Assist option, wrap and tie the battery assist cable. (Figure 13.) (P/N) 3118.0210 Rev C 06/18 • © copyright 2010-2018 dormakaba USA Inc. Page 3 of 4...
- Page 4 NOTICE: The information in this instruction sheet is subject to change without notice and does not represent a commitment on the part of dormakaba. dormakaba shall not be liable for technical or editorial errors or omissions contained herein; nor for incidental or consequential damages resulting from the furnishing, performance or use of this material.
Need help?
Do you have a question about the AUDITCON 2 Series and is the answer not in the manual?
Questions and answers