
Subscribe to Our Youtube Channel
Related Manuals for Rockler Interlock Signmaker’s Templates State Park


Summary of Contents for Rockler Interlock Signmaker’s Templates State Park
- Page 1 State Park Instructions Review full manual instructions prior to use for important safety information. Always check Rockler.com to confirm that you are using the most recent manual version for your product.
- Page 2 Keep this booklet in a place where your product. To find the most recent version, find it will be readily available for reference. the product page on Rockler.com and click on the > The user assumes all risk and responsibility for the link to the Instructions.
- Page 3 Fig. 1 Single Template Letters 3. With your plunge router and appropriate guide bushing 1. Connect all the letters, numbers, spacers or symbols together to form your custom sign template. and router bit, rout out each individual character. For deeper cuts, it is best to make multiple passes, 2.
- Page 4 Fig. 2 - Sample “LODGE” sign - First Pass Two-Template Letters The unique two-template system creates whole letters 2. Securely attach templates to desired surface. without splits, leaving center islands perfectly routed. As added security, mark location of templates No need to carefully follow the outer edge of the using the notches provided.
- Page 5 Notch location Fig. 3 - Sample “LODGE” sign Fig. 4 - Sample “LODGE” sign - Second Pass...
- Page 6 For advice on correct kerning, we strongly recommend that you visit the online Sign Making Wizard at Rockler.com. Simply enter your particular word or phrase and the wizard will create a custom routing plan including a visual guide to the sequence of templates with proper kerning and the number of passes required to rout the letters.
- Page 7 Fig. 6 - Three-Letter Combos Fig. 7 - Four-Letter Combos...
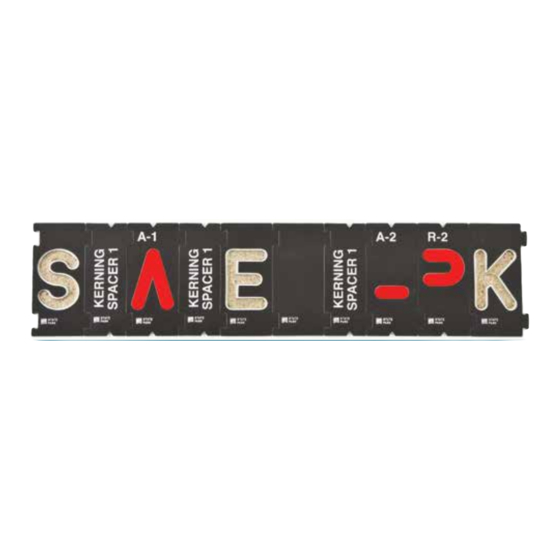
- Page 8 The above images detail the required steps to complete a STATE PARK sign. The highlighted red letters are routed in each pass. Check Rockler.com for updates. If you have further questions, please contact our Technical Support Department at 1-800-260-9663 or support@rockler.com Distributed by Rockler Companies, Inc.
Need help?
Do you have a question about the Interlock Signmaker’s Templates State Park and is the answer not in the manual?
Questions and answers