Advertisement
Quick Links
Advertisement

Related Manuals for Rockler 52149


Summary of Contents for Rockler 52149
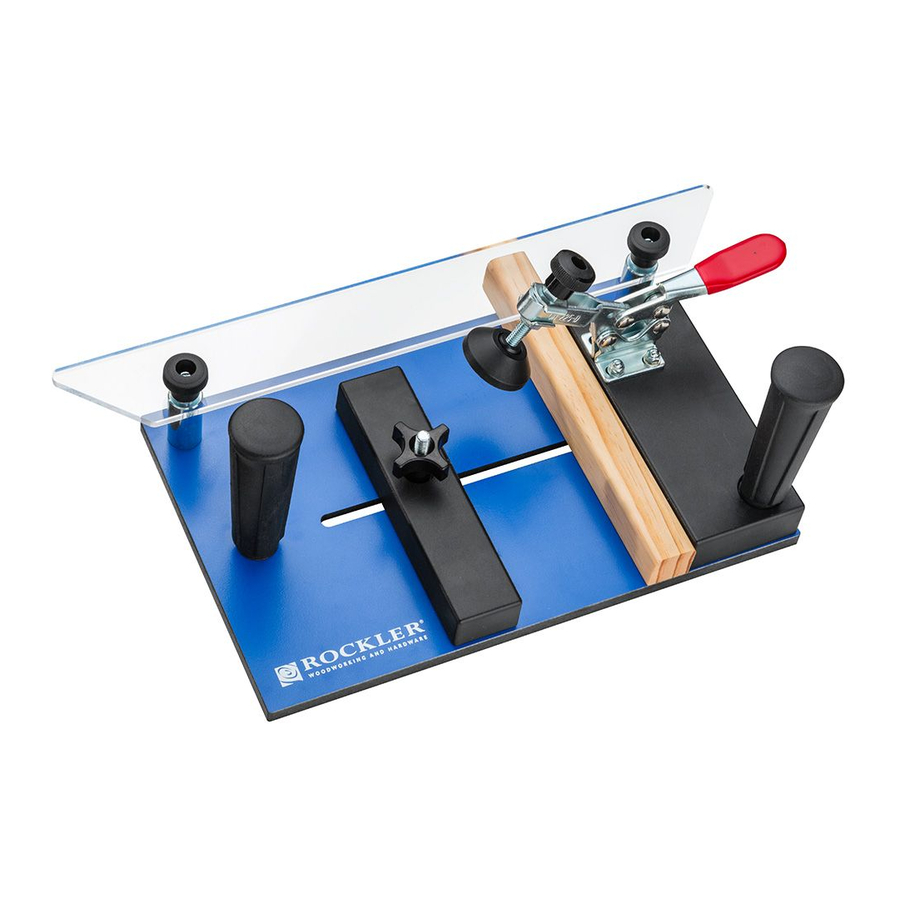
- Page 1 Rail Coping Sled Instructions...
-
Page 2: General Safety Warnings
GENERAL SAFETY WARNINGS This tool is designed for specific applications as defined in the instructions and should not be modified and/or used for any other applications. Before using the Rail Coping Sled, read, understand and follow all instructions and safety information provided. KEEP THESE INSTRUCTIONS FOR FUTURE REFERENCE. > For any tool used in conjunction with this product, > Always wear safety glasses in compliance with ANSI always read, understand and follow the instructions safety standards and hearing protection and follow all and safety warnings in the owner’s manual for that tool. standard shop safety practices, including: • Keep your work area well lit and clean;... - Page 3 PARTS LIST - RAIL COPING SLED Quantity Quantity 11 Large Washer 1 Fence Guide 12 Small Washer 2 Sled Base 13 Spacer 3 Fixed Fence 14 5/16"-18 TPI x 1" T-Slot Bolt 4 Adjustable Fence 15 5/16"-18 TPI x 1 ⁄ " T-Slot Bolt 5 Lever Clamp 16 5/16"-18 TPI x 2 ⁄ " T-Slot Bolt 6 Sacrificial Piece 17 Cap Nut 7 Front Handle 18 1 ⁄...
-
Page 4: Setup And Use
Fig. 1 Assembly 1. Assemble the parts as shown. Do not fully tighten the 1" Round Knobs (9) that secure the Fence Guide (1), the Front and Rear Handles (7 and 8) or the Mounting Screws (18) that attach the Fixed Fence (3) and Lever Clamp (5) to the Sled Base (2). - Page 5 Knobs (9), then measure again to confirm that nothing shifted. Fig. 1. using Rockler rail and stile bit sets on 3/4” stock, we offer dedicated setup jigs (Fig. 3 - Setup Jig Method) that have the rail and stile profiles machined 3.
- Page 6 Fig. 4 7. Slide the Adjustable Fence (4) tight against the stock and tighten the 4-Star Knob (10). Fig. 4 - Arrow 1. 8. Use the knob on the Lever Clamp (5) to adjust the clamp foot so it will apply sufficient pressure, then engage the clamp to fully secure the stock.
- Page 7 Notes Sacrificial Piece (6), and make your cuts, moving the sled from right to left on the router table. Fig. 6. Check Rockler.com for updates. If you have further questions, please contact our Technical Support Department at 1-800-260-9663 or support@rockler.com...
- Page 8 52149 Distributed by Rockler Companies, Inc. Rev 03/17 ©2017 Rockler Woodworking and Hardware...
Need help?
Do you have a question about the 52149 and is the answer not in the manual?
Questions and answers