Table of Contents
Advertisement
Quick Links
19 17
16
14
9
11
Introduction
Your new dovetail jig will cut Full Through
Dovetails and three varieties of Half Blind
Dovetails (flush half blind, offset half blind
and rabbeted half blind). (Figure 1) It will
accommodate stock from 1/2" to 1
and up to 11" wide.
The following instructions begin by detail-
ing how to set up the jig for basic 1/2"
and 3/4" material to mill flush half-blind
dovetails and full through dovetails (Fig. 1).
Once you have mastered this technique, you
can add other joints to your repertoire such
as offset dovetails and rabbeted dovetails.
(See page 8 for details.)
Square and flat material is key to the success of
perfectly aligned joints. For any of the joints being
cut, always cut additional pieces the exact size of
those being used in your project to experiment with
the settings for joint accuracy
Complete Dovetail Jig Instructions
1
18
15
3
4
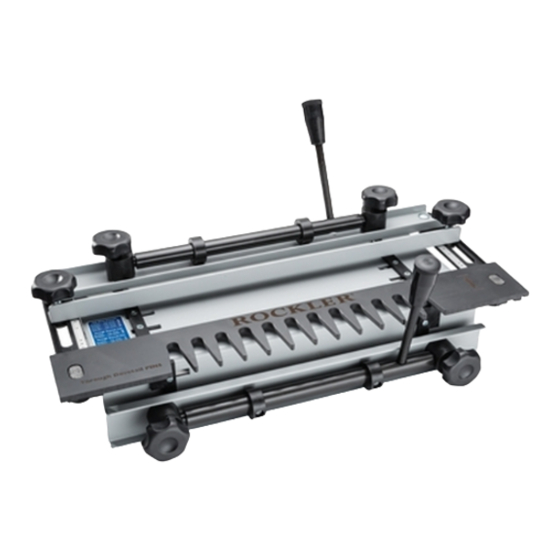
PARTS LIST - C
1 Clamp Handle (2)
2 Cam (4)
3 Clamp Axle (2)
4 Stop Bar (1)
5 Clamp Bar (2)
6 Pin Template
7 Clamp Springs (not shown)
⁄
" thick
1
8
8 Fence Lock Knobs (2)
9 1/2" Half-Blind/Tails Template (1)
10 Jig Body (1)
12
2
10
D
omplete
ovetail
11 "L" Shaped Adjustable Stops (2)
12 Cam Lock Knob (4)
13 Cam Lock Housing (4)
14 Template Adjustment Bar (2)
15 1/2"-14° Dovetail Bit
16 1/2"-8° Dovetail Bit
17 5/16" Straight Bit
18 1/2"-8mm Collet Reducer
19 Template Guide Bushing Set
Figure 1
Through Dovetails
1
13
8
6
5
J
ig
Half Blind Dovetails
9
Advertisement
Table of Contents

Related Manuals for Rockler 22818


Summary of Contents for Rockler 22818
- Page 1 Complete Dovetail Jig Instructions 19 17 PARTS LIST - C omplete ovetail 1 Clamp Handle (2) 11 “L” Shaped Adjustable Stops (2) 2 Cam (4) 12 Cam Lock Knob (4) Introduction 3 Clamp Axle (2) 13 Cam Lock Housing (4) Your new dovetail jig will cut Full Through 4 Stop Bar (1) 14 Template Adjustment Bar (2)
- Page 2 Secure the Jig Figure 2 Two holes in the bottom of the jig allow permanent attachment to a work- bench or similar stable base. Where work space is limited, the same holes allow mounting to a shop-built movable base (Fig. 2) that can be secured in the jaws of a vise.
- Page 3 Locate the Stops Figure 4 The jig is equipped with two stops (Fig. 4) that locate the drawer parts and allow repetitive milling; once they are set you can build as many drawers as you need. The first step is to to ensure that the dovetails are evenly spaced on your work piece (that is, there is the same amount of pin or tail top and bottom).
- Page 4 Figure 9 Set the Template Figure 10 For 1/2" material, set the back edge of the half blind template to the “A” setting (Fig. 9) on the adjustment arm. For 3/4" thick material use the “B” setting (Fig. 9). All the template settings for 1/2" and 3/4" material are designed as starting points to rout your joints.
- Page 5 Making Minor Adjustments Figure 12 Install your test boards in the jig, set the fence and template to their correct locations, and then lock the boards in place with the two cam Heighten to tighten locks. With the router bit set at the correct height, visually check that the bit won’t engage the template or any part of the jig.
- Page 6 Figure 15 Set up the Jig When cutting full through dovetails you will be cutting to a depth of slightly more than the thickness of the material you are working with, so Shim you will need to cut a clamping shim approximately 10" wide x 7" deep that’s 1/4"...
- Page 7 Figure 21 Set the router on the template, making sure the cutter is not in contact with the template or the stock. Turn the router on and start cutting on the left edge of the work piece. Keeping the guide bushing tight against the template, cut the tail by plung- ing in on the left edge, across the back side and coming back out on the right side of the tail.
- Page 8 3. Avoid loose clothing or Some other joints you can make with jewelry. your Rockler 12" Dovetail Jig 4. Unplug the router to make any adjustments. Offset Dovetails (top drawing) can be used when there 5. Remove the wrench(es) is no separate drawer face to attach to the drawer front.
Need help?
Do you have a question about the 22818 and is the answer not in the manual?
Questions and answers