
Related Manuals for Rockler Dust Right 52542


Summary of Contents for Rockler Dust Right 52542
- Page 1 Shop Vacuum Dust Hose Reel Instructions Effective July 2019 Review full manual instructions prior to use for important safety information. Always check Rockler.com to confirm that you are using the most recent manual version for your product.
-
Page 2: General Safety Warnings
Instructions and safety warnings for your product (see the • Keep children and bystanders away from the tool Instructions link on the product page at Rockler.com). operating area; • Do NOT use power tools in explosive environments, or in >... - Page 3 PRODUCT SPECIFIC SAFETY WARNINGS > The Hose Reel must be mounted to wall studs spaced > Do not hang or coil objects other than the specified Shop 16" on center using 3/8" x 2" Lag Screws (21) AND Vacuum Hose from the Hose Reel. 3/8"...
-
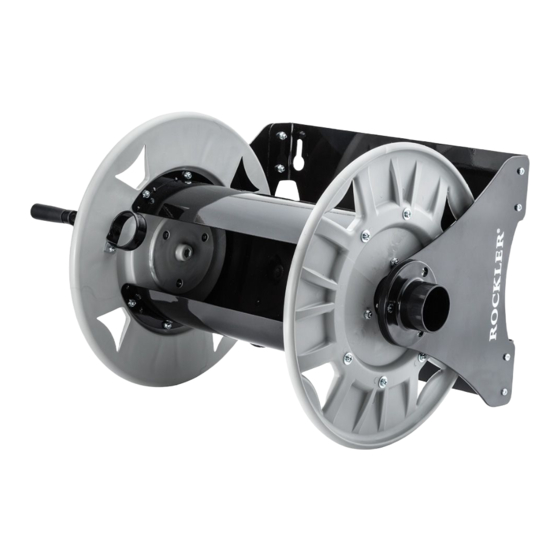
Page 4: Parts List
Assembly Base Assembly 1. Attach the Left Hub/Side Assembly (1) to the Base Plate (2), using 1/4"-20 x 5/8" Panhead Screws (4) and 1/4" Lock Nuts (5). The Side Plate goes on the outside of the tabs on the Base Plate (2) 2. - Page 5 Right Hub Assembly 1. Working from the inside face of the Right Hub (6), fit the Flat-Head Screws (10) and 1/4"-20 Lock Nuts (5). Thread the Internal Flange Pivot (7) through the center hole and attach, Four-Star Knob (11) into the Right-Hand Clamp (12), but using three 1/4"-20 x 7/8"...
- Page 6 Center Hub Assembly Center Hub Assembly 1. If you fully tightened the screws and nuts connecting the Right Lock Nuts (5). Work from the outside faces of the hubs, so that and Left Side Plates to the Base Plate, loosen them a bit to the screw heads and washers are on the outside and the nuts provide working space for installing the Center Hub (16).
- Page 7 Mounting to Wall Studs > The Hose Reel must be mounted to wall studs spaced 16" on center using 3/8" x 2" Lag Screws (21) AND 3/8" Washers (22). > Failure to mount the Hose Reel according to the included instructions could result in personal injury or damage to property.
- Page 8 Four-Star Knob (11) to adjust the resistance, but be careful not to overtighten or you could damage the mechanism. Fig. 5. Check Rockler.com for updates to these instrutions. If you have further questions, please contact our Technical Support Department at 1-800-260-9663 or support@rockler.com Fig.
Need help?
Do you have a question about the Dust Right 52542 and is the answer not in the manual?
Questions and answers