Advertisement
Quick Links
Advertisement

Related Manuals for Overmax X Bee Drone 1.5


Summary of Contents for Overmax X Bee Drone 1.5
-
Page 2: Safety Notes
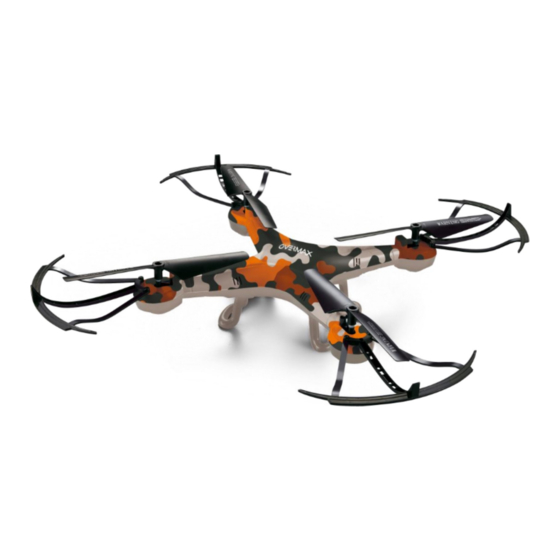
SAFETY NOTES ** The product is designed for people aged 14 and up** The users under 18 years of age can operate the product under adult supervision only. We suggest those, who are just getting started to operate drones, to contact a person with more experience in this field. The purpose of the safety notes is to protect both the product and its users as well as bystanders and their property. - Page 3 CONTROLLER (TRANSMITTER) DIAGRAM Antenna LED indicator Power on / off Speed mode button 3D flip button Throttle stick Direction control stick Headless mode Right / left trimmer Back Home button Forward / backward trimmer CONTROLLER (TRANSMITTER) BATTERY INSTALLATION Use a screwdriver to open the battery cover. Place 4 AA batteries in the battery compartment.
-
Page 4: Battery Charging
BATTERY CHARGING Use the included charger to charge the battery of the drone. ** Use ONLY the supplied charger for charging. Battery charging should always be done under adult supervision. Turn off the drone and open the battery cover by moving it backwards. - Page 5 TRANSMITTER AND RECEIVER SYNCHRONIZATION Step 1 Step 2 Open the battery cover. Place the battery in the drone's battery compartment and connect the battery Turn the controller on. Step 3 Step 4 Turn on your X-Bee Drone 1.5 using the switch located on the bottom of the drone.
-
Page 6: Flight Control
FLIGHT CONTROL Flying up / down Move the throttle stick forward to fly the drone up. Move the throttle stick backward to fly the drone down. Rotating left/ right Move the throttle stick left / right to rotate the drone in a given direction. - Page 7 beneath (make sure to steer the drone to a safe landing spot the moment you receive the low-battery signal). 360-degree stunts When you press the Flip m ode button the controller emits a beep sound indicating that the drone is in 3D flip mode (ready to perform 360-degree flip).
-
Page 8: Headless Mode
HEADLESS MODE How to turn on/off the headless m ode? Press the Headless mode button (indicated in the picture). The LED indicators start to blink indicating that the drone is in the HEADLESS mode. If you want to switch your drone back to the normal control mode, press the same button again. - Page 10 Celem n postronnych oraz ich mienia. Niniejszy produkt przeznacz oraz mienia. komorze niezgodnie z oznaczeniami polaryzacji IKLOWO-KADMOWYCH Z ALKALICZNYMI -KADMOWYCH Z ALKALICZNYMI czas ISAMI W PRZEZNACZONYCH DO TEGO MIEJSCACH. -POLIMEROWYCH dku przestrzeganie wszystkich polaryzacji. PRZEZNACZONYCH DO TEGO MIEJSCACH. 14 roku...
- Page 11 SCHEMAT KONTROLERA (NADAJNIKA) Antena Dioda LED Przycisk zmiany Przycisk akrobacji silnika i rotacji Tryb Headless Przycisk kalibracji lotu w lewo / w prawo Przycisk powrotu do miejsca startu Przycisk kalibracji lotu do przodu / INSTALACJA BATERII W KONTROLERZE (NADAJNIKU) zgodnie z oznaczeniami polaryzacji (+ -...
- Page 12 do portu USB w komputerze. zainstaluj Czerwony - Czerwony Trwa Typ baterii Specyfikacja baterii Czas pracy Akumulator litowo- Czas lotu drona: do 7 3.7V polimerowy (Li-Poly) minut Bateria cynkowo- 1,5V Czas pracy kontrolera (jednorazowa) (GP 15G R4P) (nadajnika): 18 godzin ponownie)
- Page 13 SYNCHRONIZACJA NADAJNIKA I ODBIORNIKA RC Krok 1 Krok 2 drona. Za Krok 3 Krok 4 -Bee Drone 1.5, spodzie , poziomej powierzchni. Krok 5 Krok 6 poziomej powierzchni. Przestaw lewy analog do pozycji lewy jak na rysunku. Utrzymaj t STARTEM,...
- Page 14 KONTROLA LOTU Kontrola obrotu w lewo / prawo Kontrola lotu do przodu / poleci w wybranym kierunku. Kontrola lotu w lewo / prawo prawo, dron poleci w wybranym kierunku automatycznie do przodu. Kalibracja lotu w lewo / prawo automatycznie w prawo. automatycznie w lewo.
- Page 15 , aby w szybkim czasie Akrobacje 360 stopni akrobacji wykonania obrotu o 360 stopni. Uwaga: przed wykonanie m ewolucji drzew oraz m ienia. Przycisk zmiany Przycisk akrobacji zmiany tryb wolny tryb szybki Przycisk zmiany Przycisk akrobacji...
- Page 16 TRYB HEADLESS trybu headless Diody Oznacza to, kontroli. TRYB POWROTU DO MIEJSCA STARTU Przycisk ron po aktywowaniu funkcji trybu headless t, wykonaj ruch prawym analogiem. ha m uje Przycisk powrotu do auto m atycznie i podczas wykonywania tego polecenia miejsca startu...
- Page 18 numai sub supravegherea Acest produs este destinat pentru uz PRODUSUL TREBUIE SA FIE PROTEJAT DE UMEZEALA -i ude. Ciecieczami de contact sau de umiditate. unui adult, la VA RECOMANDAM SA NU IMBINATI DIFERITE TIPURI DE BATERII NI-MH NU COMBINATI DIFERITE TIPURI DE BATERII. RECOMENDARI PENTRU BATERIE LITHIUM POLYMER NICI UN CAZ NU GAURITI BATERIA, DEOARECE ACEST LUCRU AR POATE DUCE LA CRESTEREA RISCULUI INCENDIILOR.
- Page 19 Antena Dioda LED Comutator Schimbarea vitezei de zbor Buton acrobatii joystick Modul Headless Zborul de calibrare din Buton pentru a reveni la locul de Zborul de calibrare lansare NU IMBINATI DIFERITE TIPURI DE ACUMULATORI.
- Page 20 bateriile dispozitivului, utilizati NUMAI din kit. a sub supravegherea unui adult. Indicator LED - lu m ineaza nu lu m ineaza -a finalizat Tip bateriei Ti m p de lucru Timp de zbor dron: Aproximativ 90 de minute (cu 3.7V litiu-polimer (Li-Poly) pana la 7 minute incarcare la curent 0,5 A)
- Page 21 Pasul 1 Pasul 2 Pasul 3 Pasul 4 pe X-Bee Drone 1.5, folosind comutatorul de -urile vor clipi. Pasul 6 Pasul 5 Calibrarea motoarelor. Amplasati dispozitivul pe o LED- controlerul cuplat la aparat. LED- mod constant.
- Page 22 CONTROL DE ZBOR Controlul zborului sus / jos -ul motorului, iar dronul va zbura stick- dreapta.
- Page 23 grade. Acrobatiile trebuie sa fie Schimbarea vitezei de zbor Buton de acrobatie 1 - modul liber - un semnal sonor, Modul 2 - modul normal - - trei semnale sonore. Schimbarea vitezei de zbor Buton de acrobatie...
- Page 24 MODUL HEADLESS Cu m de a activa / dezactiva functia HEADLESS? LED- -l din nou. MOD REVENIRE LA LOCUL DE PLECARE Buton care prima deplasare este de ex. Zborul dronului la modul headless raport cu punctul de analogului dreapta. Buton pentru a reveni la locul de lansare SCHIMBAREA ELICELOR...
- Page 26 SAFETY NOTES NE KEVERJE A NI- -) helyezte be. NE KEVERJEN NI- A Li- **NE DOBJA A SZEMETESBE AZ ELEMEKET.
- Page 27 (TRANSMITTER) Antenna Power gomb gomb 3D flip gomb Headless Jobb / ball trimmer Back Home Gyere haza gomb trimmer (TRANSMITTER) (+ -). NE KEVERJEN...
- Page 28 Az elemek fedelet. Piros Piros lithium-polymer Kb. 90 perc ( 3.7V elem (Li-Poly) max. 7 perc kb. 0.5 A) Zinc-carbon elem 1.5V (GP 15G R4P) ideje: 18...
- Page 29 Kapcsolja be a Kapcsolja be az X-Bee Drone 1.5- . A LED-k elkezdenek villogni. sarokba LED-jei elkezdenek villogni, majd folyamatosan - a dr ANI, A LED-...
- Page 30 migr Nyomja meg az " migr " Nyomja meg a " migr " Bal / jobb migr Nyomja meg a "Bal migr " Nyomja meg a "Jobb migr "...
- Page 31 az alatt 360- Nyomja meg a Flip flip 3D flip gomb 3D flip gomb egy beep hang; - gyors m gomb 3D flip gomb...
- Page 32 HEADLESS -kapcsolni? Nyomja meg a Headless m ). A LED HEADLESS m ugyanazt a gombot. BACK HOME Majd nyomja meg a "Back home" Headless ). A "Back home" m Back Home gomb...
Need help?
Do you have a question about the X Bee Drone 1.5 and is the answer not in the manual?
Questions and answers