
Related Manuals for Instron 2710-11 Series


Summary of Contents for Instron 2710-11 Series
- Page 1 Instron Series 2710-11x Screw Action Grips Reference Manual - Equipment M16-16348-EN Revision C The difference is measurable ®...
- Page 2 Instron is a registered trademark of Illinois Tool Works Inc. (ITW). Other names, logos, icons and marks identifying Instron products and services referenced herein are trademarks of ITW and may not be used without the prior written permission of ITW.
- Page 3 Instron products, to the best of its knowledge, comply with various national and international safety standards, in as much as they apply to materials and structural testing.
- Page 4 Preliminary Pages Warnings Flying Debris Hazard - Make sure that test specimens are installed correctly in grips or fixtures in order to eliminate stresses that can cause breakage of grip jaws or fixture components. Incorrect installation of test specimens creates stresses in grip jaws or fixture components that can result in breakage of these components.
- Page 5 Product Support: www.instron.com...
- Page 6 Preliminary Pages M16-16348-EN...
-
Page 7: Table Of Contents
Removing a Specimen ..........Product Support: www.instron.com... - Page 8 Preliminary Pages Checklist ............Procedure .
-
Page 9: Introduction
Grip Components ........... 1-2 Description Instron Series 2710-11x screw action grips are designed for static tensile testing only. For grips with capacities of 1kN or greater, clamping is achieved by tightening the screw knobs using a hex key or torque wrench to provide adequate clamping force. -
Page 10: Grip Components
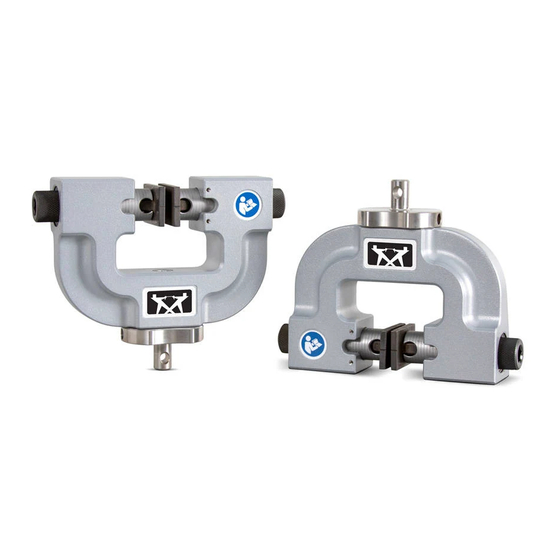
Chapter: Introduction Grip Components Specimen centering Jaw holder Screw knob device (optional) Jaw face Bearing washer Grip body Anti-rotation slot Anti-rotation pin Shoulder screw Lock nut Adapter Figure 1-1. Grip Components Grip Body The U-shaped grip body is designed to provide compliance in the gripping train. This produces a follow-up action in the gripping train that compensates for any decay in clamping force caused by the thinning of specimens during testing. -
Page 11: Adapter
The specimen stop lets you set the forward-to-back position of a specimen in the grips. The forward-to-back position of same-sized specimens in the grips can then be repeated to ensure consistent results. Product Support: www.instron.com... - Page 12 Chapter: Introduction M16-16348-EN...
-
Page 13: Chapter 2 Specifications
Chapter 2 Specifications • Grip Specifications ..........2-1 •... -
Page 14: Grip Dimensions
Chapter: Specifications Grip Dimensions Table 2-2. Grip Dimensions - mm (in) 2710-113 2710-115 Label on and 2710- and 2710- Dimension - mm (in) Figure 2-1 2710-111 2710-112 Effective height 94 (3.68) 98.6 (3.86) 116.5 (4.59) 155.5 (6.12) Maximum overall width (with 173 (6.81) 196 (7.71) 225 (8.86) - Page 15 Grip Dimensions Figure 2-1. Grip Dimensions Product Support: www.instron.com...
-
Page 16: Compatible Jaw Faces
Chapter: Specifications Compatible Jaw Faces Table 2-3. Compatible Jaw Faces for 1kN, 2kN, 5kN and 10kN Grips Maximum Specimen Thickness - mm (in) Catalog Surface Width - Height - 2710-113 and 2710-115 and mm (in) mm (in) 2710-114 2710-116 2702-300 Rubber 25 (1.0) 25 (1.0) - Page 17 38 (1.5) 25 (1.0) 33 (1.30) 43 (1.69) (HFC) 2702-347 Brake Lining 51 (2.0) 38 (1.5) 33 (1.30) 43 (1.69) (HFC) 2702-350 Line 25 (1.0) 36 (1.42) 46 (1.81) 2702-351 Line 76 (3.0) 14 (0.55) 24 (0.94) Product Support: www.instron.com...
- Page 18 Chapter: Specifications Table 2-3. Compatible Jaw Faces for 1kN, 2kN, 5kN and 10kN Grips Maximum Specimen Thickness - mm (in) Catalog Surface Width - Height - 2710-113 and 2710-115 and mm (in) mm (in) 2710-114 2710-116 2702-352 Wave 51 (2.0) 51 (2.0) 22.5 (0.67) 32.5 (1.28)
- Page 19 35 (1.38) 2702-374 Smooth 100 (4.0) 25 (1.0 35 (1.38) 2702-375 Brake Lining 25 (1.0 25 (1.0 34 (1.34) (HFC) 2702-376 Brake Lining 50 (2.0) 25 (1.0 34 (1.34) (HFC) 2702-377 Line Contact 25 (1.0 35 (1.38) Product Support: www.instron.com...
- Page 20 Chapter: Specifications M16-16348-EN...
-
Page 21: Chapter 3 Installation
Chapter 3 Installation This chapter contains procedures for installing the grips. It includes the following sections: • Installing onto a Load Frame ......... . 3-1 •... -
Page 22: Installing And Removing Jaw Faces
Chapter: Installation Grip Tommy Lock nut Female clevis socket Clevis pin Clevis pin clip Figure 3-1. Installing Grip onto Load Frame Installing and Removing Jaw Faces Install Jaw Faces 1. Push the jaw face into the grip body as shown in Figure 3-2 on page until you feel... -
Page 23: Remove Jaw Faces
Installing and Removing Jaw Faces Jaw face Figure 3-2. Installing Jaw Faces Remove Jaw Faces Simply push the jaw face out of the grip body. Product Support: www.instron.com... -
Page 24: Installing The Specimen Centering Device
Chapter: Installation Installing the Specimen Centering Device The specimen centering device is an optional feature that attaches to the grip and lets you center a specimen in the jaw faces. The specimen stop adjusts to accommodate different specimen widths. To attach the specimen centering device: 1. -
Page 25: Preload The Load String
The system is now ready to test. When you next need to change grips or any other part of the loadstring, the locknuts will be too tight to loosen by hand. Follow the unload procedure (“To unload the load string:” page 3-6). Product Support: www.instron.com... -
Page 26: To Unload The Load String
Chapter: Installation To unload the load string: 1. Install the strong specimen. 2. Increase the load on the load string to the chosen preload value. 3. Loosen all the locknuts on the grips and any intermediate couplings. 4. Reduce the load to zero. 5. -
Page 27: Chapter 4 Operation
Chapter 4 Operation • Installing a Specimen ..........4-1 •... -
Page 28: Procedure
Chapter: Operation • The load frame’s limit stops are set to prevent the grips from colliding with each other or other fixtures. If your testing system has a Specimen Protect function, use it when installing a specimen. Refer to the testing system documentation for operating details. Warnings Crush Hazard - Take care when installing or removing a specimen, assembly, structure, or load string component. - Page 29 4-3. This provides sufficient clearance for the jaw faces to articulate. thumbscrew. See Figure 4-2 on page 4-4. When testing subsequent same-sized specimens, position them against the specimen stop to ensure the forward-to-back position of all specimens is consistent. Product Support: www.instron.com...
- Page 30 Chapter: Operation 5. Starting with the upper grip, adjust the screw knobs so that the specimen is centered left- to-right, as shown in Figure 4-1 on page 4-3. Use the engraved scale on the jaw holder to aid in doing this. 6.
-
Page 31: Removing A Specimen
Caution Secure fragile specimens before opening the lower grip. 2. Unscrew the screw knob on the lower grip, using a hex wrench if necessary, until the jaw faces disengage from the specimen. 3. Remove the specimen. Product Support: www.instron.com... - Page 32 Chapter: Operation M16-16348-EN...
-
Page 33: Chapter 5 Maintenance
Chapter 5 Maintenance This chapter contains instructions for maintaining and troubleshooting your grips. It includes the following sections: • General Maintenance Checklist ........5-1 •... -
Page 34: Troubleshooting
5-1suggests a probable cause and recommends a remedy. If you are unable to solve a problem, contact Instron Service. Before you contact Instron Service, note the model and serial numbers of the test system and make sure there is a telephone at the test site. -
Page 35: Maintenance Procedures
4. Lubricate the flat surfaces of the bearing washer with Molykote 33 grease. Do not use excessive amounts of grease. 5. Reassemble the gripping train, as shown in Figure 5-1 on page 5-4. Ensure that the shoulder screw is secured tightly. Product Support: www.instron.com... - Page 36 Chapter: Maintenance Anti-rotation pin Anti-rotation slot Bearing washer Bore Screw knob Shoulder screw Jaw holder Gripping train Figure 5-1. Lubricating the Screw Knobs and Replacing the Bearing Washers 6. Reinstall the gripping train in the grip body. Ensure that the anti-rotation pin in the grip body is aligned with the anti-rotation slot in the jaw holder, as shown in Figure 5-1 page 5-4.
-
Page 37: Chapter 6 Illustrated Parts
Chapter 6 Illustrated Parts • Replaceable Parts List ..........6-1 •... - Page 38 Chapter: Illustrated Parts Figure 6-1. Exploded View of 2710-115 (5kN) Screw Action Grip M16-16348-EN...
- Page 39 Shoulder screw 9-6-21 Table 6-2. Ancillary Parts - supplied with Grips Grip Part Number Quantity 2710- 2710- 2710- 2710- 2710- 2710- per grip Description Molykote 33 grease 105-1-4 Tommy bar T1080-23 Hex key 80-1-1033 80-1-1032 (10mm) (12mm) Product Support: www.instron.com...
-
Page 40: Assemblies And Accessories
Chapter: Illustrated Parts Assemblies and Accessories Table 6-3. Available Assemblies and Accessories Applicability 2710-111 2710-113 Part number Description 2710-112 2710-114 2710-115 2710-116 2501-254 Type O adapter assembly (lock Replaces standard Can be used to convert nut, adapter and dowel pin) adapter assembly from standard Type D to Type O adapter... - Page 42 Product Support: www.instron.com...
Need help?
Do you have a question about the 2710-11 Series and is the answer not in the manual?
Questions and answers