Table of Contents
Advertisement
Quick Links
Advertisement
Table of Contents

Subscribe to Our Youtube Channel
Related Manuals for Cartoni P20


Summary of Contents for Cartoni P20
- Page 1 PROFESSIONAL CAMERA SUPPORT USER’S MANUAL & Maintenance...
- Page 2 Thank you for choosing the P20 PEDESTAL manufactured by CARTONI S.p.A. The P20 is designed and built using state-of-the-art technologies and procedures in order to guarantee maximum reliability over time, as well as total safety for its users. In order to properly and safely use the P20 Pedestal read this manual very carefully and follow the instructions.
-
Page 3: Table Of Contents
ontents 1. INTRODUCTION 1.1 PROPER USE 1.2 WARRANTY 1.3 AUTHORIZED PERSONNEL 1.4 REGULATORY INFORMATION 1.5 DOCUMENTATION 2. OPERATING ELEMENTS 2.1 SPECIFICATIONS 2.2 COMPATIBLE EQUIPMENT 2.3 USAGE 3. INSTALLATION AND SETTINGS 3.1 SETTING THE PEDESTAL 3.2 MOUNTING THE CAMERA 3.3 PRESSURIZING THE PEDESTAL AND BALANCING THE LOAD 4. -
Page 4: Introduction
The correct and safe use of this Pedestal is only guaranteed if it is used in accordance with the following manual and other documentation that accompanies the P20 Pedestal. It is therefore essential to read all the documentation carefully and to keep it in a safe place. -
Page 5: Warranty
1.2 W arranty The P20 Pedestal is covered by a warranty against manufacturing defects for 5 years from the date of shipment (three years basic warranty + two years upon online registration to www.cartoni.com). The warranty covers replacement of any defective part and the labour required excluding transport/duty costs. -
Page 7: Documentation
In case of sale or transferring ownership of the Pedestal, the manual and warranty card must be handed over to the new operator or owner. The Pedestal designed and built by CARTONI has passed the final test performed at the factory to verify functional features, dimensional characteristics and durability. -
Page 8: Operating Elements
2. o PeratIng lements... -
Page 10: Specifications
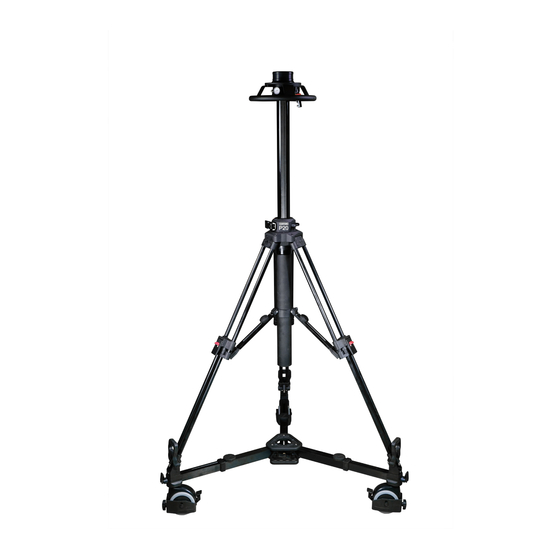
Skid arm knob Cable guard Tripod foot Steering wheel Cable guard knob Drag control knob Extendable pneumatic column Spreader central locking lever Leg tripod lever Stroke lock Tripod leg Intake valve Spreader circular knob Foot inserting seat Safety hooking Bar Skid arms locking lever Rubber hook Safety latch... -
Page 11: Compatible Equipment
2.2 C omPatIble quIPment The equipment used with the P20 Pedestal should comply with the following characteristics: • Optimal weight (Camera/lens/accessories & fluid Head): <20 kg; • Maximum weight (Camera/lens/accessories & fluid Head): 25 kg; • Weight distribution must take in consideration that the center of gravity (CG) of the mounted elements stays well inside the rim of the wheelbase. -
Page 12: Installation And Settings
The Pedestal produces a very low level noise; anyway, the weighted equivalent acoustic pressure emit- ted by the Pedestal is below 70 dB (A). nstallatIon and ettIngs The Pedestal is split into the following component parts for shipment: Skid base 1-stage column CARTONI manual Air-pump... -
Page 13: Setting The Pedestal
Prior to installation, please check the state of package for integrity on arrival, and also make sure that none of the components shows signs of impact. If any such damage occurs CARTONI should be in- formed immediately. If the product is to be forwarded elsewhere, it should be carefully packed and the greatest care should be taken not to damage any of the components. - Page 14 Lock the wheels by pushing down the lock lever (9) on each wheel. Install the column in the Skid as follows: Loosen the spreader central locking lever (13), keep the column assembly in vertical position, open to- wards external direction the tripod legs (14) and insert the lower part of the column on the central hole of the Skid (19).
-
Page 15: Mounting The Camera
3.2 m ountIng amera Lock the wheels by pushing the lock lever (9) on each wheel. Lower the column pushing it down and lock the safety latch (26) to the safety hooking bar (25). Fix the pan and tilt Head on the top of the Pedestal using one of the accessories (see 2.2 Compatible equipment –... -
Page 16: Using The Pedestal
sIng the edestal 4.1 h eIght djustment The total Pedestal height can be regulated by extending the tripod legs (operate the leg tripod levers (23)) and adjust each leg at the same height. When correctly balanced, the column can be used without any resistance throughout the stroke capa- bility. -
Page 17: Cable Guards
4.3 C able uards If there is the risk of interference with cables or other obstacles under the Pedestal rubber wheels, a cable guard (11) has been installed around each wheel to minimize this risk of interference. For height regulation from the floor loosen the cable guard knob, lift or lower the cable guard, then tighten the cable guard knob again. -
Page 18: Safety Precautions
4.4 s afety reCautIons The Pedestal is equipped with safety systems designed to eliminate the risk of injury to the operators or other surrounding people. The Pedestal has been designed to respect ergonomic principles to allow operators to use it without any physical exertion. This includes working conditions with minimum strain, movements, frequency of routines to avoid any physical and psychological dis- comfort. - Page 19 The operators must take care to avoid creating potential dangerous situations for both the operator and others. Anyone who operates the Pedestal must be thoroughly trained in the correct methods of use and its safety features. Furthermore they must be informed of the present documentation relevant to their work. During any maintenance to the Pedestal, we recommend to follow the indications in the current section.
-
Page 20: Disassembling And Storage
IsassemblIng and torage The Pedestal can be disassembled for transport and storage. Proceed as follows: Lock the three wheels with the wheel locks (9). Depressurize the Pedestal till to 1.5/2.0 Bar (total bleeding is not compulsory). Open the safety latch (26) and push down the column to engage the safety latch (26) to the safety hook- ing Bar (25). -
Page 21: Service
Pare arts Whatever extra maintenance requires to be carried out by CARTONI’s own technical servicing staff or an authorized service station appointed by CARTONI. Information on authorized service station staff can be obtained by contacting CARTONI or www.cartoni.com. -
Page 22: Track Wheel Assembly
For fast, effective problem solving CARTONI should be informed of the Pedestal model, the serial num- ber and the nature of the defect or its visible symptoms when the problem arises. All warranty conditions are invalidated should any repair operation be attempted by anyone not authorized by CARTONI. -
Page 23: Decommisioning
Special track wheels are available to allow the use on standard tracks. Replace the wheels as follows: • Remove the column from the Skid and turn the Skid upside down; • Unscrew and remove the Allen screw 6 x 25 mm (A); •... - Page 24 PROFESSIONAL CAMERA SUPPORT CARTONI S.p.A Via di Portonaccio, 33/B - 00159 Rome (Italy) Phone +39 06 4382002 Fax +39 06 43588293 Email: cartoni@cartoni.com www.cartoni.com March/2020...
Need help?
Do you have a question about the P20 and is the answer not in the manual?
Questions and answers