Table of Contents
Advertisement
Quick Links
Advertisement
Table of Contents

Related Manuals for Aqua Lung PHODS


Summary of Contents for Aqua Lung PHODS
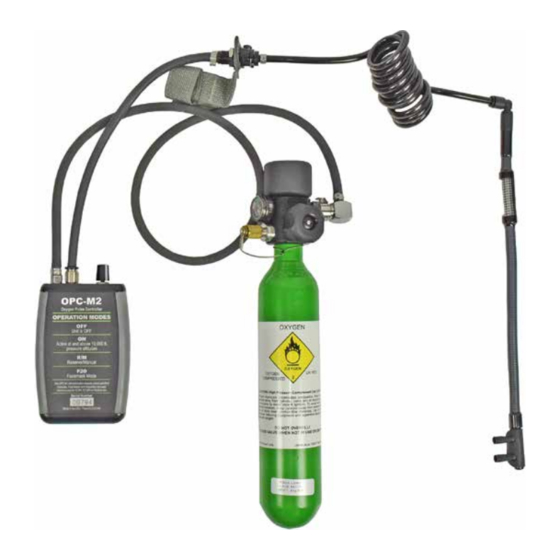
- Page 1 PHODS Portable Helicopter Oxygen Delivery System TECHNICAL MANUAL Rev. 05/20...
- Page 2 NOTICE OF NON-LIABILITY Before the (PHODS) Portable Helicopter Oxygen Delivery System is put to use, it is the responsibility of any user who will use this device to become familiar with the operation and safety aspects of this device.
-
Page 3: Table Of Contents
TABLE 3: TORQUE SPECIFICATIONS ......................... 18 TABLE 4: TEST BENCH SPECIFICATIONS ......................18 TABLE 5: RECOMMENDED CLEANERS AND LUBRICANTS ................18 TABLE 6: LIST OF TOOLS AND SERVICE KITS ....................19 PROCEDURE A: OXYGEN CLEANING AND LUBRICATING ................22 PHODS EXPLODED VIEW ............................. 23... -
Page 4: Introduction
Avoid using hardened steel picks (unless directed), as they 4. Use only genuine Aqua Lung parts provided in the overhaul may damage the o-ring sealing surface. All o-rings that are parts kit for this product. DO NOT attempt to substitute an removed are discarded and replaced with brand new o-rings. -
Page 5: First Stage Disassembly Procedure
FIRST STAGE DISASSEMBLY PROCEDURE 3. Remove the dial indicator (30) from the body (8) using a 7/8” crowfoot and flex wrench. Remove o-ring (28) from the dial indicator. NOTE: Before performing any disassembly, refer to the exploded parts drawing, which references all mandatory CAUTION: Be careful not to damage the fill port with replacement parts. - Page 6 PHODS Technical Manual 10. Remove o-ring (17) from 6. Unscrew the fill port cap from the fill port. Use a 9/16” deep the bonnet (18). socket and flex wrench to unscrew the fill port (29) from the body (8). Remove o-ring (28) from the fill port.
- Page 7 14. Separate the piston (4) from the retaining cap (2). Inspect 18. Lift the fill port cap retaining wire off the cylinder (26). the inside surface of the cap for corrosion or scratches. Remove o-ring (27) from the first stage body (8). Remove the spring (7) from the first stage body (8).
-
Page 8: First Stage Reassembly Procedure
25 ft lb / 33.9 Nm of assembling any Aqua Lung product. DO NOT ® torque to the first stage body. attempt to substitute an Aqua Lung part with ® another manufacturer’s, regardless similarity in shape, size or appearance. Doing so may render the product unsafe and could result in serious injury or death. - Page 9 6. Insert the shaft of the piston (4) through the spring (7). 9. Thread the safety plug (10) into the lower port (opposite of the fill port) on the first stage body (8). Use a 3/8” socket Press down on the retainer cap (2) and tighten the cap onto and torque wrench to apply 90 in lb /10.2 Nm of torque to the first stage body (8) until hand tight.
- Page 10 PHODS Technical Manual 12. Install o-ring (17) onto the bonnet (18) so that the o-ring 16. Place the handwheel (21) over the indicator ring (19). Insert fits into the groove located above the threads. Lightly lubricate the spring (22) into the handwheel, followed by the washer (23).
-
Page 11: First Stage Testing
The recommended time is necessary due to slower bubble 3. Attach the fill adapter and slowly fill the PHODS to 2100 formation that occurs in smaller leaks. Bubbles indicate a leak, psi / 145 BAR. -
Page 12: Opc Disassembly Procedure
PHODS Technical Manual OPC DISASSEMBLY PROCEDURE 4. Remove the filter & spring (38) from inside the inlet hose port on the OPC. Remove o-ring (37) from the end of the inlet hose (36). CAUTION: Batteries need to be removed prior to any maintenance or storage of the OPC. -
Page 13: Opc Reassembly Procedure
NOTE: The torque driver should be pre-set to 17 in lb / 1.9 Nm The torque driver setting can also be changed with the adjustment tool and instructions provided in the PHODS tool kit. 3. Install the 6mm connector w/ gasket (39) into the outlet hose port on the OPC. -
Page 14: Opc Power-Up Test
NOTE: The OPC will not deliver an oxygen pulse below Providing PHODS has passed all testing and the cylinder has 8,000 ft. PA while in ON mode other than during the been filled to 2100 psi / 145 BAR, PHODS is ready for use. Power-Up Test. -
Page 15: Opc Hose Repair
OPC HOSE REPAIR WARNING: DO NOT modify or alter the length of any hoses or tubing. 1. To remove the Oetiker clamp; a. Assemble the 4 in 1 screwdriver with the large flathead. b. Carefully slide the 4 in 1 screwdriver under the tab of the Oetiker clamp. - Page 16 PHODS Technical Manual TABLE 1: TROUBLESHOOTING GUIDE FIRST STAGE SYMPTOM POSSIBLE CAUSE TREATMENT 1. The seat & disc retainer (11) is worn or 1. Replace seat & disc retainer System will not remain depressurized damaged. after handwheel is closed and system is 2.
- Page 17 TABLE 2: TROUBLESHOOTING GUIDE OPC SYMPTOM POSSIBLE CAUSE TREATMENT Replace batteries with a fresh set of 1. Depleted or low batteries. quality Alkaline. 2. Batteries are not installed properly. 2. Reinstall batteries to correct polarity. The OPC emits no sound or start-up 3.
- Page 18 Opening Effort Inlet 2100 psi / 145 BAR 0.5 inches H20 16.93 mbar TABLE 5: RECOMMENDED CLEANERS AND LUBRICANTS LUBRICANT/CLEANER APPLICATION SOURCE Aqua Lung, PN 820466, or Lubrication Technologies Christo-Lube MCG-111 ® All o-rings 310 Morton Street Jackson, OH 45640...
- Page 19 PART # DESCRIPTION APPLICATION 100398 Vise Jaw Inserts Removal / Installation of First Stage Body (8) to Cylinder (26) Gauge, MP 102969CR Checking medium pressure PHODS O2C Adjustable 107394 Spanner Removal / Installation of Retainer Cap (2) Wrench 1/4”F - 3/8”M 103004 Adapt Torque Driver to 3/8”...
- Page 20 PHODS Technical Manual TABLE 6: LIST OF TOOLS AND SERVICE KITS (CONTINUED) PART # DESCRIPTION APPLICATION 103011 3/8” Crowfoot Removal / Installation of OPC Inlet Connector (8) Flex Wrench 103045 Removal of parts 3/8”, 8.5” 17mm 944118 Combination Removal / Installation of Nut Inside Facemask 90° Elbow Fitting...
- Page 21 Tool, Retaining 103049 Installation of 1/4 Turn Fastener Washer into MFS Ring for MFS 102990 Service Kit, Regulator, PHODS Maintenance of PHODS regulator 102950 Service Kit, OPC, PHODS Maintenance of PHODS OPC PHODS Tool Kit (PN 102968) Vise Insert Cutout...
-
Page 22: Procedure A: Oxygen Cleaning And Lubricating
Exercise extreme care when charging, handling or storing HP oxygen cylinders. • Qualifications to perform maintenance on PHODS are obtained after successful completion of the PHODS Technical Training Course. In addition, individuals must be certified as oxygen clean workers. Oxygen Safe Area Guidelines Components requiring O2 cleaning must be disassembled, cleaned and assembled in a designated “O2 Safe Area”;... -
Page 23: Phods Exploded View
O-ring (10 pk) 4 ..106769 Piston 28 ..820319P O-ring (10 pk) 5 ..820007P O-ring (20pk) 29 ..102908 Fill Port w/ Cable PHODS O2C 6 ..106726 HP Seat, Piston 30 ..102955 Indicator, Dial 3000 psi O2 (spare) 7 ..102901 Spring ..102950 Service Kit, OPC, PHODS 8 ..102954... - Page 24 PHODS Portable Helicopter Oxygen Delivery System 2340 Cousteau Court • Vista, CA 92081 Phone (760) 597-5000 • Fax (760) 597-4900 www.aqualungmilpro.com ©2020 Aqua Lung...
Need help?
Do you have a question about the PHODS and is the answer not in the manual?
Questions and answers