
Related Manuals for Stevens AeroModel Free Flight HLG01


Summary of Contents for Stevens AeroModel Free Flight HLG01
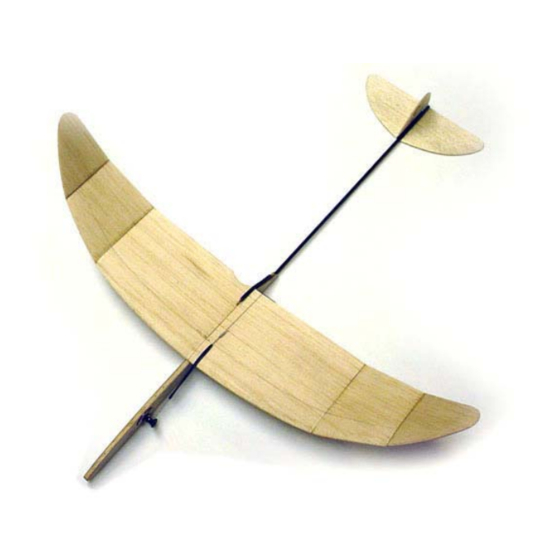
- Page 1 HLG01 Page 1 V1.0 HLG01 Hand Launch Glider #1 Span 18 in. / Length 19-3/8 in. / Area 46.5 sq. in. / Typical Flying Weight 25g © 2007 Stevens AeroModel. All Rights Reserved.
-
Page 2: Warranty
Further, Stevens AeroModel reserves the right to change or modify this warranty without notice. In that Stevens AeroModel has no control over the final assembly or material used for final assembly, no liability shall be assumed nor accepted for any damage resulting from the use by the user of the final user-assembled product. -
Page 3: General Information
V1.0 General Information: Thank you for purchasing this Free Flight kit by Stevens AeroModel. Please inspect your kit for missing or damaged items. To complete this model you will require basic woodworking tools (a sanding block and sand paper), thin CA glue, clear tape, a water, lacquer, or oil based wood sealant. -
Page 4: Instructions For Assembly
Please read the instructions carefully and take note where we offer building advice for “Lefties!”. © 2007 Stevens AeroModel. All Rights Reserved. - Page 5 (~ 1-3/4 in. from leading edge at root) 1/32 in. 1/32 in. Wing Assembly 1. Using a sharp blade separate the wing core into six total segments (three per side) by cutting skip lines that retain the sections. © 2007 Stevens AeroModel. All Rights Reserved.
- Page 6 Example (Given to complete panel 1) Step 1 Sand "A" Sand Perpendicular to Building Board Remove Material Building Board 5 degree Jig Step 2 Sand "B" Sand Perpendicular to Building Board Remove Material Building Board 10 degree Jig © 2007 Stevens AeroModel. All Rights Reserved.
- Page 7 Repeat for opposite side. Follow same process as above with assembled 20 degree jig under wing panel 2 and wing panel 3 flat on top of building board to complete the polyhedral wing assembly. © 2007 Stevens AeroModel. All Rights Reserved.
- Page 8 Lefties! the fuselage parts layout order will need to be reversed to place the timer media cavity on the right side of the glider. To build a left handed fuselage simply swap the top and bottom plywood parts in the first photo set. © 2007 Stevens AeroModel. All Rights Reserved.
- Page 9 CA glue. Make multiple applications of glue between the boom and pivot allowing ample time for the glue to cure between applications. © 2007 Stevens AeroModel. All Rights Reserved.
- Page 10 Finally apply a tiny drop of thin CA glue at the to the surface where the outside edge of the rivet body and ply fuselage sides meet. © 2007 Stevens AeroModel. All Rights Reserved.
- Page 11 Note: You’ll want your bend to be as close to the point at which pin exits aluminum tube to reduce slop. Check to be certain your pin rotates freely within timer top assembly and adjust to eliminate binding, if required (third photo). © 2007 Stevens AeroModel. All Rights Reserved.
- Page 12 10. With the putty installed within the timer cavity use four of the #0x3/16” sheet-metal screws to secure the timer top assembly to the fuselage as illustrated below. © 2007 Stevens AeroModel. All Rights Reserved.
- Page 13 “S” straight. Make the bends as tight as possible using small needle nose pliers. Trim excess material off the end opposite the tip of the pin. Install completed “S” centered to aft edge of pivot block as illustrated below. Glue. © 2007 Stevens AeroModel. All Rights Reserved.
- Page 14 1/8” balsa under the left tip of the horizontal stabilizer to provide initial stabilizer tilt. Secure stabilizer to boom using thin CA glue. Lefties! place scrap 1/8” balsa under right tip of stabilizer. © 2007 Stevens AeroModel. All Rights Reserved.
- Page 15 Glue. Once the glue has cured, curl a length of fine sand paper around your finger and sand a scallop in the trailing edge of the wing to match flush with the scallop cut in the finger rest. Lefties! Install your finger rest on to the Left wing panel. © 2007 Stevens AeroModel. All Rights Reserved.
- Page 16 When inserting the hook drive the straight pin portion of the hook at a 45 degree angle into the body of the wing and fuselage. Glue. © 2007 Stevens AeroModel. All Rights Reserved.
- Page 17 Next, take your loop an tie an overhand knot. Work the knot down to allow for a loop of about ¾” secure the knot with a drop of thin CA glue and remove the short length of remnant thread. © 2007 Stevens AeroModel. All Rights Reserved.
- Page 18 Right side DT string guide (second and third photo). With the DT string still looped around the pin at top of wing remove any slack in the string and loop multiple times through eye of Right side DT string guide (fourth photo). © 2007 Stevens AeroModel. All Rights Reserved.
- Page 19 Optional, cover the ballast pocket with 1/32” plywood plug to create a streamlined 14. You may now remove the tape from step 9 that prevented the operation of the pop-up fuselage and proceed to the Flight Trim Guide for trimming and operation instructions. © 2007 Stevens AeroModel. All Rights Reserved.
- Page 20 HLG01 Page 20 V1.0 © 2007 Stevens AeroModel. All Rights Reserved.
- Page 21 HLG01 Page 21 V1.0 Trim Guide Hand Launch Glider #1 Span 18 in. / Length 19-3/8 in. / Area 46.5 sq. in. / Typical Flying Weight 25g © 2007 Stevens AeroModel. All Rights Reserved.
- Page 22 There’s an old saying that goes something like this “but it was just a test flight” which is often followed by your prized HLG bounding skyward on a thermal never to be seen again. You should © 2007 Stevens AeroModel. All Rights Reserved.
- Page 23 Pick a point on the horizon and give a firm over-hand toss releasing the glider aimed at your distant point on the horizon with wings level to horizon. Observe the models behavior. © 2007 Stevens AeroModel. All Rights Reserved.
- Page 24 100’ in diameter. Experiment with your throwing. In many cases, problems with the models transition and altitude gain can be attributed to your throwing technique. © 2007 Stevens AeroModel. All Rights Reserved.
- Page 25 – you’ll loose it! Bring at least two HLG01’s each flying session or risk being subject to “Murphy’s Law”. • Do bring your son and daughter along they will enjoy throwing and retrieving just as much as you! © 2007 Stevens AeroModel. All Rights Reserved.
- Page 26 Add tightens up into a tight additional wash-in wedge till descending spiral. spiral is reduced. *Applies to right-handed throwers. Left-handed throwers will typically trim for the opposite direction. © 2007 Stevens AeroModel. All Rights Reserved.
- Page 27 Mark Covington who was the driving force behind development of this model. Please direct photos of your project, comments, or suggestions to: Stevens AeroModel 1528 S. Nevada Ave. Colorado Springs, CO 80906 sales@stevensaero.com © 2007 Stevens AeroModel. All Rights Reserved.
Need help?
Do you have a question about the Free Flight HLG01 and is the answer not in the manual?
Questions and answers