
Related Manuals for Stevens AeroModel 1911 Nieuport


Summary of Contents for Stevens AeroModel 1911 Nieuport
- Page 1 Wing Span: 16.5 inches | Wing Area: 63 square inches | Average Flying Weight: 1.75 ounces Build Instructions - Version 1.12 (revised 06.23.2015) The Great Race... Build it! stevensaero.com...
- Page 2 LIABILITY RELEASE In that Stevens AeroModel has no control over the final assembly or material used for final assembly, no liability shall be assumed nor accepted for any damage resulting from use by the user. By the act of using the user-assembled product, the user accepts all resulting liability.
- Page 3 Please do not hesitate to contact us with your feedback as we are company driven by our customers desires! Bill Stevens Stevens AeroModel - Calhan, CO USA ToonScale 1911 1/2 Nieuport UM - Build Instructions © 2015 Stevens AeroModel, all rights reserved. Page 3...
- Page 4 Many of the suggested items listed below are available at your local hobby shop. For your convenience, Stevens AeroModel stocks all the power system components and most of the building supplies required to complete this kit. If you have difficulties sourcing any of these items locally, please visit our website, stevensaero.com to purchase the items necessary to complete your model.
- Page 5 Build Instructions Sheet Wood Inventory (1 of 1) ToonScale 1911 1/2 Nieuport UM - Build Instructions © 2015 Stevens AeroModel, all rights reserved. Page 5...
- Page 6 Build Instructions Builder’s Notes ToonScale 1911 1/2 Nieuport UM - Build Instructions © 2015 Stevens AeroModel, all rights reserved. Page 6...
- Page 7 Please check our website for updates to these instructions before starting the build. To obtain downloads and updates to this model aircraft kit, please visit the product page at stevensaero.com ToonScale 1911 1/2 Nieuport UM - Build Instructions © 2015 Stevens AeroModel, all rights reserved. Page 7...
- Page 8 “Top” corresponding with the top of former F6. Note: The tabs at the base of F3 and F7 will not fit in notches, but instead will overlap the edge of the adjacent part. ToonScale 1911 1/2 Nieuport UM - Build Instructions © 2015 Stevens AeroModel, all rights reserved. Page 8...
- Page 9 Bottom View Step 2 Step 6 F3 Top Receiver Tray Underneath Front View Step 3 Step 7 Step 4 Step 7 Cont. Overlap Overlap ToonScale 1911 1/2 Nieuport UM - Build Instructions © 2015 Stevens AeroModel, all rights reserved. Page 9...
- Page 10 flat surface and bond all parts together with CA. Pull the rear of the fuselage sides together, fitting the tabs at the rear of the fuselage bottom F13 to the notches at the rear of the fuselage side, ToonScale 1911 1/2 Nieuport UM - Build Instructions © 2015 Stevens AeroModel, all rights reserved. Page 10...
- Page 11 Step 8 Step 12 F12a F12b Step 9 Step 13 Step 10 Step 14 Bottom View Step 11 Step 14 Cont. Bottom View ToonScale 1911 1/2 Nieuport UM - Build Instructions © 2015 Stevens AeroModel, all rights reserved. Page 11...
- Page 12 Refer to the detail sheet for correct location. Bond the ribs at the trailing edge only, using small drops of thin CA. ToonScale 1911 1/2 Nieuport UM - Build Instructions © 2015 Stevens AeroModel, all rights reserved. Page 12...
-
Page 13: Table Of Contents
Step 21 45 deg. Bottom Step 18 Step 22 45 deg. Left Right Top View Bottom View Step 19 Step 23 Bond Bottom View ToonScale 1911 1/2 Nieuport UM - Build Instructions © 2015 Stevens AeroModel, all rights reserved. Page 13... - Page 14 ToonScale 1911 1/2 Nieuport UM - Build Instructions © 2015 Stevens AeroModel, all rights reserved. Page 14...
-
Page 15: Step
Step 26 Step 30 Front Etched Line Etched Back Line Step 27 Step 30 Cont. Front Etched Hole Lines Back Left Back Centered ToonScale 1911 1/2 Nieuport UM - Build Instructions © 2015 Stevens AeroModel, all rights reserved. Page 15... -
Page 16: Step
Do-dads. Position parts M3b and M3c (sheet 08/09, 1/32 in. ply)over their respective etched areas on the front of M3a, and bond. Paint M3b and M3c a contrasting color, we chose Silver. ToonScale 1911 1/2 Nieuport UM - Build Instructions © 2015 Stevens AeroModel, all rights reserved. Page 16... -
Page 17: Step
Step 31 Cont. Step 34 Front Back Step 31 Cont. Step 36 1/16 in. x 1/4 in. Aluminum Tube Step 32 Step 37 sand ToonScale 1911 1/2 Nieuport UM - Build Instructions © 2015 Stevens AeroModel, all rights reserved. Page 17... -
Page 18: Step
LG6. Do not bond the Landing Gear to the model at the fuselage at this time! ToonScale 1911 1/2 Nieuport UM - Build Instructions © 2015 Stevens AeroModel, all rights reserved. Page 18... -
Page 19: Step
M12 through M24 Step 40 Step 44 Rear Do Not Glue Round Notch Front Step 41 Step 45 Bottom View Bond Bond Do Not Glue ToonScale 1911 1/2 Nieuport UM - Build Instructions © 2015 Stevens AeroModel, all rights reserved. Page 19... -
Page 20: Step
Snap the scored tubing into two equal lengths of 1/8 in. ToonScale 1911 1/2 Nieuport UM - Build Instructions © 2015 Stevens AeroModel, all rights reserved. Page 20... -
Page 21: Step
4 in. Step 48 Step 50 1/16 in. x 1/4 in. Tube 1/16 in. x 1/4 in. score here Tube 1/8 in. 1/8 in. ToonScale 1911 1/2 Nieuport UM - Build Instructions © 2015 Stevens AeroModel, all rights reserved. Page 21... -
Page 22: Step
flex, thus absorbing the landing shocks. Set the completed landing gear assembly aside until needed in the Final Assembly. ToonScale 1911 1/2 Nieuport UM - Build Instructions © 2015 Stevens AeroModel, all rights reserved. Page 22... - Page 23 Step 52 Step 54 1/8 in. tube Step 52 Cont. Step 55 1/8 in. Tube Medium CA Medium CA Step 53 Step 56 Bond ToonScale 1911 1/2 Nieuport UM - Build Instructions © 2015 Stevens AeroModel, all rights reserved. Page 23...
-
Page 24: Step
Fit the snake bend on each pushrod to the servo tabs on the receiver brick [PKZ3352]. Note: The holes in the tabs are different sizes. Fit the pushrod to the middle hole. ToonScale 1911 1/2 Nieuport UM - Build Instructions © 2015 Stevens AeroModel, all rights reserved. Page 24... -
Page 25: Step
FA 3 Bond Do not bond to fuselage FA 1 FA 4 “Snake Bend” FA 1 Cont. FA 5 Middle Hole Bottom View ToonScale 1911 1/2 Nieuport UM - Build Instructions © 2015 Stevens AeroModel, all rights reserved. Page 25... -
Page 26: Step
Connect the motor lead to the socket located at the center-rear of the receiver (PKZ3352), oriented so □ that the black wire is nearest the center of the circuit board. ToonScale 1911 1/2 Nieuport UM - Build Instructions © 2015 Stevens AeroModel, all rights reserved. Page 26... -
Page 27: Step
FA 10 PKZ3624 Crossover Bottom View FA 7 Cont. FA 10 Cont. Bottom View FA 8 FA 11 Black Wire Exit Slot Bottom View ToonScale 1911 1/2 Nieuport UM - Build Instructions © 2015 Stevens AeroModel, all rights reserved. Page 27... -
Page 28: Step
R2 (sheet 08/09, 1/32 in. ply) into the slot, oriented so that the hole at the end of the horn is positioned above the hinge line. Bond the horn to the rudder with medium CA. ToonScale 1911 1/2 Nieuport UM - Build Instructions © 2015 Stevens AeroModel, all rights reserved. Page 28... -
Page 29: Step
Bottom View Bond Bottom View FA 13 Cont. FA 15 Bottom View Bevelled Side Down! FA 14 FA 16 Bottom View Right Side ToonScale 1911 1/2 Nieuport UM - Build Instructions © 2015 Stevens AeroModel, all rights reserved. Page 29... -
Page 30: Step
Finish Control Linkages. With the control surfaces centered, trim the push rods 1/4 in. in front □ of the control horns. Retain the scrap pieces of wire. ToonScale 1911 1/2 Nieuport UM - Build Instructions © 2015 Stevens AeroModel, all rights reserved. Page 30... - Page 31 Bottom View Bottom View Bond FA 19 FA 23 Perpendicular Bond Bottom View FA 20 FA 24 1/4 in. Top View Bottom View ToonScale 1911 1/2 Nieuport UM - Build Instructions © 2015 Stevens AeroModel, all rights reserved. Page 31...
- Page 32 Bond the wing panel to the fuselage and spar with a small bead of medium CA. Repeat for the opposite wing panel. ToonScale 1911 1/2 Nieuport UM - Build Instructions © 2015 Stevens AeroModel, all rights reserved. Page 32...
- Page 33 FA 27 FA 31 3/4 in. Bond Part “B” make two. FA 28 FA 32 Bottom View Bond “B” Heat Shrink Tube Bond “A” ToonScale 1911 1/2 Nieuport UM - Build Instructions © 2015 Stevens AeroModel, all rights reserved. Page 33...
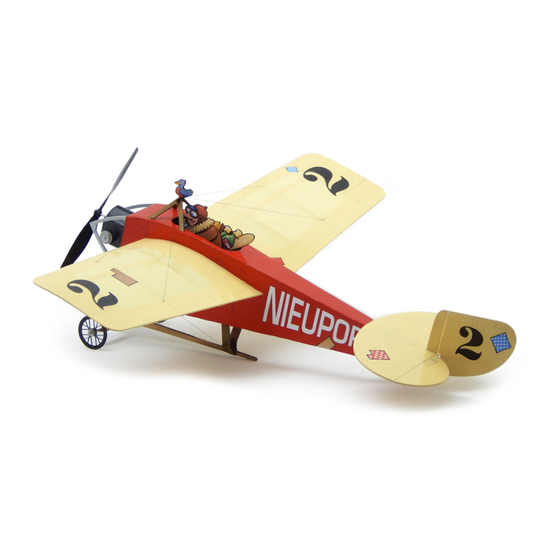
- Page 34 Congratulations! Your Stevens AeroModel 1911-1/2 Nieuport UM is now complete. Please proceed to the Setup and Preflight sections of this manual to prepare your model for it’s first flight ToonScale 1911 1/2 Nieuport UM - Build Instructions © 2015 Stevens AeroModel, all rights reserved.
- Page 35 Build Instructions FA 33 FA35 Cont. FA34 Complete! FA35 FA35 Cont. wings appear equal in twist wash-out at “R” and “L” is 1/8 in. ToonScale 1911 1/2 Nieuport UM - Build Instructions © 2015 Stevens AeroModel, all rights reserved. Page 35...
- Page 36 Check Wing Attachment Points. Always make sure you inspect for damage and wear. Make sure that the wing and wing struts, if applicable, are properly attached. ToonScale 1911 1/2 Nieuport UM - Build Instructions © 2015 Stevens AeroModel, all rights reserved. Page 36...
- Page 37 Crosswind landings should be avoided until you are comfortable with the model’s in-flight behavior. Congratulations! Once you’ve completed your first flights, you will have noticed that the Stevens AeroModel ToonScale is a very stable model airplane. When built straight, and trimmed for level flight, it Nieuport UM should readily return to “wings level”...
Need help?
Do you have a question about the 1911 Nieuport and is the answer not in the manual?
Questions and answers