Advertisement
Quick Links
Advertisement

Related Manuals for Stevens AeroModel 1911 Caudron


Summary of Contents for Stevens AeroModel 1911 Caudron
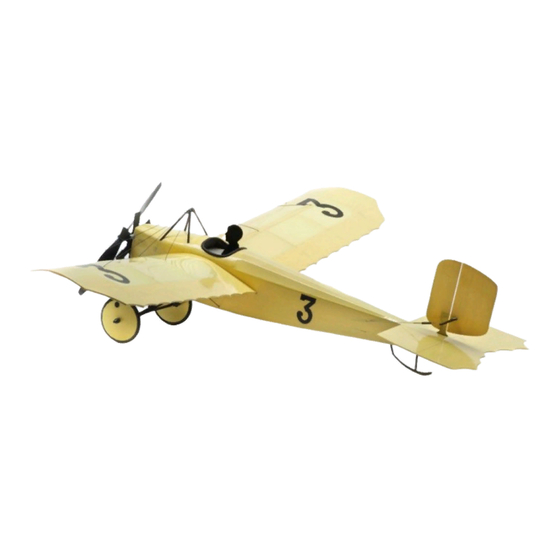
- Page 1 Build Instructions 1911 Caudron Hendon-London Aerial Derby Racer Wing Span: 18.25 inches | Wing Area: 56 inches | Average Flying Weight: 1.4 ounces Version 1.0 (revised 11.01.2013) 1911 Cuadron Build Instructions. © 2013 Stevens AeroModel all rights reserved.! Page 1...
- Page 2 Build Instructions WARRANTY Stevens AeroModel guarantees this kit to be free from defects in both material and workmanship at the date of purchase. This warranty does not cover any component parts damaged by use or modification. In no case shall Stevens AeroModel’s liability exceed the original cost of the purchased kit. Further, Stevens AeroModel reserves the right to change or modify this warranty without notice.
- Page 3 1 - 1-1/2 in length of 1/16 in. diameter Heat Shrink Tube 1 - Nylon Receiver Clip 1 - Nylon Tail Skid 1 - Pair Plastic Wheels [SIGSH540] 1 - Balsa Part M1 1 - Ply Part F19 1911 Cuadron Build Instructions. © 2013 Stevens AeroModel all rights reserved.! Page 3...
- Page 4 ☐ DEFT clear lacquer based sealant (available at most hardware stores). ☐ Design Master Color Tool lacquer based spray paint (available at most art supply stores). 1911 Cuadron Build Instructions. © 2013 Stevens AeroModel all rights reserved.! Page 4...
- Page 5 Build Instructions Sheet Wood Inventory (1 of 1) 1911 Cuadron Build Instructions. © 2013 Stevens AeroModel all rights reserved.! Page 5...
- Page 6 Build Instructions Builders Notes 1911 Cuadron Build Instructions. © 2013 Stevens AeroModel all rights reserved.! Page 6...
- Page 7 Build Instructions General Assembly Instructions Thank you, for purchasing this Stevens 1911 Caudron Racer. This product has been developed and manufactured using state of the art CAD/CAM systems and features a unique interlocking construction process that, when compared to traditional methods found in other model aircraft kits, save countless hours of measuring, cutting, sanding, and fitting.
- Page 8 F8. Tack glue F7, F8, and the battery tray with tiny drops of medium CA. 1911 Cuadron Build Instructions. © 2013 Stevens AeroModel all rights reserved.! Page 8...
- Page 9 Rear Portion of Slots Forward Step 3 Step 7 Step 4 Step 8 Forward Forward F5 Angles Battery Forward Tray Slightly Tabs Fill Forward Portion of Slots 1911 Cuadron Build Instructions. © 2013 Stevens AeroModel all rights reserved.! Page 9...
- Page 10 Pull the fuselage sides together in the middle of the assembly, engaging the tabs on F1, F8, □ and F9. Square the assembly on a flat surface, and completely bond the fuselage sides to F1, F8, and F9. 1911 Cuadron Build Instructions. © 2013 Stevens AeroModel all rights reserved.! Page 10...
- Page 11 Tack Glue right Step 10 Step 14 left Step 15 Etched Side Forward Bond Step 11 Rear View Rear View Step 16 Etched Side Forward Bond Step 12 1911 Cuadron Build Instructions. © 2013 Stevens AeroModel all rights reserved.! Page 11...
- Page 12 Bond with thin CA. □ Fuselage Top - Fit former F20 to the inner portion of the slots in F1 shared by former F8 below. 1911 Cuadron Build Instructions. © 2013 Stevens AeroModel all rights reserved.! Page 12...
-
Page 13: Table Of Contents
Bond Step 22 Recess Step 18 Bottom View F17a Top of Slot Open F17c F17d F17b Step 19 Step 23 Step 24 Bond Step 20 Top View 1911 Cuadron Build Instructions. © 2013 Stevens AeroModel all rights reserved.! Page 13... - Page 14 □ When F25 and F26 are completely dry, remove the tape and bond them to the formers and fuselage sides with a slow setting CA glue. 1911 Cuadron Build Instructions. © 2013 Stevens AeroModel all rights reserved.! Page 14...
-
Page 15: Step
Build Instructions Engage Tabs front Step 25 Step 29 Step 26 Step 30 Engage Step 27 Tabs Step 31 Step 28 Step 32 F25b F25a 1911 Cuadron Build Instructions. © 2013 Stevens AeroModel all rights reserved.! Page 15... -
Page 16: Step
Lay the completed wing panels aside until required in the final assembly. Tail Surfaces □ Fit ply part V1 to the vertical stabilizer V2, and bond with medium CA glue. 1911 Cuadron Build Instructions. © 2013 Stevens AeroModel all rights reserved.! Page 16... -
Page 17: Step
Build Instructions W1(R) Step 33 Step 37 Step 38 Step 34 Step 35 W1(R) W1(L) Step 39 Etched Side Step 40 Facing Up! W1(R) Step 36 1911 Cuadron Build Instructions. © 2013 Stevens AeroModel all rights reserved.! Page 17... -
Page 18: Step
Read step 47 in it’s entirety before proceeding. □ Cover your model with AeroLITE covering material, available from Stevens AeroModel. The full size 1911 Cuadron was probably covered in unbleached linen - common at the time - leaving the finish a light cream or tan color. Antique White AeroLite is ideal for this model. - Page 19 Step 41 Step 42 Step 47 45 deg. Right Left Cover Round Step 43 Step 47 Cont. Square Round Leave Open! Round Step 45 Step 47 Cont. 1911 Cuadron Build Instructions. © 2013 Stevens AeroModel all rights reserved.! Page 19...
-
Page 20: Step
Slit the covering over the rear portion of the lower exit slot on the right side of the fuselage, and pass the push rod through the slot. 1911 Cuadron Build Instructions. © 2013 Stevens AeroModel all rights reserved.! Page 20... -
Page 21: Step
Step 48 Step 52 “Snake Bend” Step 49 Step 53 Step 50 Step 54 Step 51 Step 55 Upper Lower Slot Slot Left Side Right Side Fuselage Fuselage 1911 Cuadron Build Instructions. © 2013 Stevens AeroModel all rights reserved.! Page 21... -
Page 22: Step
Ensure that the tabs at the front of the mounting plate extend beyond the motor - to allow proper fit of the dummy engine - then secure the motor by wicking thin CA under each mounting tab. 1911 Cuadron Build Instructions. © 2013 Stevens AeroModel all rights reserved.! Page 22... - Page 23 Step 56 Step 60 Tabs DO NOT BOND! Step 57 Step 61 Long Spikes Step 58 Step 62 Cover Step 59 Step 63 Tabs Extend Beyond Gear Box 1911 Cuadron Build Instructions. © 2013 Stevens AeroModel all rights reserved.! Page 23...
- Page 24 CA along LG1, and at the points where the wire exits the landing gear pocket. Ensure that no glue enters the two recesses in the bottom edge of LG1. 1911 Cuadron Build Instructions. © 2013 Stevens AeroModel all rights reserved.! Page 24...
- Page 25 Step 64 Step 68 Hey I’m no “dummy” I am a faux! Step 65 Step 69 Bond Bond Step 66 Step 70 Step 67 Step 71 Open 1911 Cuadron Build Instructions. © 2013 Stevens AeroModel all rights reserved.! Page 25...
- Page 26 Fit the nylon tail skid into the holes in the fuselage. Ensure that the skid is perpendicular to the bottom of the fuselage, then wick thin CA around the points where the skid enters the fuselage. 1911 Cuadron Build Instructions. © 2013 Stevens AeroModel all rights reserved.! Page 26...
- Page 27 Glue Step 71 Cont. Step 72 Step 76 Open Open Step 73 LG2a (Front) LG2b LG2a (Front) Open LG2b Step 77 Step 74 Step 78 LG3a LG3b 1911 Cuadron Build Instructions. © 2013 Stevens AeroModel all rights reserved.! Page 27...
- Page 28 Remove the covering over the two slots near the leading edge of the horizontal stabilizer, □ on the bottom surface only. Remove the covering over the central slot in the horizontal stabilizer, on both the top and □ bottom surfaces. 1911 Cuadron Build Instructions. © 2013 Stevens AeroModel all rights reserved.! Page 28...
- Page 29 Left Side Open Step 80 Step 84 Bottom Left Side Right Side Step 81 Step 85 Bottom Only Left Side Step 82 Step 86 Bottom and Top 1911 Cuadron Build Instructions. © 2013 Stevens AeroModel all rights reserved.! Page 29...
- Page 30 Repeat steps 91 and 92 to install the right side wing panel. Struts - Cut the 12 in. length of .020 carbon rod supplied in your kit into four equal lengths of □ 3 in. each. 1911 Cuadron Build Instructions. © 2013 Stevens AeroModel all rights reserved.! Page 30...
- Page 31 90 deg. Flush Step 88 Step 91 90 deg. Bottom View Bond Step 89 Step 92 Bond Open Bottom View Step 90 Step 93 3 in. Alignment Mark 1911 Cuadron Build Instructions. © 2013 Stevens AeroModel all rights reserved.! Page 31...
- Page 32 When the rudder is in the correct position, apply a tiny drop of medium CA to both ends of the tube to secure. Repeat this process to connect the elevator pushrod. 1911 Cuadron Build Instructions. © 2013 Stevens AeroModel all rights reserved.! Page 32...
- Page 33 Step 96 1/8 in. Parallel Open Step 95 Step 97 Bottom View Step 95 Cont. Bottom View Step 98 1 in. Step 99 Step 95 Cont. Bottom View 1911 Cuadron Build Instructions. © 2013 Stevens AeroModel all rights reserved.! Page 33...
- Page 34 “Pre-Flight” sections and prepare to impress your buddies at the flying field! Thanks again for purchasing our product. We hope you enjoyed building this model as much as we enjoyed dreaming it up for you. Happy flying! -Stevens AeroModel 1911 Cuadron Build Instructions. © 2013 Stevens AeroModel all rights reserved.!
- Page 35 Build Instructions Step 99 Cont. Step 100 Step 101 1911 Cuadron Build Instructions. © 2013 Stevens AeroModel all rights reserved.! Page 35...
- Page 36 Sure it’s a little bitty flexible plastic prop but it’s still fun to yell “Clear Prop” Before applying power to the model... and an excellent habit to form. 1911 Cuadron Build Instructions. © 2013 Stevens AeroModel all rights reserved.! Page 36...
- Page 37 Calhan, CO 80808 twisted wing. Make certain that your wing is stevensaero.com straight before you fly. 1911 Cuadron Build Instructions. © 2013 Stevens AeroModel all rights reserved.! Page 37...
Need help?
Do you have a question about the 1911 Caudron and is the answer not in the manual?
Questions and answers