
Related Manuals for Stevens AeroModel Ace 100


Summary of Contents for Stevens AeroModel Ace 100
- Page 1 Wing Span: 24 inches | Wing Area: 100 square inches | Average Flying Weight: 2.25 ounces Build Instructions - Version 1.18 (revised 03.30.2017) ...
- Page 2 Build Instructions WARRANTY Stevens AeroModel guarantees this kit to be free from defects in both material and workmanship at the date of purchase. This warranty does not cover any component parts damaged by use or modification. In no case shall Stevens AeroModel’s liability exceed the original cost of the purchased kit. Further, Stevens AeroModel reserves the right to change or modify this warranty without notice.
- Page 3 Stevens AeroModel. Ace (100) - Build Instructions © 2017 Stevens AeroModel, all rights reserved.
- Page 4 Many of the suggested items listed below are available at your local hobby shop. For your convenience, Stevens AeroModel stocks all the power system components and most of the building supplies required to complete this kit. If you have difficulties sourcing any of these items locally, please visit our website, stevensaero.com to purchase the items necessary to complete your model.
- Page 5 Build Instructions Sheet Wood Inventory (1 of 1) Ace (100) - Build Instructions © 2017 Stevens AeroModel, all rights reserved. Page 5...
- Page 6 Build Instructions Builder’s Notes Ace (100) - Build Instructions © 2017 Stevens AeroModel, all rights reserved. Page 6...
- Page 7 Please check our website for updates to these instructions before starting the build. To obtain downloads and updates to this model aircraft kit, please visit the product page at stevensaero.com Ace (100) - Build Instructions © 2017 Stevens AeroModel, all rights reserved. Page 7...
- Page 8 Turn the assembly up side down. Fit and tack glue former F7 (sheet 02/10, 1/16 in. balsa) □ to the slots in F1 immediately below former F5. Ace (100) - Build Instructions © 2017 Stevens AeroModel, all rights reserved. Page 8...
-
Page 9: Table Of Contents
Build Instructions Step 1 Step 4 Cont. Flush Flush Step 2 Step 5 Rear View Step 3 Step 6 Front Step 4 Step 7 Bottom View Ace (100) - Build Instructions © 2017 Stevens AeroModel, all rights reserved. Page 9... - Page 10 Fuselage Sides - Assemble the fuselage sides by laying F16a (sheet 01/10, 1/16 in. balsa) □ on the work surface, then fitting and bonding F16b and F16c (sheet 01/10, 1/16 in. balsa) in place, using CA. Ace (100) - Build Instructions © 2017 Stevens AeroModel, all rights reserved. Page 10...
-
Page 11: Step
Step 12 Long Arm Step 9 Step 13 Receiver Tray Bottom View Step 10 Step 14 Recess Top View Step 11 Step 15 F16a F16b F16c Ace (100) - Build Instructions © 2017 Stevens AeroModel, all rights reserved. Page 11... -
Page 12: Step
Fuselage Bottom - Lay F22a (sheet 03/10, 1/16 in. balsa) on the work surface, then fit and □ bond F22b and F22c (sheet 02/10, 1/16 in. balsa) in place using CA. Ace (100) - Build Instructions © 2017 Stevens AeroModel, all rights reserved. Page 12... -
Page 13: Step
Step 16 Step 20 Bottom View Step 17 Step 21 Bottom View Step 18 Step 22 Bottom View Bottom View Step 19 Step 23 F22a F22b F22c Ace (100) - Build Instructions © 2017 Stevens AeroModel, all rights reserved. Page 13... -
Page 14: Step
Upper Fuselage - Fit former F27 (sheet 01/10, 1/16 in. balsa) to the two slots just in front of □ the large opening in the rear of F1. Ace (100) - Build Instructions © 2017 Stevens AeroModel, all rights reserved. Page 14... -
Page 15: Step
F26a Bottom View Step 24 Cont. Step 27 Cont. Remove Tabs Bottom View Step 25 Step 28 F26b Remove Tabs Bottom View Step 26 Step 29 Ace (100) - Build Instructions © 2017 Stevens AeroModel, all rights reserved. Page 15... -
Page 16: Step
The stringers will fit in the notches in formers F15, F11, F6, F3, and end in the pockets created by former F5 and the cockpit sheeting F32. Bond with CA. Ace (100) - Build Instructions © 2017 Stevens AeroModel, all rights reserved. Page 16... -
Page 17: Step
Build Instructions Step 30 Step 34 Rear View Step 31 Step 35 Stringers Stringers Step 32 Step 36 Stringers Stringers Step 33 Step 36 Cont. Ace (100) - Build Instructions © 2017 Stevens AeroModel, all rights reserved. Page 17... - Page 18 Fit P1a to P1b and bond with CA. Position P2 (sheet 09/10, 1/32 in. ply) between the etched lines and the edges of P1. Bond □ with CA. Ace (100) - Build Instructions © 2017 Stevens AeroModel, all rights reserved. Page 18...
- Page 19 Build Instructions Step 37 Step 41 Step 38 Step 42 45 deg. Step 39 Step 43 Etched Lines Step 40 Step 44 45 deg. Ace (100) - Build Instructions © 2017 Stevens AeroModel, all rights reserved. Page 19...
- Page 20 Fit and tack glue the leading edge W8 (sheet 05/10, 3/32 in. balsa) to the front of each W7, oriented so that the arrow at the inner end of W8 points toward the center of the wing. Ace (100) - Build Instructions © 2017 Stevens AeroModel, all rights reserved. Page 20...
- Page 21 Step 49 P2’s Underneath Bottom View Step 46 Step 50 Step 47 Step 51 Bottom View Step 48 Step 52 W1 - Etched Side to the Rear Ace (100) - Build Instructions © 2017 Stevens AeroModel, all rights reserved. Page 21...
- Page 22 Fit the wing tip leading edge W22 (sheet 05/10, 3/32 in. balsa) to the front of the ribs. □ Carefully align the front face of W22 with the front face of W21, then bond them together with CA. Ace (100) - Build Instructions © 2017 Stevens AeroModel, all rights reserved. Page 22...
- Page 23 Build Instructions Step 53 Step 57 Step 54 Step 58 Step 55 Step 59 Rear View Step 56 Step 60 Etched Lines Ace (100) - Build Instructions © 2017 Stevens AeroModel, all rights reserved. Page 23...
- Page 24 – A snazzy vinyl decal set is available separately from Stevens AeroModel as well. Leave the bottom of the fuselage uncovered for now - this will allow access to the interior for installing the pushrods. Cover both sides of the wings and tail surfaces.
- Page 25 Step 64 Exit Slot Step 62 Step 64 Cont. Bottom View Right Side Step 62 Cont. Step 64 Cont. Bottom View Left Side Left Side Bottom View Ace (100) - Build Instructions © 2017 Stevens AeroModel, all rights reserved. Page 25...
- Page 26 Repeat the process outlined in step 70 to hinge the elevator to the horizontal stabilizer. □ Make sure that the bevelled side of the elevator faces down! Ace (100) - Build Instructions © 2017 Stevens AeroModel, all rights reserved. Page 26...
- Page 27 Step 69 Step 66 Step 70 Middle Hole Bevelled Side Down! Step 67 Step 71 Right Side Bottom View Step 68 Step 72 Bevelled Side Down! Ace (100) - Build Instructions © 2017 Stevens AeroModel, all rights reserved. Page 27...
- Page 28 When you are satisfied that the surface is centered, secure the push rod by applying a small drop of medium CA to each end of the tube. Ace (100) - Build Instructions © 2017 Stevens AeroModel, all rights reserved. Page 28...
- Page 29 Step 74 Step 78 Heat Shrink Tube 3/4 in. 2 Pieces .015 in. Wire Step 75 Step 78 Cont. 3/8 in. Step 76 Step 79 1/8 in. Ace (100) - Build Instructions © 2017 Stevens AeroModel, all rights reserved. Page 29...
- Page 30 (sheet 09/10, 1/32 in. ply) into the slot, and bond with medium CA. Motor Installation Mount the propellor (EFL9051) by twisting it onto the threaded portion of the prop shaft until □ fully seated. Ace (100) - Build Instructions © 2017 Stevens AeroModel, all rights reserved. Page 30...
- Page 31 Step 81 Step 84 Bottom View .032 Wire Step 82 Step 85 Bend Up 90 Degrees Step 83 Step 86 Prop Shaft Underneath Motor Bottom View Ace (100) - Build Instructions © 2017 Stevens AeroModel, all rights reserved. Page 31...
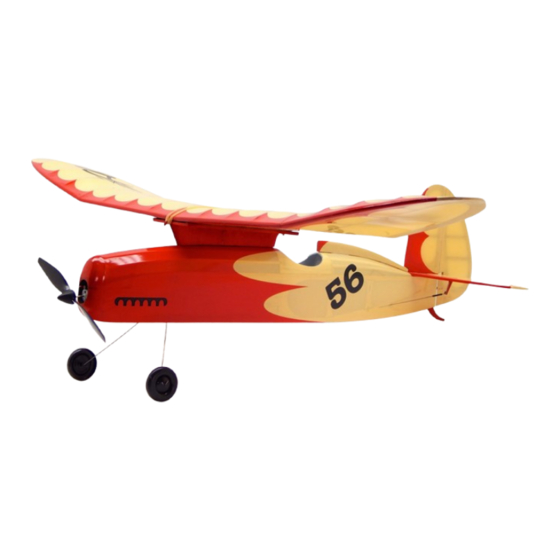
- Page 32 No. 16 rubber bands supplied in your kit. Congratulations! Your Stevens AeroModel Ace is complete! Continue to the Setup and Preflight sections to prepare your model for it’s first flight. Ace (100) - Build Instructions © 2017 Stevens AeroModel, all rights reserved.
- Page 33 Build Instructions Step 86 Cont. Bottom View Step 86 Cont. Black Wire Bottom View Step 87 Complete Ace (100) - Build Instructions © 2017 Stevens AeroModel, all rights reserved. Page 33...
- Page 34 Check Wing Attachment Points - Always make sure you inspect for damage and wear. Make sure that the wing and wing struts, if applicable, are properly attached. Ace (100) - Build Instructions © 2017 Stevens AeroModel, all rights reserved. Page 34...
- Page 35 Congratulations! Once you’ve completed your first flights, you will have noticed that the Stevens AeroModel Ace is a very stable model airplane. When built straight, and trimmed for level flight, it should readily return to “wings level” from any attitude. When flying, we never miss an opportunity to allow an onlooker to get a little “stick-time”.
Need help?
Do you have a question about the Ace 100 and is the answer not in the manual?
Questions and answers