Table of Contents
Advertisement
Quick Links
4K HDR Four-Input HDMI Switcher with Auto-Switching and
Return Optical Audio
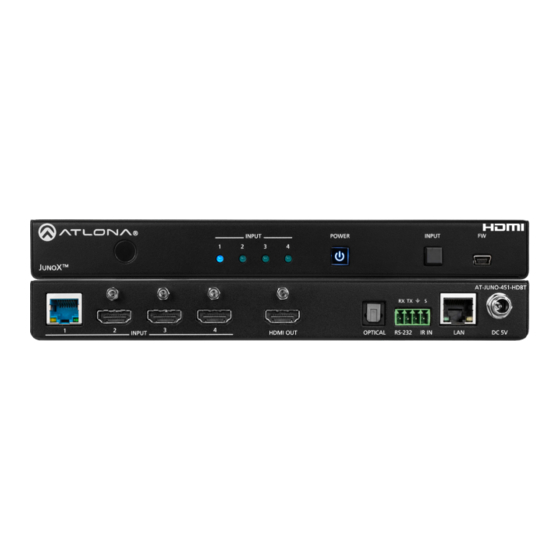
AT-JUNO-451 / AT-JUNO-451-HDBT
The Atlona JunoX™451 HDBT (AT-JUNO-451-HDBT) is a 4x1 switcher for high dynamic range
(HDR) formats. The JunoX 451 HDBT features three HDMI inputs, plus an HDBaseT input for
receiving video, embedded audio, and Ethernet over distances up to 330 feet (100 meters).
It is HDCP 2.2 compliant and supports 4K/UHD video @ 60 Hz with 4:4:4 chroma sampling,
as well as HDMI data rates up to 18 Gbps. The JunoX 451 HDBT is ideal for receiving 4K HDR
over HDBaseT from an Atlona Opus™ Series matrix switcher, and is also compatible with the
Atlona UHD-PRO3, UHD-CAT, and SW Series for data rates up to 10 Gbps. It includes EDID
management features and automatic input switching. The JunoX 451 HDBT also supports
the HDMI Audio Return Channel for receiving digital audio from a television,and includes a
TOSLINK digital audio output for sending this audio to an AV receiver or soundbar. This JunoX
Series switcher can be controlled via Ethernet, RS-232, and IR. A handheld IR remote control is
included.
The Atlona JunoX™ 451 (AT-JUNO-451) provides the same features at the AT-JUNO-451-HDBT,
except that the HDBaseT input is replaced with an HDMI port.
Package Contents
AT-JUNO-451
1 x AT-JUNO-451
1 x 4-pin captive screw connector
2 x Mounting plates
4 x Rubber feet
4 x Screws
1 x IR remote control
1 x DC 5V power supply
1 x IEC cord
1 x Installation Guide
IMPORTANT: Visit http://www.atlona.com/product/AT-JUNO-451-HDBT and
http://www.atlona.com/product/AT-JUNO-451 for the latest firmware updates
and User Manual.
AT-JUNO-451-HDBT
1 x AT-JUNO-451-HDBT
1 x 4-pin captive screw connector
2 x Mounting plates
4 x Rubber feet
4 x Screws
1 x IR remote control
1 x DC 5V power supply
1 x IEC cord
1 x Installation Guide
1
Installation Guide
AT-JUNO-451 / AT-JUNO-451-HDBT
Advertisement
Table of Contents

Related Manuals for Panduit Atlona AT-JUNO-451


Summary of Contents for Panduit Atlona AT-JUNO-451
- Page 1 Installation Guide AT-JUNO-451 / AT-JUNO-451-HDBT 4K HDR Four-Input HDMI Switcher with Auto-Switching and Return Optical Audio AT-JUNO-451 / AT-JUNO-451-HDBT The Atlona JunoX™451 HDBT (AT-JUNO-451-HDBT) is a 4x1 switcher for high dynamic range (HDR) formats. The JunoX 451 HDBT features three HDMI inputs, plus an HDBaseT input for receiving video, embedded audio, and Ethernet over distances up to 330 feet (100 meters).
- Page 2 Installation Guide AT-JUNO-451 / AT-JUNO-451-HDBT Panel Descriptions (AT-JUNO-451-HDBT shown) INPUT POWER INPUT AT-JUNO-451-HDBT RX TX INPUT HDMI OUT OPTICAL RS-232 IR IN DC 5V IR Window HDMI OUT Receives IR signals from the included IR Connect an HDMI cable from this port to remote.
-
Page 3: Ir Remote Control
Installation Guide AT-JUNO-451 / AT-JUNO-451-HDBT IR Remote Control Both the AT-JUNO-451 and AT-JUNO-451-HDBT Power Video include an IR remote control that can be used to All On operate the unit from a remote location. Video 1 Video 2 On / Off buttons Press the On button to power-on the unit. -
Page 4: Installation
Installation Guide AT-JUNO-451 / AT-JUNO-451-HDBT Installation • AT-JUNO-451-HDBT: Connect a compatible transmitter to the HDBaseT (INPUT 1) port on the AT-JUNO-451- HDBT. NOTE: HDR formats are only supported when connected to an Atlona Opus matrix. Connect an HDR source to each of the three HDMI inputs (INPUT 2 - INPUT 4). •... - Page 5 Installation Guide AT-JUNO-451 / AT-JUNO-451-HDBT IP Configuration By default, the AT-JUNO-451 / AT-JUNO-451-HDBT are set to DHCP mode, allowing a DHCP server (if present) to assign the unit an IP address. Make sure the unit is powered. Press and hold the INPUT button for approximately 10 seconds. Release the button once the POWER button begin to flash.
-
Page 6: Connection Diagrams
Installation Guide AT-JUNO-451 / AT-JUNO-451-HDBT Connection Diagrams AT-JUNO-451 UHD Blu-ray Player Media Player Laptop Laptop AT-JUNO-451 IN PU W ER IN PU UHD Display AV Receiver AT-JUNO-451-HDBT AT-UHD-PRO3-44M Media Player Set-Top Box P BOX AT -UH Blu-ray Player Media Player AT-JUNO-451-HDBT D BT 51 -H... -
Page 7: Mounting Instructions
Installation Guide AT-JUNO-451 / AT-JUNO-451-HDBT Mounting Instructions Both the AT-JUNO-451 and AT-JUNO-451- HDBT include two mounting brackets, which can be used to attach the unit to any flat surface. Use the two enclosure screws, on the sides of the unit to attach the mounting brackets. -
Page 8: Troubleshooting
Installation Guide AT-JUNO-451 / AT-JUNO-451-HDBT Troubleshooting Problem Solution How do I update the • Firmware and instructions can be found and downloaded firmware? from the firmware tab at http://www.atlona.com/product/ AT-JUNO-451 and http://www.atlona.com/product/AT- JUNO-451-HDBT. RS-232 and/or IR control • Verify that the 4-pin captive screw block is wired is not working. - Page 9 Installation Guide AT-JUNO-451 / AT-JUNO-451-HDBT Notes...
- Page 10 Installation Guide AT-JUNO-451 / AT-JUNO-451-HDBT Notes...
- Page 11 Installation Guide AT-JUNO-451 / AT-JUNO-451-HDBT Notes...
- Page 12 Installation Guide AT-JUNO-451 / AT-JUNO-451-HDBT English Declaration of Conformity The English versions can be found under the resources tab at: https://atlona.com/product/at-juno-451/. https://atlona.com/product/at-juno-451-hdbt/. Chinese Declaration of Conformity 中国RoHS合格声明 由SKU列出於: https://atlona.com/about-us/china-rohs/. ® The terms HDMI, HDMI High-Definition Multimedia Interface, and the HDMI Logo are trademarks or registered trademarks of HDMI licensing Administrator, Inc.
Need help?
Do you have a question about the Atlona AT-JUNO-451 and is the answer not in the manual?
Questions and answers