
Related Manuals for Panduit Atlona AT-HDVS-150-TX-HDMI


Summary of Contents for Panduit Atlona AT-HDVS-150-TX-HDMI
- Page 1 Three-Input Switcher for HDMI and VGA with HDBaseT Output ™ AT-HDVS-150-TX Atlona Manuals Switchers AT-HDVS-150-TX-PSK...
- Page 2 Version Information Version Release Date Notes 09/16 Initial release 01/17 Combined TX and TX-PSK manual AT-HDVS-150-TX / AT-HDVS-150-TX-PSK...
- Page 3 Welcome to Atlona! Thank you for purchasing this Atlona product. We hope you enjoy it and will take a extra few moments to register your new purchase. Registration only takes a few minutes and protects this product against theft or loss. In addition, you will receive notifications of product updates and firmware.
- Page 4 Atlona, Inc. (“Atlona”) Limited Product Warranty Coverage Atlona warrants its products will substantially perform to their published specifications and will be free from defects in materials and workmanship under normal use, conditions and service. Under its Limited Product Warranty, Atlona, at its sole discretion, will either: •...
- Page 5 • Damage, deterioration or malfunction resulting from the installation or removal of this product from any installation, any unauthorized tampering with this product, any repairs attempted by anyone unauthorized by Atlona to make such repairs, or any other cause which does not relate directly to a defect in materials and/or workmanship of this product.
- Page 6 Important Safety Information 9. Do not defeat the safety purpose of a polarized CAUTION or grounding-type plug. A polarized plug has two RISK OF ELECTRIC SHOCK blades with one wider than the other. A grounding DO NOT OPEN type plug has two blades and a third grounding CAUTION: TO REDUCT THE RISK OF prong.
-
Page 7: Table Of Contents
Table of Contents Introduction Features Package Contents Panel Description Installation Connection Instructions Connection Diagram Solution Setup and Configuration Guide Toggling Power on the Display Selecting the Input Passing Analog Audio Input Auto Switching Display Control Appendix Updating the Firmware Specifications Index AT-HDVS-150-TX / AT-HDVS-150-TX-PSK... -
Page 8: Introduction
Introduction The Atlona AT-HDVS-150-TX is a 3×1 switcher with display control for HDMI and VGA transmission over HDBaseT™. It features two HDMI inputs plus a VGA input with 3.5mm audio connector. The AT-HDVS-150-TX combines the benefits of a switcher with built-in auto-switching and the advantages of long-distance HDBaseT signal extension over a single cable. -
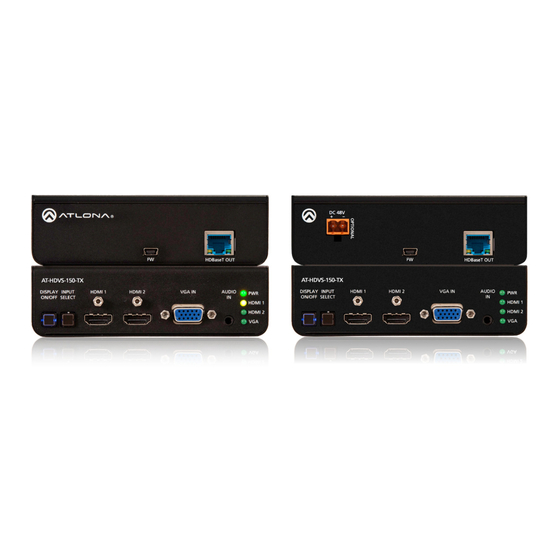
Page 9: Panel Description
Panel Description Front Rear DC 48V 8 10 DC 48V VGA IN Connect the power supply to this port to power an Connect a VGA source to this port. HDBaseT receiver, projector, or other PoE device. AUDIO IN Connect a 3.5mm mini-stereo audio cable, from NOTE: The DC 48V port is only available on an analog audio source, to this port. -
Page 10: Installation
Installation Connection Instructions AT-HDVS-150-TX / AT-HDVS-150-TX-PSK 1. Use HDMI cables to connect up to two HD sources to the HDMI 1 and HDMI 2 ports on the switcher. 2. Connect a VGA cable from a VGA source to the VGA IN port on the switcher. 3. -
Page 11: Connection Diagram
Basic Operation Connection Diagram ri c R SY RS -2 ID GE M ON 3. 5m ST ER M IC ri c R SY IN PU AT-PA100-G2 Speakers Display se T AT-HDVS-150-RX AT-HDVS-150-TX Desktop PC Laptop Laptop AT-HDVS-150-TX / AT-HDVS-150-TX-PSK... -
Page 12: Solution Setup And Configuration Guide
Solution Setup and Configuration Guide The following sections provide step-by-step instructions for the following topics: • Toggling Power on the Display • Selecting the Input • Passing Analog Audio • Input Auto Switching • Display Control Toggling Power on the Display When the unit is connected to a compatible receiver and display, pressing the DISPLAY ON/OFF button will send a command to set the display power state. -
Page 13: Selecting The Input
Solution Setup and Configuration Guide Selecting the Input Press the INPUT SELECT button to cycle through each of the available inputs on the unit. The unit will always retain the last selected input when the unit is powered-off. 1. Below, the HDMI 1 LED indicator is bright green, indicating that HDMI 1 is the active input. 2. -
Page 14: Passing Analog Audio
Solution Setup and Configuration Guide Passing Analog Audio Both products can pass two-channel analog audio with the VGA signal. In order for the audio to be passed to the receiver, an active VGA source must be connected to the VGA IN port and the port must be selected. Analog audio cannot be embedded on an HDMI signal. -
Page 15: Input Auto Switching
Solution Setup and Configuration Guide Input Auto Switching The AT-HDVS-150-TX provides auto-switching capability between HDMI IN 1 and HDMI IN 2, which will automatically switch the input to the most recently-connected or powered source when a source is disconnected. For example, if the connection sequence is HDMI 2 >... - Page 16 Solution Setup and Configuration Guide HDBaseT IN DC 48V 4. Press and release the VOL DN button until the Others menu is highlighted in blue. RX TX LINK MENU HDMI OUT AUDIO OUT RS-232 Main Menu Input Select Input Resolution Output Resolution Picture Adjust Aspect...
-
Page 17: Display Control
Solution Setup and Configuration Guide Display Control The AT-HDVS-150-RX features a control interface which can be used to program connected transmitters, allowing them to power-on/off displays as well as adjust the appearance of the output image. In order to configure display control, the control software should be downloaded and installed. The control software is available for download, under the AT-HDVS-150-RX page on the Atlona web site, and supports programming of the following transmitters. - Page 18 Solution Setup and Configuration Guide 2. Go to the Windows Device Manager and verify the installed COM port, under Ports (COM & LPT). 3. If running Windows 10, perform the step 3a. Otherwise, continue with step 4. a. Install the gulim.ttc font file by double-clicking it. This file must be installed, if running the software under Windows 10.
- Page 19 Solution Setup and Configuration Guide Programming the AT-HDVS-150-RX Once the control software is running, it can be used to program the AT-HDVS-150-RX to affect the behavior of the connected display. For example, the display can automatically be turned on, when the source device is turned on. Conversely, when the source is turned off (or disconnected), then display is automatically turned off.
- Page 20 Solution Setup and Configuration Guide Projector Control If a projector is being controlled by the AT-HDVS-150-RX, then click the Projector radio button in the top-portion of the screen, as shown below. This section of the control software is similar to the HDVS Receiver section. In addition, this area also provides two fields for RS-232 “Display On”...
- Page 21 Solution Setup and Configuration Guide 6. Once the proper command strings have been entered, refer to the tables below for information on setting the Auto Display On and Auto Display Off features. Auto Display On Click this drop-down list to select when the display will be powered-on, based on the detection of a source. Setting Description Powers-on the display when a source is detected.
-
Page 22: Appendix
Appendix Updating the Firmware The following procedure is used for both the AT-HDVS-150-TX and the AT-HDVS-150-TX-PSK. The firmware file for the AT-HDVS-150-TX is used for both models. Requirements • AT-HDVS-150-TX or AT-HDVS-150-TX-PSK Firmware file: AT-HDVS-150-TX_[version].bin • • USB Type A to Mini-USB Type B cable •... - Page 23 Appendix If the folder is not displayed, open Windows Explorer and locate the drive named USB UPDATER. 7. Delete all files from the USB drive, if any are present. 8. Drag-and-drop the AT-HDVS-150-TX_[version].bin firmware file to the drive. 9. After the file has been copied, disconnect the USB cable from both the computer and the AT-HDVS-150-TX. 10.
-
Page 24: Specifications
Appendix Specifications Video HD/SD 4096x2160@24/25/30/50*/60Hz*, 3840x2160@24/25/30/50*/60Hz* (UHD), 2048x1080p, 1080p@23.98/24/25/29.97/30/50/59.94/60Hz, 1080i@50/59.94/60Hz, 720p@50/59.94/60Hz, 576p, 576i, 480p, 480i VESA 2560x2048, 2560x1600, 2048x1536, 1920x1200, 1680x1050, 1600x1200, 1600x900, 1440x900, 1400x1050, 1366x768, 1360x768, 1280x1024, 1280x800, 1280x768, 1152x864, 1024x768, 800x600, 640x480 Color Space YUV, RGB Chroma Subsampling 4:4:4, 4:2:2, 4:2:0* Color Depth 8-bit, 10-bit, 12-bit... - Page 25 Appendix Power AT-HDVS-150-TX AT-HDVS-150-TX-PSK Consumption 18.7 W (when paired) 18.7 W (when paired) Idle Consumption 22 W Supply Input: 100 - 240 V AC, 50/60 Hz Output: 48 V DC, 3.125 A Dimensions Inches Millimeters H x W x D 1.50 x 5.00 x 4.02 38 x 127 x 102 Weight...
-
Page 26: Index
Index Audio Operating notes AUDIO IN port passing analog audio Auto-switching Power port indicator Connection diagram instructions Contents Resolutions package supported table of RS-232 Control software control, display installation Customer support Safety information Specifications DC 48V Switching port auto Display control DISPLAY ON/OFF button Transmitters... - Page 27 Toll free US International atlona.com 877.536.3976 41.43.508.4321 • • © 2019 Atlona Inc. All rights reserved. “Atlona” and the Atlona logo are registered trademarks of Atlona Inc. All other brand names and trademarks or registered trademarks are the property of their respective owners. Pricing, specifications and availability subject to change without notice.
Need help?
Do you have a question about the Atlona AT-HDVS-150-TX-HDMI and is the answer not in the manual?
Questions and answers