Table of Contents
Advertisement
Quick Links
Advertisement
Table of Contents

Related Manuals for CAB 3014


Summary of Contents for CAB 3014
- Page 1 Assembly Instructions Front-Side Applicator 3014 / 3016 Made in Germany...
- Page 2 9009428 Copyright This documentation as well as translation hereof are property of cab Produkttechnik GmbH & Co. KG. The replication, conversion, duplication or divulgement of the whole manual or parts of it for other intentions than its original intended purpose demand the previous written authorization by cab.
-
Page 3: Table Of Contents
Table of Contents Introduction ............................4 Instructions ............................... 4 Intended Use ............................4 Safety Instruction ............................. 4 Safety Marking ............................5 Environment ............................. 5 Product Description ..........................6 Important Features ........................... 6 Technical Data ............................6 Overview ..............................7 Mounting ..............................8 Mounting the applicator parts on the printer ..................... -
Page 4: Introduction
• The device is designed to use on a cab printer of the HERMES Q and Hermes+ series. Any other use or use going beyond this shall be regarded as improper use. The manufacturer/supplier shall not be liable for damage resulting from unauthorized use;... -
Page 5: Safety Marking
Introduction • Before mounting the delivered components disconnect the printer from the power supply and close the shutoff valve at the applicator. • Only connect the device to other devices which have a protective low voltage. • Switch off all affected devices (computer, printer, accessories) before connecting or disconnecting. •... -
Page 6: Product Description
For operation in a system the I/O interface of the printer can be used. Technical Data Label transfer mode Tamp pad Spring loaded tamp pad Blow pad 3014/16 L/R 1100 3014/16 L/R 3100 3014/16 L/R 2100 HERMES Q4 / Hermes + 4 25 - 114 80 - 114... -
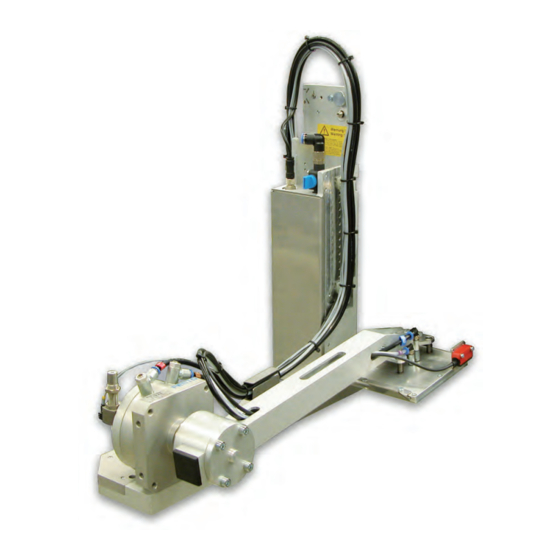
Page 7: Overview
Product Description Overview Fig. 2 Device overview 1 Compressed air connector 5 Knurled screw for attaching the applicator to the printer 2 Shutoff valve 6 Hinges 3 Pad (customized) 7 SUB-D 15 Interface to the printer 4 Blow tube for supporting air... -
Page 8: Mounting
Mounting Mounting the applicator parts on the printer Fig. 3 Mounting Applicator - Printer Note! In case of order a complete / configured system will be mounted some parts. Several steps of mounting dropped. Particularly pad and product sensor. 1. Hang on the control assembly (8) with the female part of hinges (2) at the printer mounted hinges (3). 2. -
Page 9: Mounting The Blow Tube
Mounting Mounting the blow tube Fig. 4 Mounting the blow tube It is possible to rotate the blow tube to optimize the support with the support air for the take over procedure of the label from printer to applicator. 1. Loosen screw (1). 2. -
Page 10: Operation
Operation Standard Operation Check all external connections. Load the material. Ensure that the locking system is locked "Operator's Manual" of the printer. Open the shutoff valve. Attention! Ensure that the pad is not covered by a label when switching on the printer-applicator system. Otherwise the vacuum sensor may be calibrated faultily. -
Page 11: Error Messages
Error Messages Error Messages of the Printer For detailed information about printer errors (e.g. 'Paper out', 'Ribbon out', etc.) Check the operator's manual of the printer. Error treatment: Clearing the error results. Press the respectively feed to synchronize the label feed, remove the left over labels manually. To quit the error state press Repeat (HERMES Q) respectively the pause key (Hermes +). -
Page 12: Licences
In the event of any alteration which has not been approved by us being made to any device as designated below, this statement shall thereby be made invalid. Device: Applicator Type: 3014, 3016 Applied EU Regulations: Applied Standards Directive 2006/42/EC on machinery: •... -
Page 13: Eu Declaration Of Conformity
EU Rules for Safety and Health. In the event of any alteration which has not been approved by us being made to any device as designated below, this statement shall thereby be made invalid. Device: Applicator Type: 3014, 3016 Applied EU Regulations: Applied Standards Directive 2014/30/EU relating to electromagnetic compatibility: •...
Need help?
Do you have a question about the 3014 and is the answer not in the manual?
Questions and answers