
Related Manuals for dallmeier SMAVIA appliance VideoNetBox II


Summary of Contents for dallmeier SMAVIA appliance VideoNetBox II
- Page 1 Commissioning English Appliance VideoNetBox II P R E L O A D E D 004707 / Rev. 1.0.2 / 2014-03-13...
-
Page 2: Warranty
General Validity This documents applies to the SMAVIA appliance VideoNetBox II. It has been created in connection with version 8.11.3 of the software SMAVIA Recording Server. Documentation • Data Sheet - information on technical specifications and features (for trained system integrators) • Commissioning - instructions for mounting and commissioning (for trained system integrators) • Configuration - instructions for the configuration of the software (for trained system integrators) • Main Functions - instructions for the operation of basic software functions (for operators without special knowledge) • Operation - instructions for the operation of all software functions (for operators without special knowledge) • Service - instructions for maintaining and cleaning (for trained system integrators) Conventions • Instructions are indicated with this arrow ►. -
Page 3: Safety Instructions
Safety Instructions Only use the unit if it is technically in proper working condition and for the intended purpose while keeping safety and potential dangers in mind. • Qualified Personnel The installation, mounting, connection, commissioning and configuration of the unit may only be carried out by qualified personnel. This also applies to the maintenance, testing and repair, whereat the regulations of the DIN VDE 0701 series of standards (repair, modification and inspection of electrical appliances) have to be followed. • Regulations The use of video and audio surveillance systems is, in general, strictly regulated. Inform yourself about the currently valid laws and regulations regarding data, worker and environmental protection before using the unit and ensure compliance with them. • System Components Only use internal components that have been tested and approved by Dallmeier. Inappropriate internal components can cause malfunctions, damages and data loss and can result in the loss of warranty. • Modifications Do not make any modifications to the hardware or software that has not been tested and approved by Dallmeier. Inappropriate modifications can cause malfunctions, damages and data loss and can result in the loss of warranty. • Documentation Read the documents included in the delivery carefully and thoroughly. Always observe the contained instructions, notes and warnings. The product documentation contains several documents which are included in the delivery in printed form and/or on a digital medium. Store all documents in legible condition in a suitable location in order to provide for later consultation. • Condensation Water If the device is brought from a cold to a warm environment, resulting condensation water may cause malfunctions and damages. In this case, wait (up to 8 hours) until the device has reached room temperature before commissioning. • Earthing & Equipotential Bonding For the safety of persons (protection against dangerous contact voltages) and devices (protection against over-voltages) and... -
Page 4: Ambient Conditions
• steam or oil vapours (e.g. kitchen) • unsuitable ambient temperatures • insufficient ventilation (e.g. closed cabinet) • direct sunlight • sources of strong heat dissipation (e.g. radiator) • sources of strong radiation (e.g. radio transmitter, magnetic field) • corrosive surrounding (e.g. gas, salt water) Stand-alone operation The appliance is designed for stand-alone operation. It can usually be set up and operated at any place that meets the requirements above. In addition, observe the following requirements and notes: Computer room This appliance is not designed for the use in a computer room as defined in the US fire protection regulation “Standard for Protection of Electronic Computer/Data Processing Equipment, ANSI/NFPA 75”. Secured room Risk of manipulation and sabotage. A stand-alone installation should be operated in secured rooms with restricted access only. Socket outlet The used socket outlet has to be installed near the appliance. It has to be easily accessible. Hard disk drives Appliances that have been ordered with hard disk drives can be mounted, connected and commissioned directly. Appliances that have been ordered without hard disk drives must be equipped with one 2.5'' hard disk drive at least. Note that • all mounted hard disk drives have to be tested and released for mounting by Dallmeier (HDD whitelist in the Partner Forum)! • all mounted hard disk drives do not have to be formatted or partitioned! • the HDD holder 1 on the left side has to be used if only one hard disk drive is mounted! www.dallmeier.com... -
Page 5: Hdd Mounting
► Insert the HDD-1 completely into the guidances of the HDD slot 1. ► Proceed as described in order to mount the HDD-2, if necessary. ► Finally put the cover on the housing. ► Close the cover using the 6 housing screws. NOTE During the fi rst start various messages can be displayed. ► Observe the given instructi ons and confi rm the messages. ► Note the appropriate Confi gurati on documentati on. ► Load the Default System Parameters as fi rst step of the confi gurati on. www.dallmeier.com... - Page 6 Mounting The VideoNetBox II is designed for vertical mounting on a wall. As an option it can be mounted on an horizontal surface or on a ceiling. ► Ensure a stable mounting surface. ► Ensure a horizontal or vertical mounting surface. ► Ensure 10 cm (4.0'') of free space at the left and right side. ► Use the drilling template or the housing feet as guidance. ► Mark 4 drill holes. ► Drill 4 holes, appropriate for the designated anchors / screws. ► Use proper anchors, appropriate for the condition of the mounting surface. ► Mount the appliance with 4 screws. ► Connect the appliance as described on the following pages. ► Commission the appliance as described on the following pages. www.dallmeier.com...
- Page 7 Dimensions 230 mm (9.0'') 95 mm (3.6'') 150 mm (5.9'') 280 mm (11.0'') 100 mm (3.9'') 256 mm Ø 4 mm (10.1'') (0.2'') Dimensions W × H × D 230 × 95 × 150 mm / 9.0'' × 3.6'' × 5.9'' (without feet) 280 × 100 × 150 mm / 11.0'' × 3.9'' × 5.9'' (with feet) www.dallmeier.com...
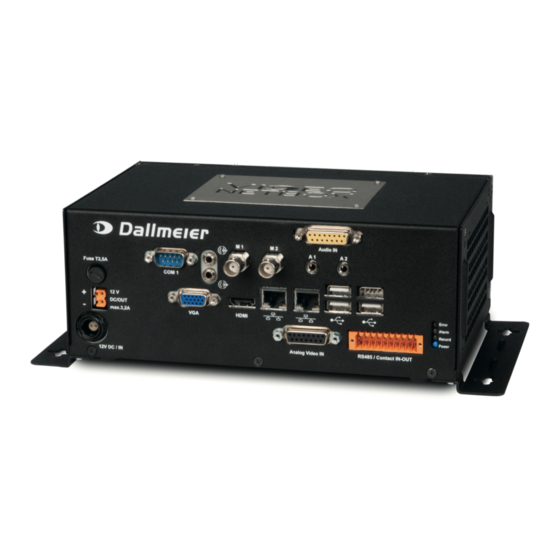
- Page 8 (optional, only with Analog Upgrade Kit) Fuse for 12 V DC OUT USB Interface 5 × 20 mm, type F, 3.15 A 4× USB 2.0, type A Serial Interface COM 1 Serial Interface COM 2 D-SUB, 9 pins, 1× RS232 2 pins on Weidmüller 20 pins, 1× RS485 Half Duplex (for Dallmeier PTZ dome) Video OUT Mini-D-SUB Relay OUT (1 and 2) Mini-D-SUB, 15-pole, 1920 × 1080 Weidmüller socket, 4 pins, max. 12 V DC / 24 V AC / 0.5 A, (for configuration, LocalViewing optional) 150 mOhm Audio OUT Contact IN global (1 - 4) 3.5 mm phone jack, 1 kOhm, 2.828 V Weidmüller socket, 4 pins, only for switch / push button...
- Page 9 Assignment Assignment Assignment Camera 1 Camera 6 GND 3 Camera 2 Camera 7 GND 4 Camera 3 Camera 8 GND 5 Camera 4 GND 1 GND 6 Camera 5 GND 2 GND 7 + 8 Audio IN (U) Assignment Assignment Assignment Audio 1 Audio 6 GND 3 Audio 2 Audio 7 GND 4 Audio 3 Audio 8 GND 5 Audio 4 GND 1 GND 6 Audio 5 GND 2 GND 7 + 8 www.dallmeier.com...
- Page 10 The user interface is displayed in the initial state after the start is complete. Login In the initial state it is possible to login without a password. The rights of the Administrator group are valid. Note that the definition of the passwords and of the network parameters are necessary for remote access (SMAVIA Viewing Client). ► Drag the mouse pointer to the lower screen edge. The task bar with the LOGIN button is displayed. ► Click the LOGIN button. The Recorder login dialogue is displayed. ► Click Later to login without changing a password. The configuration interface is displayed. ► Observe the appropriate Operation and Configuration documentations. www.dallmeier.com...
- Page 11 (SMAVIA Viewing Client). ► Observe the documentation Operation for the software PService. ► Start the software PService. ► Scan the network and select the appliance in the displayed list. ► Open the context menu with a right-click and select NetConfig3. The dialog NetConfig3 is displayed with the basic data of the appliance. ► Enter the serial number (e.g. DAV7-12345678) as Password. ► Confirm with Login. The configuration interface is compressed for slow network connections before transmission if the Slow Network check-box is activated. The configuration interface is displayed. ► Observe the appropriate Configuration documentation. www.dallmeier.com...
- Page 12 Dallmeier electronic GmbH & Co.KG Cranachweg 1 93051 Regensburg Germany www.dallmeier.com info@dallmeier.com All trademarks identified by ® are registered trademarks of Dallmeier electronic. www.dallmeier.com...
Need help?
Do you have a question about the SMAVIA appliance VideoNetBox II and is the answer not in the manual?
Questions and answers