Polaris FR-1516 Installation Instructions Manual
For ford ranger
Hide thumbs
Also See for FR-1516:
- User manual (12 pages) ,
- Installation instructions manual (13 pages) ,
- Troubleshooting manual (9 pages)
Table of Contents
Advertisement
Quick Links
Thank you for purchasing the Polaris
Ford Ranger FR-1516 in-dash unit.
Before removal and installation, be
sure to thoroughly read these
instructions. Keep these instructions
with your vehicle for future reference
FORD
RANGER
FR-1516 INSTALLATION
INSTRUCTIONS
If you have any questions
concerning the installation,
warranty or operation of the unit,
please contact POLARIS on
1300 555 514
Warranty Terms
The Ford Ranger FR-1516 is covered for 1 year and includes:
Defective Equipment
Defective cables
Not covered under warranty:
Abuse
Improper installation
Alteration to cables
Accidents
This installation guide is for reference
only. Polaris takes no responsibility for
any damage caused to any vehicle
through incorrect installation, unsafe
practices or poor workmanship.
Warranty for this product is 1 year
from the date of purchase, however
warranty will be void if:
- The unit is tampered with,
damaged or modified in any way
- Reverse camera cable is cut or
modified in any way
- Reverse camera is subjected to
over voltage
- The navigation SD card is
damaged or tampered with in
any way (
this includes installing
foreign mapping or software
-
(this includes cutting of any cables
)
)
Advertisement
Table of Contents

Related Manuals for Polaris FR-1516


Summary of Contents for Polaris FR-1516
- Page 1 POLARIS on 1300 555 514 Warranty Terms The Ford Ranger FR-1516 is covered for 1 year and includes: Defective Equipment Defective cables Not covered under warranty: ...
-
Page 2: Tools Required
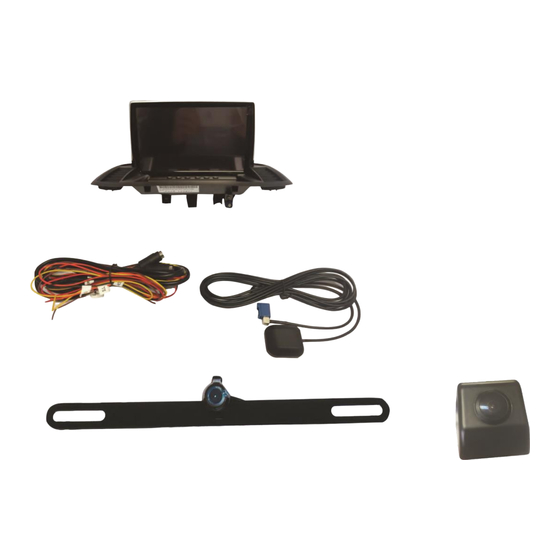
Prior to installing the unit, please make sure that you have all the parts from the box and the necessary tools to complete the installation. Tools required 13. Yellow Tongue (long strike, 1. Trim tools 7. Step through drill approx. 3-4 metres) 2. -
Page 3: Section 1-Unit Prep
SECTION 1-UNIT PREP First, remove glove box for easy access, by opening and squeezing in the two edges. There will be two white plastic pins near the hinge that need to be removed so the glove box can be pulled out and set aside. -
Page 4: Section 2-Reverse Camera Installation
SECTION 2-REVERSE CAMERA INSTALLATION Run a long strike through the chassis rail from front to rear With the end of the strike hanging out, tape the camera cable (large 4 pin), illumination wire and reverse power wire onto it. Pulling carefully, pull the strike through from the front of the vehicle, making sure that you leave enough cable and wires at the rear to plug in rear camera and wire up the two... -
Page 5: Section 3-Reverse Camera Wiring
SECTION 2 CONTINUED…. Open the back tail gate to get access to the two screws that need to be undone in order to remove the passenger side tail light. SECTION 3-REVERSE CAMERA WIRING Now tap into the reverse positive wire, red with yellow stripe (Attach reverse power wire), and tap into tail light wire, red and grey (Attach illumination wire). - Page 6 SECTION 3 CONTINUED... Remove scuff plate and kick panel on the passenger side of the vehicle, then lift up the carpet to locate the grommet. Remove grommet and feed cable up into the cab. Using cutters, make an incision in the grommet so that the cables can be fed through it.
-
Page 7: Section 4-Wiring Diagram
SECTION 4-WIRING DIAGRAM GPS antenna plug Caravan camera Front camera Back camera To find BATT+ and ACC, remove scuff plate and kick panel of driver’s side. Using a test lamp, find constant power for BATT+ and accessory power for ACC. (The plug circled has a grey with blue stripe wire and this wire is generally ACC power, although not guaranteed with different year models). -
Page 8: Section 5-Mounting Headunit & Gps
Run the blue plug up the right side of rectangular hole. Any extra GPS cable can be bundled and shoved in under dash. Grab the FR-1516 in-dash and plug in the main harness, then plug in the blue GPS plug. It’s advised that you test all the features before putting everything back together.
Need help?
Do you have a question about the FR-1516 and is the answer not in the manual?
Questions and answers