Advertisement
Thank you for choosing Rough Country for all your lighting needs.
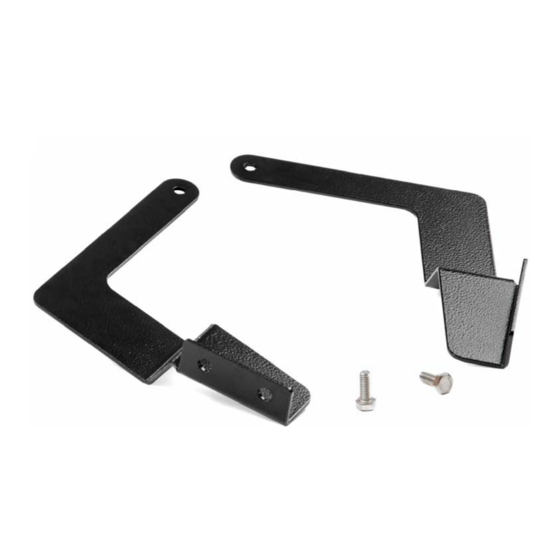
Please read instructions before beginning installation. Check the kit hardware against the kit contents
shown below. Be sure you have all needed parts and know where they go.
If question exist, please call us @1-800-222-7023. We will be happy to answer any questions concerning the design,
function, and correct use of our products.
Only fits Toyota Tacoma 2016 models.
Tools Needed:
14mm Wrench
Reciprocating Saw
Side Cutters
10mm Socket
Flat Screwdriver
By purchasing any item sold by Rough Country, LLC, the buyer expressly warrants that he/she is in compliance with all
applicable Federal, State, and Local laws and regulations regarding the purchase, ownership, and
use of the item. It shall be the buyers responsibility to comply with all Federal, State and Local laws
governing the sales of any items listed, illustrated or sold. The buyer expressly agrees to indemnify
and hold harmless Rough Country, LLC for all claims resulting directly or indirectly from the purchase,
ownership, or use of the items.
2016 Tacoma 30" Single Row LED Bumper Mount
Kit Contents:
2-Rough Country LED Light Brackets
1-70619BAG containing:
Instructions
1-70523BAG2 containing:
(2) 8mm Hex Head Stainless Bolts
927061900
Advertisement
Table of Contents

Subscribe to Our Youtube Channel
Related Manuals for rough country 927061900


Summary of Contents for rough country 927061900
- Page 1 1-70523BAG2 containing: (2) 8mm Hex Head Stainless Bolts By purchasing any item sold by Rough Country, LLC, the buyer expressly warrants that he/she is in compliance with all applicable Federal, State, and Local laws and regulations regarding the purchase, ownership, and use of the item.
- Page 2 1. Park the vehicle on a smooth level surface. 2. Using a 10mm socket, remove the (2) upper grille mount screws. See Photo 1. 3. Using a flat screwdriver, remove the (2) upper grille push pins. See Photo 2. Photo 1 Photo 2 Remove upper grille mounts.
- Page 3 8. Gently pull to remove the grille duct from the truck. Repeat on opposite side of truck. See Photo 7. 9. Using a reciprocating saw, cut the vertical bars of the lower grille in the bumper and the horizontal bar on each end. See Photo 8.
- Page 4 14. Using a 14mm socket, remove the (2) bumper mounting bolts on each side of the truck . See Photo 13. 15. Insert light mounting brackets through hole in bumper. See Photos 14 & 15. Photo 14 Photo 13 Remove bumper mounting nuts. Insert light bracket into bumper opening.
- Page 5 19. Using supplied 8mm bolts and spacers (supplied with the light), install the light between the light mounts. See Photo 20. Measure 6” from the bottom of the grille duct and mark. See Photo 20. Photo 19 Photo 20 Attach light to mounting brackets. Mark grille duct for cutting.
- Page 6 25. Install grille push pins. See Photo 25. 26. Using a 10mm socket and factory bolts, attach the upper grille mounts to the truck. See Photo 26. Photo 25 Photo 26 Replace grille push pins. Attach upper grille mounts. 27. Make sure the lower portion of the grille is locked into place with the factory clips.. See Photo 27. 28.
Need help?
Do you have a question about the 927061900 and is the answer not in the manual?
Questions and answers