
Related Manuals for H3C SecPath PSR300-12A2


Summary of Contents for H3C SecPath PSR300-12A2
- Page 1 H3C SecPath PSR300-12A2 & PSR300-12D2 Power Modules User Manual New H3C Technologies Co., Ltd. http://www.h3c.com Document version: 6W102-20200303...
- Page 2 The information in this document is subject to change without notice. All contents in this document, including statements, information, and recommendations, are believed to be accurate, but they are presented without warranty of any kind, express or implied. H3C shall not be liable for technical or editorial errors or omissions contained herein.
- Page 3 This documentation is intended for: • Network planners. • Field technical support and servicing engineers. • Network administrators working with the the H3C SecPath PSR300-12A2 & PSR300-12D2. Documentation feedback You can e-mail your comments about product documentation to info@h3c.com. We appreciate your comments.
-
Page 4: Table Of Contents
Contents Overview ························································································ 1 Views ······································································································································ 1 Technical specifications ··············································································································· 2 LEDs ······································································································································· 2 Installing and removing the power supply ·············································· 3 Safety precautions ····················································································································· 3 Tools ······································································································································· 3 Installing and removing the power supply ························································································ 3 ... -
Page 5: Overview
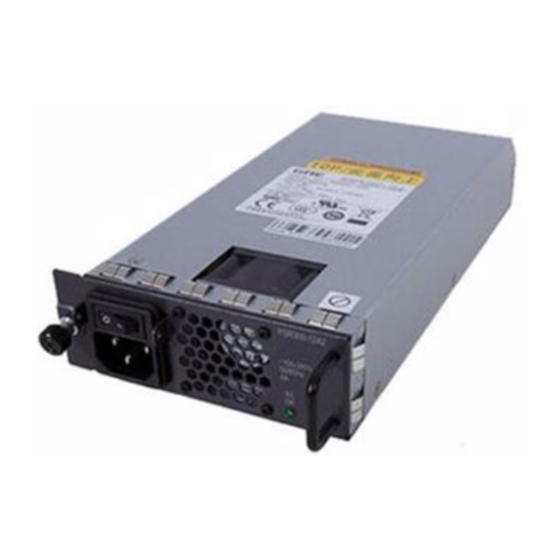
Overview The PSR300-12A2 is an AC-input and DC-output power supply. The PSR300-12D2 is a DC-input and DC-output power supply. They provide a maximum output power of 300 W. The PSR300-12A2 and PSR300-12D2 power supplies have the following features: • Provide protection against input overcurrent, input undervoltage, output overvoltage, output short-circuit, and overtemperature. -
Page 6: Technical Specifications
Technical specifications Table 1 Technical specifications Item Specifications • PSR300-12A2: 100 VAC to 240 VAC Rated input voltage • PSR300-12D2: –48 VDC to –60 VDC Output voltage 12 V Maximum output current 25 A Maximum output power 300 W Dimensions (H × W × D) 40.13 ×... -
Page 7: Installing And Removing The Power Supply
• To avoid power supply damage, do not open the power supply. If the internal wires or units are faulty, contact H3C Support. Tools When installing and removing a power supply and power cord, you must wear an ESD wrist strap. -
Page 8: Connecting The Power Cord
To install the power supply: Wear an ESD wrist strap and make sure the strap makes good skin contact and is reliably grounded. Unpack the power supply and make sure the power supply model is as required. Keep the power supply package secure for future use. As shown in Figure 4, correctly orient the power supply (with the lettering on it upwards). -
Page 9: Removing The Power Supply
Figure 5 Connecting the AC power cord to the power supply Connect the other end of the AC power cord into an AC power source, and turn on the circuit breaker for the power cord. Turn on the power switch. If the AC OK LED is on, the power cord is connected correctly. If the AC OK LED is off, the connection might be wrong. - Page 10 Figure 7 Power supply removal procedure To remove the power supply: Turn off the circuit breaker for the power cord. Wear an ESD wrist strap and make sure the strap makes good skin contact and is reliably grounded. Turn off the power switch. Loosen the releasable cable tie that secures the power cord to the handle of the power supply.
- Page 11 Figure 9 Removing the power supply Put the removed power supply on an antistatic mat or into its package. If you are not to install a new power supply, install the filler panel in the slot to prevent dust from entering the chassis.
Need help?
Do you have a question about the SecPath PSR300-12A2 and is the answer not in the manual?
Questions and answers