Table of Contents
Advertisement
Quick Links
H3C PSR300-12A & PSR300-12D
Series Power Modules
User Manual-6PW105
Overview
Introduction
The PSR300-12A series (PSR300-12A, PSR300-12A1, and
PSR300-12A2) are AC-input and DC-output power modules.
The PSR300-12D series (PSR300-12D1 and PSR300-12D2) are
DC-input and DC-output power modules. These power modules
provide 12 VDC voltage and a maximum output power of 300 W.
The power modules support 1+1 redundancy and load sharing and
are hot swappable.
The power modules provide overvoltage, short circuit, overcurrent,
and overtemperature protections.
•
It shuts down and latches off when an overvoltage, short circuit,
or overcurrent condition occurs.
To restore the operation, reconnect the power cord. Make sure
you turn off the power switch on the power module when you
disconnect and reconnect the power cord.
•
It shuts down when an overtemperature condition occurs and
automatically restores operation after the temperature
decreases to the acceptable range.
1
BOM: 3101A12G
Advertisement
Table of Contents

Related Manuals for H3C PSR300-12A Series


Summary of Contents for H3C PSR300-12A Series
- Page 1 User Manual-6PW105 BOM: 3101A12G Overview Introduction The PSR300-12A series (PSR300-12A, PSR300-12A1, and PSR300-12A2) are AC-input and DC-output power modules. The PSR300-12D series (PSR300-12D1 and PSR300-12D2) are DC-input and DC-output power modules. These power modules provide 12 VDC voltage and a maximum output power of 300 W.
-
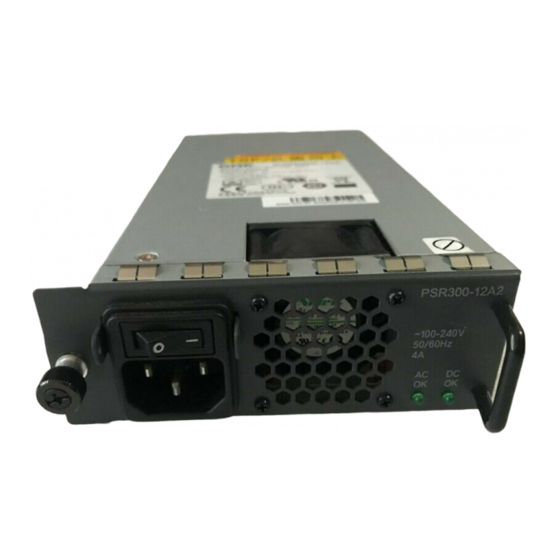
Page 2: Technical Specifications
Storage temperature –40°C to +70°C (–40°F to +158°F) Front panel The PSR300-12A series are the same in appearance except the mark. The PSR300-12D series are the same in appearance except the mark. This section uses the PSR300-12A and PSR300-12D1 as... - Page 3 Figure 1 Front panel (1) Power switch ("O" represents off and "—" represents on) (2) Power receptacle (3) Tab (4) Handle (5) Output status LED (6) Input status LED (7) Bail latch (8) Captive screw (9) Screw hole for securing the plug...
-
Page 4: Installing And Removing A Power Module
LEDs Table 2 LED description Status Description No power is input or an input failure Input status has occurred. LED (AC OK or Input) The power input is normal. No power is output or an output Output status failure has occurred. LED (DC OK or Output) The power output is normal. -
Page 5: Installing A Power Module
• To avoid power module damage, do not open the power module. If a failure occurs on the internal wires or units, contact H3C Support. Procedure You need to prepare an ESD wrist strap, a flathead screwdriver, and a Phillips screwdriver for power module installation and removal. -
Page 6: Removing A Power Module
Orient the power module with the characters on the front panel upward. Grasping the module handle with one hand and supporting the module bottom with the other, push the module slowly into the slot along the guide rails. See callout 1 in Figure To prevent damage to the power module and the connectors on the backplane of the device, insert the power module gently. -
Page 7: Connecting An Ac Power Cord
Grasp the module handle with one hand and pull the module part way out. Support the module bottom with the other hand and pull the module slowly out of the slot along the guide rails. Put the removed power module into an anti-static bag. Connecting an AC power cord Make sure the power switch on the AC power module is turned off. - Page 8 2 in Figure Connect the other end of the DC power cord to the DC power source. Figure 6 Connecting a DC power cord Copyright © 2008-2017 New H3C Technologies Co., Ltd.
Need help?
Do you have a question about the PSR300-12A Series and is the answer not in the manual?
Questions and answers