Table of Contents
Advertisement
Quick Links
Advertisement
Table of Contents

Related Manuals for Zimmer Z Wave PRO


Summary of Contents for Zimmer Z Wave PRO
- Page 1 Instructions for Use ZWave...
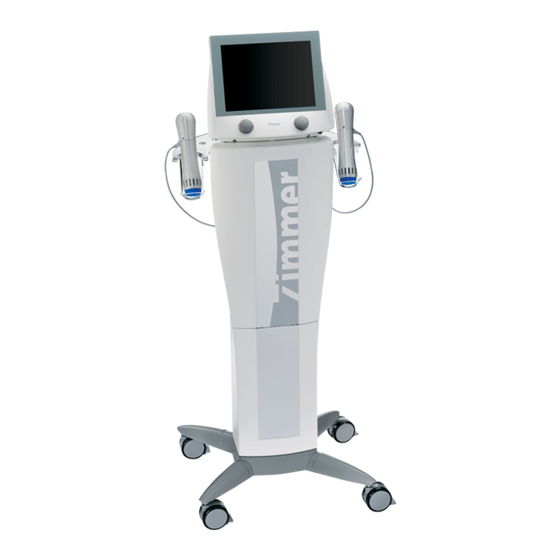
- Page 3 Illustrations Front of the Device Fig.1 Selection and control 1 Control unit elements 2 Pulse energy controller 3 Display 4 Frequency controller 5 Slot for SD card 6 Power switch Handpiece 7 Handpiece 8 Air vents, front 9 Air vents with fan, rear 10 Holder for handpiece Footswitch 11 Footswitch...
- Page 4 Illustrations Rear of the Device Fig.2 Switches / Connector 13 Socket for power cord sockets 14 Mains fuse 15 Socket for handpiece channel I 16 Socket for handpiece channel II 17 Socket for footswitch 18 Identification plate...
- Page 5 Illustrations Screens / Displays Fig 3. Display / Application 19 Status bar screen 20 Buttons on the screen 21 Navigation bar Fig 4. Navigation bar (A) Back Move back one step Description of the (B) Menu Move to the selected menu functions...
- Page 6 Illustrations Applicator Head and Accessories Fig.5 Applicator head 22 39 mm applicator head Accessories 23 Silicone cap...
-
Page 7: Explanation Of The Symbols
Explanation of the Symbols In this instructions for use, this symbol stands for “Danger”. In this instruction for use, this symbol indicates “Caution” with regard to possible Caution damage of the device. Connection socket handpiece Connection socket footswitch Instructions for use Follow instruction for use. -
Page 8: Table Of Contents
Table of Contents Illustrations Front of the Device Rear of the Device Screens / Displays Applicator Head and Accessories Explanation of the Symbols Page Indications / Contraindications Application Information Warnings ZWave – in brief Set-up Device Installation of Cables Settings Operation Instructions 7.1 Device Description 7.2 Notes on Operation... - Page 9 Table of Contents Page Safety and Maintenance 11.1 Safety 11.2 Maintenance Function Test Error Messages / Troubleshooting / Disposal Manufacturer’s declaration of Electromagnetic Compatibility Valid for the device ZWave This instructions for use is an integral part of the device. It must be stored with the device and kept accessible at all times for anyone authorized to operate this device.
-
Page 10: Indications / Contraindications
Indications / Contraindications Indications The application is recommended for the temporary reduction in the appearance of cellulite. Contraindications Application is contraindicated in the following cases: vascular diseases present in or near the area of application local infections in the area of application ... -
Page 11: Application Information
Inspect the device before use. If there is any damage, do not use the device. Caution Only use accessories from Zimmer MedizinSysteme GmbH. The handpiece of the device is not designed for continuous operation. After a max. Caution 6000 strokes, a treatment pause of 15 min is required. -
Page 12: Warnings
Warnings Users of ZWave must have the appropriate skills. Any treatment instructions regarding treatment location, duration and intensity of application requires medical knowledge and may only be provided by persons with the appropriate expertise. These instructions must be followed. The patient must not be left unattended during use. People who are undergoing simultaneous treatment to reduce and/or alter blood clotting or to prolong blood-clotting time (e.g. -
Page 13: Zwave Pro - In Brief
ZWave – in brief What is ZWave A state of the art innovative therapeutic massager. Pulse application High energy radial pulse application is a procedure for the temporary reduction in the appearance of cellulite. What does Creation of pulses using an ergonomic handpiece and transmission of pulses via a ZWave special applicator. -
Page 14: Set-Up Device
Set-up Device Installation of Cables Note: If the ZWave is not mounted on the designated system trolley, please make sure that it is standing on a stable surface. . Note: Make sure that the power switch of the device is set to “0”. Connect the power Connect the power cable to the appropriate socket (13) in the device, and connect cable... -
Page 15: Settings
Operation Instructions 7.1 Device Description Note: Changes in the basic settings are only possible from the start-up screen. Start-up screen After switching on the device and performing the self-test, the start-up screen opens. Note: Activation of the “Protocols” button (2) immediately switches to the application screen. - Page 16 Operation Instructions 7.1 Device Description The default settings are pre-programmed as shown in the screen. (1) Start settings Start menu: Individual options of the start menu. If you select the “Protocols (Body)” or the “Protocols (List)” setting, application is selected via the list of application areas is in the start menu.
-
Page 17: Device Description
The pulse generator in the handpiece is a wear part and needs to be replaced after a certain period as its ability to function decreases with time. Zimmer MedizinSystemeGmbH guarantees unrestricted use of at least two million pulses per one pulse generator. Depending on the power and frequency, more than two million pulses can be generated. - Page 18 Operation Instructions 7.1 Device Description Temperature The generation of the mechanical pulse energy causes a substantial build-up of heat monitoring / in the handpiece. To avoid reducing the life of the handpiece, a temperature switch is regulation handpiece integrated. An internal shutdown mechanism forces the handpiece to cool if excessive temperatures are reached.
-
Page 19: Notes On Operation
Operation Instructions 7.2 Notes on Operation Application Please hold the handpiece as shown below. The ZWave operates with mechanical energy; it is transferred to the patient through a handpiece. For this purpose, the handpiece with the applicator is placed vertically on the application area. -
Page 20: Performing The Application
Operation Instructions 7.3 Performing the Application Note: All buttons, menus, and sub-menus can be directly activated on the screen by touching with your finger. Program start Activating the right button in the start screen opens the screen selected in the settings menu. - Page 21 Operation Instructions 7.3 Performing the Application Application After selecting the application, another window with detailed application recommendation recommendation will open. Select application Activation of the “Application” button opens the application screen with the program appropriate program. All relevant application recommendations are pre-set, but the pulse energy must be individually stepped up for each application.
-
Page 22: Display And Buttons
Operation Instructions 7.4 Display and Buttons Description of the display elements and buttons (1) Energy Displays the set pulse energy. When the application is active, the bar graph is filled in. The pulse energy can be set before and during the delivery of pulses. The pulse energy is adjustable between 60–185 mJ in 10 mJ steps. - Page 23 Operation Instructions 7.4 Display and Buttons (5) Number of pulses Display of the preselected number of pulses and the currently emitted pulses as well as the total number of emitted pulses if the total number of emitted pulses is not pre- selected.
-
Page 24: Sd Card
Operation Instructions 7.5 SD Card SD Card On the SD-card, the user-defined settings as well as the body regions and the application list are stored. If the SD-card is not inserted, the display application recommendation will not open upon activation of the start button on the home page. The following message appears: “SD card not found. -
Page 25: Favorites List - Retrieving Programs And Editing List
Operation Instructions 7.6 Favorites Lists – Retrieving Programs and Editing Lists The parameters of the pre-defined programs can be modified individually and saved. Store and Activating the “save” button opens the field for entering the program name. name program The program name is entered via the keyboard. Note: The programs can be saved in the favourites list. - Page 26 Operation Instructions 7.6 Favorites Lists – Retrieving Programs and Editing Lists Individually stored programs are listed in the favorites list. These can be retrieved here for application, 2. for editing (moving and deleting). Activation of the “Favorites” button opens the favorites list. Select favorite list The desired program is directly selected in the corresponding row Open program...
- Page 27 Operation Instructions 7.6 Favorites Lists – Retrieving Programs and Editing Lists Edit favorites Activation of button (1) moves the program to the bottom. Activation of button (2) moves the program to the top. Activation of button (3) deletes the program. Activation of button (4) saves the modifications and returns you to the program.
-
Page 28: Technical Information
Technical Information Basic device Power supply 100 – 240 V / 50/60 Hz Fuses 2 × T3A15L, 250V Power consumption 250VA Protection class Frequency range 1 Hz – 22 Hz, adjustable in 1 Hz steps 3 burst modes with 4, 8, or 12 pulses Pulse energy levels 60 –... -
Page 29: Info-Chart, Duration Of Application
Technical Information 8.1 Info-Chart, Duration of Application Max. possible pulses per application frequency Page 20... -
Page 30: Cleaning Disinfection
Cleaning Disinfection - Before starting any maintenance and cleaning measures, the device must always be turned off with the main switch, and the mains cable must be disconnected. - Make sure that during the cleaning and disinfection the labelling of the device (such as warnings, label of control devices and identification plate) are not damaged. -
Page 31: Scope Of Delivery Accessories
Scope of Delivery Accessories Scope of delivery combination with syscart Set: Art. no. 5531-X01 Art. no. 5531 1 ZWave control unit 9160 1 Syscart with tray mount 5511 2 Handpieces 93133530 3 Applicator heads 39 mm 65137110 10 Silicone caps 50500038 1 ZWave Lotion 94130411... -
Page 32: Safety And Maintenance
The ZWave is manufactured according to the DIN EN 60601-1 safety regulations. Zimmer MedizinSysteme GmbH can only be held responsible for safety and reliability of the device if the device is operated using a proper power outlet with earth contact and the electrical installation complies with DIN VDE 0100 part 710, ... -
Page 33: Maintenance
Safety and Maintenance 11.2 Maintenance Before cleaning and maintenance, the device must always be switched off with the main switch, and the power cord must be disconnected. Checking the impact At the applicator head, a deformation / shortening of the rear dome takes place during dome use. -
Page 34: Function Test
Function Test After the device is switched on, the ZWave performs a self-test, which checks all internal components. In the event of a fault, an error message appears. In addition, an extended function test can be performed as described below. This test should be performed monthly or if there are any doubts about the viability of the device. -
Page 35: Error Messages Troubleshooting Disposal
Error Messages Troubleshooting Disposal Loss of function of In the status bar, the message “Ready” appears, and despite activating the foot handpiece switch, no pulse is triggered. Possible cause 1 Handpiece / foot switch is not properly connected, or defective. Fix for cause 1 Make sure that the foot switch and handpiece are connected correctly. - Page 36 Error Messages Troubleshooting Disposal Applicator not found In the status bar, the message “No applicator found” appears. Possible cause Handpiece not connected or incorrectly connected. Fix for cause Make sure the handpiece is properly connected. The plug must be properly snapped Functional failure of No response to the main switch / display remains dark device...
- Page 37 In the case of other malfunctions, switch the device off and then switch it on after waiting for 5 seconds. If the problem persists, please contact the customer service department in Irvine. Zimmer MedizinSystems 3 Goodyear, Suite B Irvine, CA. 92618...
-
Page 38: Manufacturer's Declaration Of Electromagnetic Compatibility
Manufacturer’s declaration of Electromagnetic Compatibility The Zwave is developed according to the recognized standards of technology; the information on the intended use of the components is taken into account. The Zwave must not be operated near active HF surgery devices or magnetic resonance tomography that can cause high levels of electromagnetic interference. - Page 39 Manufacturer’s declaration of Electromagnetic Compatibility Table 1 Guidance and Manufacturing Declaration- Electromagnetic Emissions Zwave The device is intended for use in the electromagnetic environment specified below. The customer or user Zwave of the device should ensure that it is used in such environment. Emission Measurement Compliance Electromagnetic Environment-Guidelines...
- Page 40 Manufacturer’s declaration of Electromagnetic Compatibility Guidance and Manufacturing Declaration- Electromagnetic Immunity Zwave The device is intended for use in the electromagnetic environment specified below. The customer or user Zwave of the device should ensure that it is used in such environment. Immunity IEC 60601- Test Level Compliance Level...
- Page 41 Manufacturer’s declaration of Electromagnetic Compatibility Table 3 Guidance and Manufacturing Declaration- Electromagnetic Immunity Zwave The device is intended for use in the electromagnetic environment specified below. The customer or user Zwave of the device should ensure that it is used in such environment. Immunity Test IEC 60601-Test Compliance Level...
- Page 42 Manufacturer’s declaration of Electromagnetic Compatibility Electromagnetic immunity to HF radio communication equipment Test Maximum Immunity Test Band Distance Frequency Service Modulation Energy Level (MHz) (MHz) (V/m) 5240 5100- WLAN 802.11 a/n Pulse 5800 Modulation 5500 217 Hz 5785 Page 33...
- Page 44 Instructions for Use Zimmer MedizinSystems 3 Goodyear, Suite B Irvine, CA. 92618 800 327 3576 949 727 2154 fax www.zimmerusa.com info@zimmerusa.com...
Need help?
Do you have a question about the Z Wave PRO and is the answer not in the manual?
Questions and answers