Table of Contents
Advertisement
Quick Links
Advertisement
Table of Contents

Related Manuals for Zimmer ZWave


Summary of Contents for Zimmer ZWave
- Page 1 User Manual ZWave...
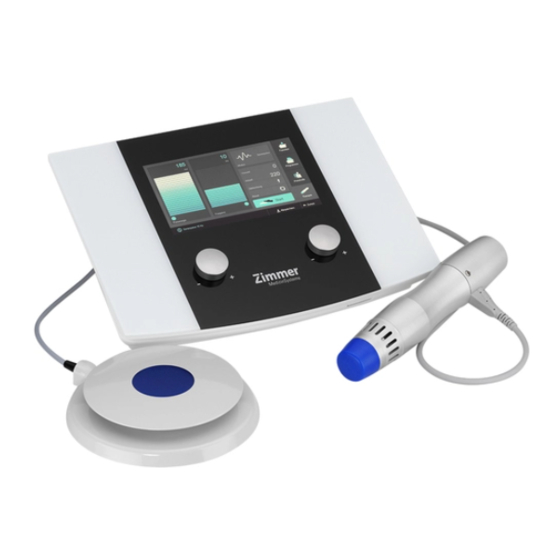
- Page 2 Figures Front view of device Control unit / Handpiece / Footswitch Selection and control Control unit elements Pulse energy controller Touch pen in holder Display Frequency controller SD card slot Handpiece Handpiece Air vents, front Air vents with fan, rear Footswitch Footswitch...
- Page 3 Figures Front view of device Display Screen readouts Status bar Buttons on the screen Title bar Navigation bar...
- Page 4 Figures Rear view of device Switch and connector sockets 15 16 17 Switch / Connector Main switch sockets Mains fuse Port for mains cable Port for handpiece Port for footswitch Serial number / manufacturer's plate...
- Page 5 Figures Accessories Silicone cap 2” applicator head...
-
Page 6: Table Of Contents
Rear view of device Figures – Switch and connector sockets Accessories Figures ZWave briefly 1.1. Summary 1.2. Quick operation instructions 1.3. How to use ZWave 1.4. Handpiece 1.5. Applicator heads 1.6. Footswitch Installation 2.1. Fitting the cables, starting the system 2.2. - Page 7 Scope of delivery - Accessories Manufacturer’s declaration of Electromagnetic Compatibility Valid for the ZWave devices These operating instructions are an integral part of the device. They must be stored with the device and kept accessible at all times for anyone authorised to operate this device.
- Page 8 What does ZWave do? Creation of pulses using an ergonomic handpiece and transmission of pulses via special applicators. ZWave has a maximum penetration depth of about 35 mm in human tissue. How are pulses An electromagnetic field is generated via a coil in the back of the generated with ZWave? handpiece.
-
Page 9: Zwave Briefly
ZWave briefly 1.2. Quick operation instructions Note: The following descriptions are all based on the factory settings. Note: All buttons, menus, and submenus are activated directly on the screen by touching it or using the touch pen or finger. Starting the program Press the 'Start' button to open the application screen. - Page 10 ZWave briefly 1.2. Quick operation instructions Application information Press the 'Application' button to open the application screen with details of the selected program. Selecting the application program Positioning handpiece / Position the handpiece on the selected treatment point / field. To avoid...
- Page 11 ZWave briefly 1.2. Quick operation instructions Setting the frequency Adjust the frequency using the right controller, if necessary. Setting the pulse energy Adjust the pulse energy using the left controller, if necessary. Starting application Depress the footswitch to start the application.
-
Page 12: 1.3. How To Use Zwave
1.3. How to use ZWave Start application ZWave operates with mechanical energy. The energy is transmitted to the client via a handpiece, which is usually held in one hand. To do this, the handpiece is placed on the area or point of treatment with the applicator head held vertically. - Page 13 ZWave briefly 1.3. How to use ZWave Recommendation for Applications Number of Applications Frequency Power Pulses per sessions per week level application application Cellulite 2500 to 8 - 10 2- 3 14 – 16 Hz 60 – 120 mJ stage I...
-
Page 14: Handpiece
The pulse generator in the handpiece is an expendable part and has to be replaced after a specific period of use as its functionality decreases over time. Zimmer MedizinSysteme guarantees unrestricted use of at least 2 million pulses per pulse generator. Wear of the pulse generator varies. Depending on performance and frequency, sometimes far more than 2 million pulses can be delivered. -
Page 15: Applicator Heads
ZWave briefly 1.5. Applicator heads There is one size applicator head available for application. Changing applicator To change the applicator head, hold the handpiece in one hand and heads unscrew the applicator head from the handpiece with the other hand (anticlockwise). -
Page 16: Footswitch
ZWave briefly 1.6. Footswitch Place the footswitch that it can be reached easily during application. The footswitch control unit is non-directional so it is not necessary to align the footswitch exactly. To avoid damage please note that only slight pressure needs to be exerted on the switch. -
Page 17: Installation
2.1. Fitting the cables, starting the system Note: Before starting up the system, remove ZWave from its transport case. Do not operate the device while it is in the case. Ensure that ZWave is placed on a stable surface. Note: Make sure that the main switch on the device is set to '0'. -
Page 18: Settings
Installation 2.2. Settings Note: Changes to the default settings can only be made from the start screen. Press button ′Settings′ to open the configuration screen. Language Press this button to open the menu to select the language. The language is selected by pressing on the appropriate row in the pull down menu. Welcome message Option to configure an individual welcome message. - Page 19 Installation 2.2. Settings Version Press the version button to open the window with information about the current software version of the device. Default settings Press the default button to reset the factory default settings. Touch calibration Press the ′Touch Calibration′ button to open the screen to carry out the touch calibration.
-
Page 20: Sd Card
SD card User-defined settings and the applications list are saved on the SD card. Note: If the SD card is not inserted, the message ′SD card not found′ appears when the 'Favorites' and 'Memory' buttons are pressed. Deactivate the message by pressing the button ′OK′, insert the SD card, and then continue. -
Page 21: Application Screen
Application screen Application program Title bar The title bar shows the name of the current program. Status bar The status bar shows the information about the current status of the application. If the application is not active, it shows the word ′Ready' and if an application is running the text 'Active' appears. - Page 22 Pressing the 'Number of pulses' field opens the Input window, defining preselection and count direction. Note: ZWave offers two options for pulse delivery: Pulse delivery without For pulse delivery with no preselected number of pulses, the application preselecting the pulse is not ended by the device.
- Page 23 Application screen Pulse delivery with For pulse delivery with a preselected pulse number, the application is preselection of the ended by the device once the preselected number of pulses has been number of Pulse reached. The footswitch is deactivated and pulse delivery is no longer possible. The application can be continued by resetting the current number of pulses or by adjusting the preselection.
-
Page 24: Favorites And Memory List
Favorites and Memory list 5.1. Saving modified programs Programs can be stored either in the Favorites list or the Memory list. Program name For saving the program enter the program name using the keyboard Favorites Press the 'Favorites' button to open the Favorites list and automatically save the program. -
Page 25: Retrieving And Editing Favorites And
Favorites and Memory list 5.2. Retrieving and editing Favorites and Memory list Note The following steps to edit the Favorites list correspond exactly to those used to edit the Memory list Individually saved programs are listed in the Favorites or Memory list. From here they can be: 1. - Page 26 Favorites and Memory list 5.2. Retrieving and editing Favorites and Memory list Editing Press the ′Edit′ button to open the 'Edit Favorites' screen Activate the desired program by pressing the appropriate row. You are now able to move or ...
-
Page 27: Description Of The Selection Keys
Description of the selection keys Activation of the key: opens the Memory list in save mode, saves programs to the Memory list Can be used to reverse the counting direction. Pressing the key resets the current number of pulses ... - Page 28 Description of the selection keys Press the button to reject the changes made. Activation of the ′+′ button increase the pulse rate in increments of 1000, activation of the ′-′ button reduces the number of the pulses in steps of 1000.
-
Page 29: Application Menu
Application menu The application recommendation menu helps you to select the appropriate application. The application can be selected using the application list. Application information After selecting the detailed state of the cellulite stage, another window opens showing detailed application information. - Page 30 Application menu Selecting the application Press the ′Application′ button to open the application screen with the program program. Retrieving application Press the ′Info′ button to open the window with the application information. information The application should always be conducted in the direction (arrows) of the lymphatic outward flow.
-
Page 31: Medical Information
Medical information 8.1. Application High energy radial pulse application for the temporary reduction in the appearance of cellulite. -
Page 32: Contraindications
Medical information 8.2. Contraindications Application is contraindicated in the following cases: vascular diseases present in or near the area of application local infections in the area of application around malignant or benign tumours directly on cartilage surfaces or near the small facet joints of the spinal column ... -
Page 33: General Information
General information 9.1. Explanation of symbols In the user manual, this symbol stands for Danger / Warning. In the operating instructions this symbol stands for 'Caution' with regard to possible damage to property. Handpiece port Footswitch socket Follow Operating Instructions Value of the accessible fuses Instrument type BF (according IEC60601-1): Degree of protection against electric shock... -
Page 34: Warnings / Cautions
It is imperative that these instructions are followed. Application must always be carried out under supervision. The ZWave handpiece is not designed for permanent use. After a treatment with max. 6000 pulses, a break of 15 min. becomes necessary. -
Page 35: Technical Data
General information 9.3. Technical Data Device classification Therapeutic massager Dimensions W 13” / D 9” / H 5” Weight 6 lbs (without handpiece) Power supply 100–240 VAC / 50/60 Hz Fuse 2 x T3A15 Protection class Application class Type BF Frequency range 1 Hz –... -
Page 36: Technical Information
General information 9.4. Technical information As the manufacturer Zimmer MedizinSysteme can only be responsible for the safety and reliability under the following circumstances: if the device is operated from an approved, grounded wall socket and the electrical installation conforms to DIN VDE 0100 Part 710 or equivalent. -
Page 37: Legal Information
Legal information Legal Information National laws and regulations must be observed when installing and operating this treatment device. This device is manufactured by: Zimmer MedizinSysteme GmbH Junkersstraße 9 89231 Neu-Ulm – Germany Phone +49 (0)731 9761-291 + 49 (0)731 9761-299 export@zimmer.de... -
Page 38: Maintenance
Maintenance Separate servicing is not required for this product. Before starting any maintenance or cleaning, the device must always be switched off at the main switch and the plug pulled out. You should also check the domes on the applicators for any wear, as described in chapter 1.5. - Page 39 Maintenance Monitoring the Generating mechanical pulse energy causes a considerable build up of handpiece temperature heat in the handpiece. To avoid shortening the lifetime of the handpiece there is an integrated temperature switch. This triggers an internal switch-off if the temperature becomes too high, forcing the handpiece to cool down.
- Page 40 Maintenance Monitoring the As soon as the handpiece has reached the operating temperature, the handpiece temperature message 'Overtemperature' is replaced by the message 'Ready' in the status bar and the application can be continued.
-
Page 41: Troubleshooting
Troubleshooting Failure or malfunction Ensure that the handpiece plug is properly connected to the device. of the handpiece It must be fully engaged. Check the cable of the handpiece for any mechanical damage. Irregular delivery Possible cause 1: Wear of applicator head of pulses / Difficulty to move due to wear overheating... - Page 42 Before doing this, check the entire power supply for any possible faults. If the error occurs again, it is essential to inform the service / after-sales service department. Zimmer MedizinSystems 25 Mauchly Suite 300 Irvine, CA 92618 Office (800) 327-3576 Fax (949) 727-2154 info@zimmerusa.com...
-
Page 43: Function Test
Function Test ZWave runs a self-test that checks all internal components after it is switched on. An error message is shown in case of faults. In addition, a function test can be performed as follows. This test shall be made monthly or in case of doubt about the proper function of the device. -
Page 44: Error Messages
Error Messages In the status bar the Check that the handpiece is correctly connected. message 'Handpiece not found' appears. Monitoring the Generating mechanical pulse energy causes a considerable build up of handpiece temperature heat in the handpiece. To avoid shortening the lifetime of the handpiece there is an integrated temperature switch. -
Page 45: Scope Of Delivery - Accessories
Scope of delivery - Accessories Scope of delivery 5507xxxx Control unit for ZWave 5511xxxx Handpiece, applicator head 2” included 63130411 Holder for handpiece 93133530 2” applicator head 65137110 Silicone caps 50500038 Lotion for treatment 94130411 Footswitch 67250130 Mains cable 10101833... -
Page 46: Manufacturer's Declaration Of Electromagnetic Compatibility
Portable and mobile RF communication systems (e.g. mobile phones) may interfere with medical electrical equipment. ZWave should only be operated with the original mains cable specified in the list of contents delivered. Operating the device with any other mains cable can lead to increased emissions or reduced interference immunity of the device. - Page 47 Electromagnetic Compatibility Guidance and manufacturer’s declaration – Electromagnetic immunity The ZWave device is intended for use in the electromagnetic environment specified below. The customer or the user of the ZWave device should assure that it is used in such an environment.
- Page 48 Uninterrupted operation is not required with the use intended. Guidelines and manufacturer's declaration – electromagnetic interference immunity The device ZWave is intended for operation in the electromagnetic environment specified below. The customer or user of the ZWave should ensure that it is used in such an environment.
- Page 49 If the measured field strength in the location where the ZWave device is to be used exceeds the above compliance levels, the ZWave device should be monitored in order to ensure that it is functioning as intended. If unusual features are noticed, additional measures may be necessary such as re-orienting or relocating the ZWave device.
- Page 50 User Manual Zimmer MedizinSystems 25 Mauchly, Suite 300 Irvine, CA. 92618 800 327 3576 949 727 2154 fax www.zimmerusa.com info@zimmerusa.com...
Need help?
Do you have a question about the ZWave and is the answer not in the manual?
Questions and answers