
Related Manuals for Ropox 4SingleElectric


Summary of Contents for Ropox 4SingleElectric
- Page 1 4SingleElectric User Manual Mounting Instructions Keep this folder with product at all times! PDF 6090 / Rev 001 © ROPOX 2015...
-
Page 2: Table Of Contents
The frame seems loose or unstable......................15 11.2 The height of the frame cannot be adjusted (adjustment seems very difficult) ........15 11.3 The frame does not move straight ......................15 12. COMPLAINTS ..............................16 Page 2 © ROPOX 2019... -
Page 3: Introduction
4. 4Single is not designed for use in damp rooms. The control unit has IP32/ll protection and must always be installed in accordance with the low voltage directive or corresponding national or international legislation. Page 3 © ROPOX 2019... -
Page 4: Technical Data
250 kg evenly distributed (option) Speed/lifting time: Approx. 12 - approx. 25sec. sec. Temperature: 5-45°C Air humidity: 5-85% (non-condensing) Complaints: See Complaints, page 15 Producer: Ropox A/S, DK-4700 Naestved, Tel.: +45 55 75 05 00 e-mail: info@ropox.dk - www.ropox.com Page 4 © ROPOX 2019... -
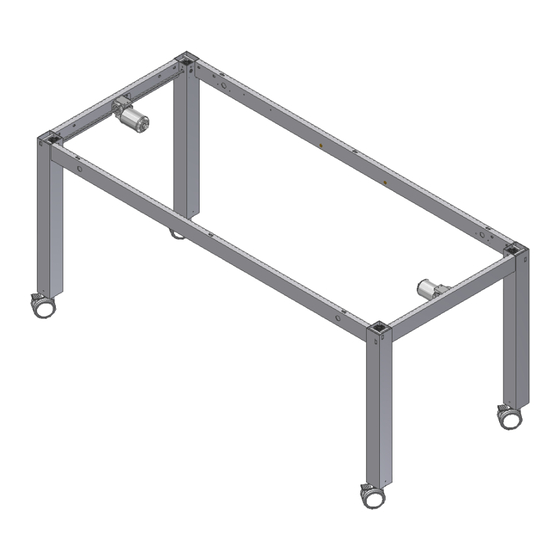
Page 5: Schematic Diagram Of Frame
Height: 55-85cm (H1) Height: 65-95cm H2) Height w. wheels: + 6,5cm Table size without middle support: Table size with middle support: Length 60cm - 300cm Length 60cm - 300cm Width 60cm - 120cm Width 121cm - 200cm Page 5 © ROPOX 2019... - Page 6 10. Front fascia profile Length = frame length – 12.4cm 11. Screw ø4.8x13, Torx 95091012 12. Cover plates 50*40000-025 Leg 1 Leg 2 Black Green by Green by increased lifting increased lifting power Black power Black Black Leg 2 Leg 1 Page 6 © ROPOX 2019...
-
Page 7: Mounting Instructions, Description
Prior to mounting, check that all parts have been provided. See list of components, section 7. Assembly of frame 6.1.1 Mount hexagonal shaft and motor cable. 6.1.2 Mount motor on side fascia. Free cut of profile away from table top. 6.1.3 Mount the spring for retention of motor plug. Page 7 © ROPOX 2019... - Page 8 See label on legs. provided. 6.1.6 Position the angle plate for control unit 6.1.7 Attach control unit to angle plate and as shown and fasten it to front fascia. fasten. Page 8 © ROPOX 2019...
-
Page 9: Mounting Of Safety Strip
Safety strip (Options) Cable for control switch Mounting of safety strip Option: Ropox always recommends the use of safety strips on electrically adjustable frames. See the manual for strips provided. Be careful not to damage the safety strip during transportation or mounting. -
Page 10: Performance Test
Press the DOWN button and let the table move 2-5cm downward while activating the safety strip. The table must now stop the downward movement, move1-2cm upward and stop. When all these tests have been carried out the table is ready for use. See ”Safety in use, section 9”. Page 10 © ROPOX 2019... -
Page 11: List Of Components
Angle plate for control unit 50*40000-039: 1 pc. Motor 96000553: 2 pcs. Motor cable 96000573: 2 pcs. Allen screw M8x16 95010003: 16 pcs. Screw ø4.8x13 95091012: 6 pcs. Screw ø4.2x6.5 95090806: 2 pcs. Spring 50-40000-040: 2 pcs. Page 11 © ROPOX 2019... -
Page 12: Options
Increased lifting power, set of legs H2, 50-41420: Max. load 250kg evenly distributed 1 set (To be ordered with main order) For frames with increased lifting power the gear housing will be green and black Page 12 © ROPOX 2019... -
Page 13: Safety In Use
If the table has not been assembled according to these mounting instructions the right to complain may become void. ➢ Only use Ropox original spare parts as replacement parts. If other spare parts are used, the right to complain may become void. Page 13... -
Page 14: Cleaning/Maintenance
Check that all cables have been mounted correctly and are undamaged. After each inspection, fill in the service schedule. See 10.3 Only use Ropox original spare parts for replacement of parts. If other spare parts are used, the right to complain may become void. -
Page 15: Service Schedule, Operation And Maintenance
11.3 The frame does not move straight ➢ If the frame does not move straight, it must be reset, see Maintenance, section 10.2 If there has been a power failure, the table must always be reset before use. Page 15 © ROPOX 2019... -
Page 16: Complaints
Complaints See General Terms of Sale and Delivery on www.ropox.com ROPOX A/S Ringstedgade 221 DK – 4700 Naestved Tel.: +45 55 75 05 00 Fax.: +45 55 75 05 50 E-mail: info@ropox.dk www.ropox.com Page 16 © ROPOX 2019...
Need help?
Do you have a question about the 4SingleElectric and is the answer not in the manual?
Questions and answers