Table of Contents
Advertisement
Quick Links
Advertisement
Table of Contents

Related Manuals for FISNAR DC50


Summary of Contents for FISNAR DC50
- Page 1 DC50 Digital Dispenser Operating Manual info@fisnar.com www.fisnar.com...
-
Page 2: Table Of Contents
DC50 Digital Dispenser Operating Manual Table of Contents Machine Overview Product Safety Statements Specifications Accessories External Controls Machine Setup Dispense Setup Dispense Modes Manual Mode Timed Mode External Machine Actuation Spare Parts List © 2020 Fisnar - 2 -... -
Page 3: Machine Overview
OVERVIEW Model DC50 Digital Dispenser The DC50 is a general purpose, reliable and easy to use digital dispenser with a bright 4-digit timer control display for precise & repeatable dispensing. The simple user-friendly programming enables a dispense cycle to be quickly created and automatically display. -
Page 4: Product Safety Statements
DC50 Digital Dispenser Operating Manual SAFETY General Precautions Do not operate the machine in excess of its maximum ratings / settings. Make sure that the input air supply is clean and dry. A 5 micron air filter/regulator (item number 560567) is recommended to ensure the input air supply is clean and dry. - Page 5 Immediately disconnect power if any sparking or smoke appears. Do not expose the machine directly to sunlight. Maintenance The DC50 is generally a maintenance free machine. However, to ensure smooth operation please follow the below instructions. Only use non-woven cleaners on the machine.
-
Page 6: Specifications
DC50 Digital Dispenser Operating Manual SPECIFICATIONS Dimensions (W x D x H): 7.56” x 7.17” x 3.00” (192 x 182 x 76 mm) Weight: 2.14 lbs (0.97 kg) Input AC to Power 100 – 240 VAC, 50 / 60 Hz... -
Page 7: External Controls
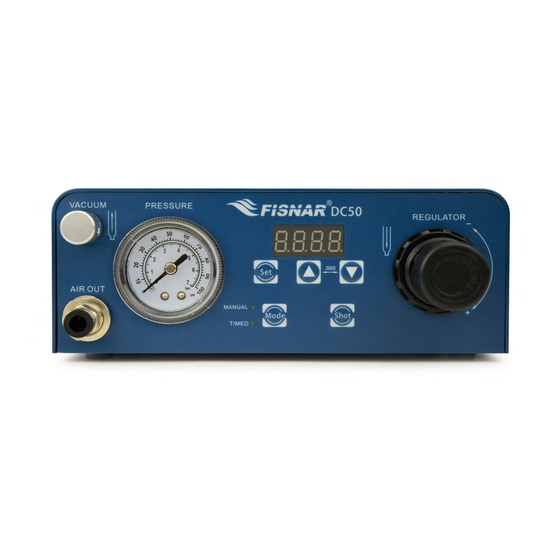
DC50 Digital Dispenser Operating Manual EXTERNAL CONTROLS FRONT REAR FIG. 1: External Controls - Overview Item Illustration Item Illustration Item Illustration Vacuum Control Scroll Buttons Air Inlet Port Exhaust Port Air Outlet Port Air Pressure Regulator Air Pressure Gauge Display... - Page 8 DC50 Digital Dispenser Operating Manual EXTERNAL CONTROLS FIG. 2: External Controls – Front Keeps a negative air pressure in the syringe barrel when not Suck Back dispensing. Required to prevent low viscosity fluids dripping from the Control dispense tip in between dispense cycles.
- Page 9 FIG. 3: External Controls - Back The foot pedal switch is connected here. Or it can be used for Foot Switch connecting to an external device (e.g. Fisnar dispense robot) that will Connector send the dispense start signal to the machine.
- Page 10 DC50 Digital Dispenser Operating Manual EXTERNAL CONTROLS FIG. 4: Control Buttons Press the button to switch between the two different dispense modes (MANUAL or TIMED). A green LED light will alight next to the text “MANUAL” Switch Modes or “TIMED” to identify the current dispense mode that the machine is operating Press the button in order to change the dispense time.
-
Page 11: Machine Setup
DC50 Digital Dispenser Operating Manual MACHINE SET UP FIG. 5: Front and Back Views Connect air hose (1) from compressed air 70-100 psi (5-7 bar) to the air inlet port on the back of the machine. See FIG. 5. Insert the Foot Pedal connector (2) to the port on the back of the machine. See FIG. 5. -
Page 12: Dispense Setup
Connect the syringe barrel adapter air tube to the “Air Out” port on the front of the machine. (4) See FIG. 5. Can be standard use with Fisnar adapter head assemblies supplied with green color push to connect fitting (5606038). -
Page 13: Dispense Modes
DC50 Digital Dispenser Operating Manual DISPENSE MODES FIG. 7: Dispense Modes MANUAL MODE Use the button to switch to MANUAL mode. MANUAL mode allows the operator to actuate the machine on demand whenever the dispense signal is activated (i.e. foot pedal is pressed). -
Page 14: Timed Mode
DC50 Digital Dispenser Operating Manual DISPENSE MODES FIG. 8: Dispense Modes TIMED MODE Use the button to switch to TIMED mode. TIMED mode allows the operator to dispense for a set period, regardless of how long the foot pedal is pressed. - Page 15 DC50 Digital Dispenser Operating Manual Press the button again to move to the next digit to the right of the one that was previously flashing. Adjust accordingly to the correct numerical value using the buttons. Continue to press the button to scroll through the digit positions, adjusting the numerical values as required.
- Page 16 DC50 Digital Dispenser Operating Manual SETTING A DISPENSE TIME GREATER THAN 9.999 SECONDS. Use the button to scroll to the first digit position. use button to increase the numerical value upwards. Once the numerical value “9” is displayed, press the button again.
- Page 17 DC50 Digital Dispenser Operating Manual REDUCING A DISPENSE TIME FROM GREATER THAN 10.00 SECONDS Use the button to scroll to the first digit position. use button to decrease the numerical value downwards until the numerical value “1” is displayed. Use the button to scroll to the second digit position.
-
Page 18: External Machine Actuation
DC50 Digital Dispenser Operating Manual EXTERNAL MACHINE ACTUATION FIG. 9: External Machine Actuation A dry contact closure (0 Volt) between the Input (Pin #1) and Common (Pin #2) Input pins will trigger a dispense signal. PLEASE READ: Do not apply a voltage between the input pin (1) and the common pin (2). -
Page 19: Spare Parts List
DC50 Digital Dispenser Operating Manual SPARE PARTS LIST Ref. Item Number Description 5601900 Air Out Module 5601901 Vacuum Control Valve (inc. fittings) 5601902 Pressure Gauge (inc. fittings) 5601903 Pressure Regulator (inc. fittings) 5601904 Solenoid Module (inc. fittings) 5601905 Timer Board 5601887-10FT Ø6mm Transparent PU Tubing (10ft) - Page 20 In no event shall manufacturer be liable for consequential or incidental damages. A return authorization is required prior to shipping a defective machine to the factory. Manufacturer reserves the right to make engineering or product modifications without notice. info@fisnar.com www.fisnar.com...
Need help?
Do you have a question about the DC50 and is the answer not in the manual?
Questions and answers