Table of Contents
Advertisement
Available languages
Available languages
Quick Links
Advertisement
Table of Contents

Subscribe to Our Youtube Channel
Related Manuals for Real Flame Bentley


Summary of Contents for Real Flame Bentley
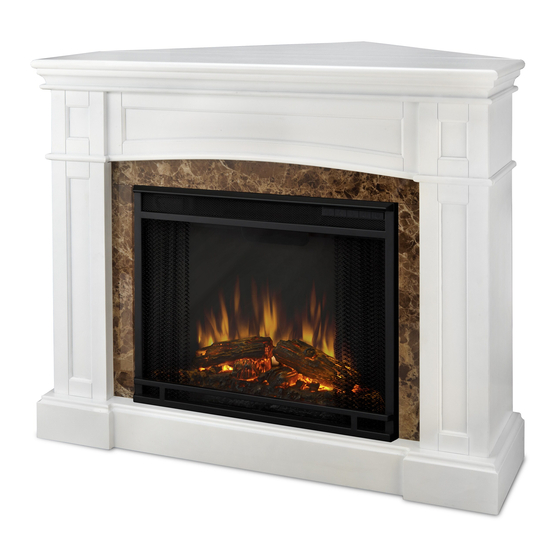
- Page 1 Lot: _________________ Model # 1700 Bentley Fireplace...
-
Page 2: Care And Cleaning
Helpful Tips for Assembly Before assembly carefully unpack and check for each replace piece and necessary hardware IF ANY PARTS ARE DAMAGED OR MISSING PLEASE CALL US DIRECTLY AT: 1-800-654-1704 Prep, plan and clear your space. In order to minimize damage while assembling make sure unpacking and assembly takes place on a carpeted surface. - Page 3 P AR T S L IS T Number Description Espresso White Quantity Right Front Panel 17000301 17000801 Left Front Panel 17000302 17000802 Center Panel 17000303 17000803 Right Firebox Trim 17000304 17000804 Left Firebox Trim 17000305 17000805 Upper Firebox Trim 17000306 17000806 Right Side Panel 17000307...
- Page 4 STEP 1 - Lay the Right Front Panel (1) and the Left Front Panel (2) face down on a carpeted surface. - Lay the Center Panel (3) on the Left and Right Front Panels and attach using one Wood Screw (A) at each end as shown.
- Page 5 STEP 2 - Using two Wood Dowels (B) and two 3-in-1 Bolts (C) per side; attach the Side Panels (7 & 8) to the Front Panels as shown with two Ex-center Fittings (D).
- Page 6 STEP 3 - Place the Base (9) on a at stable surface. - Install six 3-in-1 bolts (C) and eight Wood Dowels (B) into the corresponding locations in Base (9). - With the help of another person place the previously assembled section of the replace onto the base. - Secure this portion to the base using six Ex-center ttings (D).
- Page 7 STEP 4 - Using two Wooden Dowels connect the Upper Firebox Trim (6) to both the Right Firebox Trim (4) and the Left Firebox Trim (5) - Attach the Firebox Trim panels to the inside of the replace mantel using eleven Wood Screws (A). NOTE: If placing the replace against a wall continue to next step.
-
Page 8: Step 5 - Wall Installation
STEP 5 - Wall Installation - Install eight 3-in-1 pins (C) in the mantel top. - Place ten Wood Dowels (B) in the corresponding holes in the tops of each panel. - Lower the Mantel Top (14) onto the rest of the replace making sure that all Dowels and 3-in-1 ttings all t into the correct holes. -
Page 9: Step 6 - Corner Installation
STEP 6 - Corner Installation - Place the Mantel Top(14) and the Mantel Corner (13) upside down on the oor. - Place three Wood Dowels (B) into the edge of the Mantel Corner (13) as shown. - Slide the two parts together. - Connect the Mantel Top (14) and the Mantel Corner (13) with two Corner Mantel Braces (15). - Page 10 STEP 7 - Assemble the Mantel Top Corner support. - Attach the Corner Base Connector (11) to the end of the Corner Floor Brace (10) with two Wood Screws (E) - Attach the opposite end of the Corner Floor brace to the bottom of the Corner Support (12) with two Wood Screws (E).
- Page 11 STEP 8 - Insert ten Wood Dowels (B) into the corresponding holes in the tops of the panels. - Place the assembled Corner Mantel Top onto the rest of the replace making sure that all dowels and 3-in-1bolt t together correctly. - Secure the Top to the Mantel with nine Excenter ttings as shown.
-
Page 12: Warranty & Return Policies
Real Flame disclaims all other warranties, including any implied warranty of merchantability or fitness for a particular purpose. In addition, Real Flame will not be responsible for consequential damages in excess of the purchase price of the product on which such liability is based. - Page 13 Numéro de lot:___________ Foyer Bentley Modèle Nº 1700...
-
Page 14: Nettoyage Et Entretien
Conseils pour un bon assemblage Avant l’assemblage, déballer et véri er soigneusement toutes les pièces du foyer et de la quincaillerie. Si des pièces sont manquantes ou endommagées, veuillez nous contacter directement au 1-800-654-1704 Préparer, plani er et libérer votre espace. A n de minimiser les dommages, procéder au déballage et à l’assemblage sur une surface recouverte d’un tapis. - Page 15 Liste des pièces Nº Description Espresso Blanc Quantité Panneau avant droit 17000301 17000801 Panneau avant gauche 17000302 17000802 Panneau du centre 17000303 17000803 Moulure droite 17000304 17000804 Moulure gauche 17000305 17000805 Moulure supérieure 17000306 17000806 Panneau latéral droit 17000307 17000807 Panneau latéral gauche 17000308 17000808...
-
Page 16: Première Étape
Première étape - Déposer le panneau avant droit (1) et le panneau avant gauche (2) côté face sur une surface douce. - Déposer le panneau du centre (3) sur les panneaux avant gauche et droit et xer avec une vis à bois (A) à chaque extrémité (voir illustration). - Page 17 Deuxième étape - Avec deux goujons de bois (B) et deux boulons 3 en 1 (C) par côté, xer les panneaux latéraux (7 et 8) aux panneaux avant et bloquer avec des écrous de blocage décentrés (D) comme illustré.
- Page 18 Troisième étape - Placer la base (9) sur une surface plane et stable. - Mettre six boulons 3 en 1 (C) et huit goujons de bois (B) dans chacun des trous correspondants. - Avec l’aide d’une autre personne, placer sur la base les pièces précédemment assemblées. - Fixer solidement le tout avec six écrous de blocage décentrés (D).
- Page 19 Quatrième étape - Avec deux goujons de bois, raccorder la moulure supérieure (6) à la moulure droite (4) et à la moulure gauche (5). - Fixer les moulures à l’intérieur du manteau de cheminée avec onze vis à bois (A). Note : Si vous placez le foyer contre un mur, procéder à...
- Page 20 Cinquième étape - Installation murale - Installer huit boulons 3 en 1 (C) dans le dessus du manteau de cheminée. - Mettre dix goujons de bois (B) dans les trous correspondants sur le dessus de chaque panneau. - Déposer le dessus du manteau de cheminée (14) sur le reste du foyer en vous assurant que les goujons et les boulons 3 en 1 correspondent bien à...
- Page 21 Sixième étape - Installation en angle - Mettre le dessus du manteau de cheminée (14) et le coin du manteau de cheminée (13) à l’envers sur le sol. - Mettre trois goujons de bois (B) dans la bordure du coin du manteau de cheminée comme illustré. - Glisser les deux parties l’une vers l’autre.
- Page 22 Septième étape - Assembler le support du dessus du manteau de cheminée en coin. - Fixer le connecteur pour la base en coin (11) à l’extrémité de l’entretoise pour le coin (au sol) (10) avec deux vis à bois (E). - Fixer le côté...
- Page 23 Huitième étape - Insérer dix goujons en bois (B) dans les trous correspondants sur le dessus des panneaux. - Placer le dessus de manteau en coin préalablement assemblé sur le reste du foyer en vous assurant que tous les goujons et les boulons 3 en 1 s’insèrent correctement.
- Page 24 Garantie et politique de retour Garantie de 90 jours : La compagnie Jensen Metal Products inc. D/B/A Real Flame® garantit les foyers sans ventilation Real Flame et ses accessoires de tout défaut (pièces et main d’œuvre) con- formément à un usage régulier et pour une période de 90 jours à partir de la date d’expédition. Dans l’éventualité...
Need help?
Do you have a question about the Bentley and is the answer not in the manual?
Questions and answers