VADDIO ConferenceSHOT AV Complete Manual
Enterprise-class conferencing system
Hide thumbs
Also See for ConferenceSHOT AV:
- Complete manual (114 pages) ,
- Integrator's complete manual (74 pages) ,
- Installation manual (34 pages)

Related Manuals for VADDIO ConferenceSHOT AV


Summary of Contents for VADDIO ConferenceSHOT AV
- Page 1 Complete Manual for ConferenceSHOT AV Enterprise-Class Conferencing System Document 411-0001-30 Rev E October 2019...
-
Page 2: Table Of Contents
Contents Overview What's in this Guide Features Unpacking the Conferencing System Conferencing Accessories ConferenceSHOT AV Bundles A Quick Look at the System Front of the Camera Back of the Camera Back of the Speaker Installation Don’t Void Your Warranty! Before You Install the Camera... - Page 3 Complete Manual for the ConferenceSHOT AV Enterprise-Class Conferencing System Setting Passwords and Access Configuring Other Security Settings Enabling or Requiring HTTPS Disabling Telnet Access Adding Room Information to the Screen Saving (Exporting) or Restoring (Importing) a Configuration Installing a Firmware Update...
- Page 4 Complete Manual for the ConferenceSHOT AV Enterprise-Class Conferencing System Example: Assigning a Function to the Connected Microphone's Home Button Additional Camera Settings Indicator Light and Standby Behavior Operating the Camera Stopping or Resuming Video Managing the Camera Ready State Moving the Camera...
- Page 5 Complete Manual for the ConferenceSHOT AV Enterprise-Class Conferencing System Video and Streaming Audio Other Issues Status Indicator Light Correct a Motor Calibration Error Restoring Default Camera Settings Operation, Storage, and Care Glossary Compliance and Conformity Statements FCC Part 15 Compliance...
-
Page 6: Overview
North America – 999-99950-400 (silver/black), 999-99950-400W (white) Europe and UK – 999-99950-401 (silver/black), 999-99950-4601W (white) Australia and New Zealand – 999-99950-409 (silver/black), 999-99950-409W (white) ConferenceSHOT AV Bundle, TableMIC 1 without Speaker (camera, microphone, HDMI audio embedder) This bundle replaces the Basic 1 bundle, 999-9995-500/500W/501/501W/509/509W. - Page 7 ConferenceSHOT AV Bundle, Basic 1 (camera, microphone, HDMI audio embedder) 999-9995-500/500W/501/501W/509/509W Replacement: 999-99950-500/500W/501/501W/509/509W, TableMIC 1 without Speaker ConferenceSHOT AV Bundle, Basic 2 (camera, two microphones, HDMI audio embedder) 999-9995-600/600W/601/601W/609/609W Replacement: 999-99950-600/600W/601/601W/609/609W, TableMIC 2 without Speaker ConferenceSHOT AV Bundle, Integrator 2 without Speaker (camera, two microphones)
-
Page 8: What's In This Guide
Complete Manual for the ConferenceSHOT AV Enterprise-Class Conferencing System What's in this Guide This guide covers Unpacking Physical features Installation Controlling the camera using the IR remote Web interface: System administration and performance/behavior configuration Telnet API reference Specifications Troubleshooting Warranty and compliance/conformity information For your convenience, the information you need to install this product is also available in the smaller, stand- alone Installation Guide for ConferenceSHOT AV Enterprise-Class Conferencing Systems. -
Page 9: Unpacking The Conferencing System
Complete Manual for the ConferenceSHOT AV Enterprise-Class Conferencing System Unpacking the Conferencing System Make sure you received all the items you expected. Here are the packing lists for the ConferenceSHOT AV system. Caution Always support the camera's body when lifting or moving it. Lifting the camera by its head or mounting arm will damage it. -
Page 10: Conferenceshot Av Bundles
Complete Manual for the ConferenceSHOT AV Enterprise-Class Conferencing System ConferenceSHOT AV Bundles ConferenceSHOT AV Bundle – TableMIC 1 Replaces ConferenceSHOT AV Huddle Bundle North America: 999-99950-300 (black/silver) or 999-99950-300W (white) Europe and UK: 999-99950-301 (black/silver) or 999-99950-301W (white) Australia and New Zealand: 999-99950-309 (black/silver) or 999-99950-309W (white) - Page 11 Complete Manual for the ConferenceSHOT AV Enterprise-Class Conferencing System ConferenceSHOT AV Bundle – TableMIC 2 Replaces ConferenceSHOT AV Group Bundle North America: 999-99950-400 (black/silver) or 999-99950-400W (white) Europe and UK: 999-99950-401 (black/silver) or 999-99950-401W (white) Australia and New Zealand: 999-99950-409 (black/silver) or 999-99950-409W (white)
- Page 12 Complete Manual for the ConferenceSHOT AV Enterprise-Class Conferencing System ConferenceSHOT AV Bundle – CeilingMIC 1 Replaces ConferenceSHOT AV Integrator 1 Bundle North America: 999-99950-100 (black/silver) or 999-99950-100W (white) Europe and UK: 999-99950-101 (black/silver) or 999-99950-101W (white) Australia and New Zealand: 999-99950-109 (black/silver) or 999-99950-109W (white)
- Page 13 Complete Manual for the ConferenceSHOT AV Enterprise-Class Conferencing System ConferenceSHOT AV – CeilingMIC 2 Replaces ConferenceSHOT AV Integrator 2 Bundle North America: 999-99950-200 (black/silver) or 999-99950-200W (white) Europe and UK: 999-99950-201 (black/silver) or 999-99950-201W (white) Australia and New Zealand: 999-99950-209 (black/silver) or 999-99950-209W (white)
-
Page 14: A Quick Look At The System
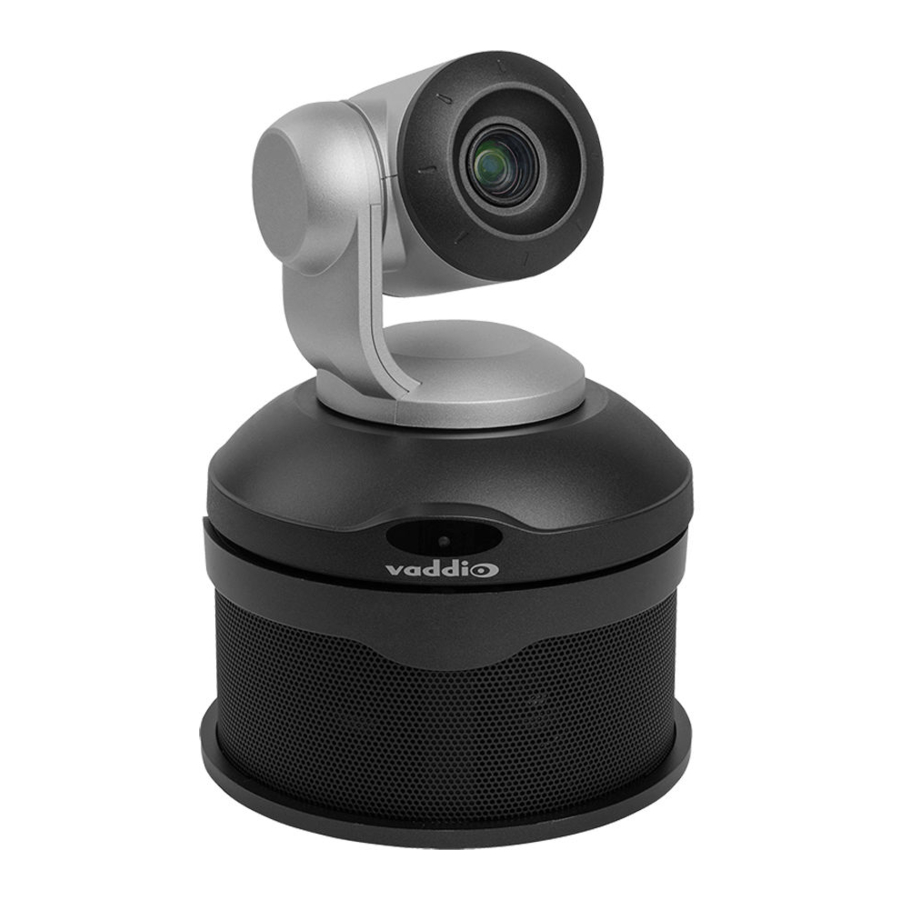
Front of the Camera This photograph shows the camera and speaker mounted together. Camera and zoom lens – The ConferenceSHOT AV camera features a 10X optical zoom lens (11X in Super-Wide mode). IR sensor – Receives signals from the IR remote. Make sure there's nothing directly in front of the camera base, and point the remote at the camera. -
Page 15: Back Of The Camera
USB 3.0 – USB type B connector. Connect to a computer for use with soft conferencing applications. Provides uncompressed USB 3.0 stream. EasyMic ports – RJ-45 connectors. Connect up to two Vaddio CeilingMIC, TableMIC, or other EasyMic-compatible microphones. Audio output – Line level differential audio and 12 VDC power output to the optional amplified speaker or other audio infrastructure. -
Page 16: Installation
Caution Do not install or operate this product if it has been dropped, damaged, or exposed to liquids. If any of these things happen, return it to Vaddio for safety and functional testing. Before You Install the Camera Things to keep in mind when deciding where to install the camera: Consider camera viewing angles, lighting conditions, line-of-sight obstructions, and in-wall obstructions where the camera is to be mounted. ... -
Page 17: Installing The Wall Mount
Complete Manual for the ConferenceSHOT AV Enterprise-Class Conferencing System Installing the Wall Mount The camera is shipped with a wall mount. Other mounting options are available as well. Contact us if you don’t have the camera mount you need. You can install the camera wall mount to a 2-gang wall box or directly to the drywall. -
Page 18: Cabling Notes
Cabling Notes Caution When building cables for Vaddio products, do not use pass-through RJ-45 connectors. If they are crimped incorrectly, they can cause intermittent connections and degrade signal quality. Incorrectly crimped pass-through connectors can also damage the connectors on the product, which will void your warranty. -
Page 19: Basic Connections
Here is an example of how the camera might be set up in a medium-size conference room. (Shown: ConferenceSHOT AV bundle – TableMIC 2.) In this setup, a PC uses a unified communications conferencing application to manage the camera and connected microphones and speaker. When... - Page 20 The camera can also be connected without the speaker, using an HDMI audio embedder to include the far- end audio in the HDMI output. (Shown: ConferenceSHOT AV bundle – TableMIC 1 without speaker.) This allows you to use a display with integrated speakers. When connected this way, the system provides echo cancellation.
-
Page 21: Installing The Camera Without The Speaker
Complete Manual for the ConferenceSHOT AV Enterprise-Class Conferencing System Installing the Camera without the Speaker Caution Before you start, be sure you can identify all cables correctly. Connecting a cable to the wrong port can result in equipment damage. Caution Check your cables. -
Page 22: Installing The Camera And Speaker
Complete Manual for the ConferenceSHOT AV Enterprise-Class Conferencing System Installing the Camera and Speaker 1. If you are adding a speaker to a previously-installed ConferenceSHOT AV camera, remove its mounting screw. 2. Place the camera on the mounting shelf if you have not already done so. -
Page 23: Powering Up The System
Complete Manual for the ConferenceSHOT AV Enterprise-Class Conferencing System Powering Up the System Connect camera power. The camera will initialize and move. This will take a few seconds. When an image is available, the camera is ready to accept control information. -
Page 24: Using The Remote Control
Complete Manual for the ConferenceSHOT AV Enterprise-Class Conferencing System Using the Remote Control The remote provides basic camera control. Quick Reference What do you need to do? Button(s) Power on or standby Power (green button at top right) Select the camera to control (if this remote... -
Page 25: Ir Remote Details
Complete Manual for the ConferenceSHOT AV Enterprise-Class Conferencing System IR Remote Details The remote provides the following functions: Data Screen – Press and hold for 3 seconds to display the camera’s IP address and MAC address on the near-end display. Press momentarily to dismiss the information. -
Page 26: Using The Web Interface
Complete Manual for the ConferenceSHOT AV Enterprise-Class Conferencing System Using the Web Interface The camera's web interface allows control via a network connection, using a browser. Password-protected pages provide administrative access to tasks such as setting passwords, changing the IP address, viewing diagnostics, and installing firmware updates. - Page 27 Complete Manual for the ConferenceSHOT AV Enterprise-Class Conferencing System If you cannot yet view video from the camera: 1. Connect the camera to the network, and connect the camera's USB cable to your computer. Then power up the camera. If necessary, your computer loads the appropriate USB driver.
-
Page 28: User Access
Complete Manual for the ConferenceSHOT AV Enterprise-Class Conferencing System User Access By default, the web interface opens to the operator's page, but the camera can be configured to require a user login. Check with the system administrator if the camera's web interface requires you to log in. -
Page 29: Compact Menu View
Complete Manual for the ConferenceSHOT AV Enterprise-Class Conferencing System System administration tasks are on these pages: Network Security Room Labels System Help Diagnostics Performance and behavior configuration tasks are on these pages: Camera Audio Control Devices Streaming System Compact Menu View By default, the navigation buttons in the camera's administrative interface display an icon and a text label. -
Page 30: System Administration
Note Vaddio's cameras have very similar web interfaces. Some of the screen shots in this manual may be from other models of camera. Configuring the Camera for Your Network By default, the camera is set to DHCP, and will receive an IP address automatically if your network assigns IP addresses. -
Page 31: For Non-Dhcp Environments: Configuring The Device With A Static Ip Address For Initial Installation
Complete Manual for the ConferenceSHOT AV Enterprise-Class Conferencing System For Non-DHCP Environments: Configuring the Device with a Static IP Address for Initial Installation ETWORKING PAGE If the camera is currently at an IP address other than 169.254.1.1, skip this section. - Page 32 Complete Manual for the ConferenceSHOT AV Enterprise-Class Conferencing System To configure the camera with a static IP address: 1. Work with your IT department to determine the correct IP address, subnet mask, and gateway to assign. 2. On the Networking page, set IP Address to Static.
-
Page 33: Optional For Dhcp Environments: Changing From A Dhcp Address To A Static Ip Address
Complete Manual for the ConferenceSHOT AV Enterprise-Class Conferencing System Optional For DHCP Environments: Changing from a DHCP Address to a Static IP Address ETWORKING PAGE In a network that assigns IP addresses automatically, the camera's IP address may change from time to time. -
Page 34: Specifying Time Zone And Ntp Server
Complete Manual for the ConferenceSHOT AV Enterprise-Class Conferencing System Specifying Time Zone and NTP Server ETWORKING PAGE Using automatic NTP updating ensures that the timestamps in the camera's diagnostic log are accurate. Specifying your time zone may make it easier to match logged events with other actions and external events. -
Page 35: Setting Passwords And Access
Complete Manual for the ConferenceSHOT AV Enterprise-Class Conferencing System Setting Passwords and Access ECURITY PAGE The Account Passwords and Web Server areas of the Security page provide basic security for the web interface: Admin password – Required for access to the admin pages of the web interface and for Telnet access to the device. -
Page 36: Enabling Or Requiring Https
Complete Manual for the ConferenceSHOT AV Enterprise-Class Conferencing System Enabling or Requiring HTTPS ECURITY PAGE By default, the web interface uses the HTTP protocol. You can configure the camera's web interface to require a secure HTTPS connection instead. 1. Select Show Advanced Settings. The advanced options open. -
Page 37: Adding Room Information To The Screen
Complete Manual for the ConferenceSHOT AV Enterprise-Class Conferencing System Adding Room Information to the Screen ABELS PAGE The information you enter on this page is displayed on every page of the web interface. In a multi-camera environment, you may also wish to specify what appears on the browser tab. - Page 38 Complete Manual for the ConferenceSHOT AV Enterprise-Class Conferencing System To export a configuration: 1. Configure the camera – set the time zone, create the room label, and store the presets you need. 2. Export the configuration (Export Data button). The export downloads to your computer as a .dat file. The filename is the camera's hostname.
-
Page 39: Installing A Firmware Update
If the update process presents warnings or error messages, read them carefully. The camera reboots when the update is complete, and the web interface prompts you to log in again. Contact Vaddio Technical Support if you encounter any problems with the update. -
Page 40: Installing A Firmware Update For A Connected Microphone
Complete Manual for the ConferenceSHOT AV Enterprise-Class Conferencing System Installing a Firmware Update for a Connected Microphone YSTEM PAGE ERIPHERALS TAB The process to update microphone firmware is the same as for updating the camera. 1. Download the firmware and release notes from the legrandav.com website. Microphone firmware is available on the microphone product page and the pages for the camera bundles that include the microphone that you have. -
Page 41: Rebooting The Camera
Complete Manual for the ConferenceSHOT AV Enterprise-Class Conferencing System Rebooting the Camera YSTEM PAGE IRMWARE TAB This can help if the camera stops responding as you expect. In the System Utilities section, select Reboot. -
Page 42: Contacting Vaddio Technical Support
You’ll find information for contacting Vaddio Technical Support on the Help screen. Viewing Diagnostic Logs IAGNOSTICS PAGE If you encounter a problem that you can’t solve, your Vaddio technical support representative may ask you to download and email the log file available from the Diagnostics screen. -
Page 43: Configuring Camera Behavior
Complete Manual for the ConferenceSHOT AV Enterprise-Class Conferencing System Configuring Camera Behavior This chapter covers settings for defining how the camera performs in your environment – for example, streaming settings. What do you need? Go to this page Camera operation... - Page 44 Complete Manual for the ConferenceSHOT AV Enterprise-Class Conferencing System To store a preset: 1. Set up the shot. 2. In the Presets area, select Store to open the Store Preset dialog. 3. Select the preset to store. The preset button changes color.
-
Page 45: Renaming Presets
Complete Manual for the ConferenceSHOT AV Enterprise-Class Conferencing System Renaming Presets AMERA PAGE You can rename presets to identify the shots. This also helps you identify and avoid overwriting stored presets when you store a new preset. Right-click the button for the custom scene or preset, and edit the label. -
Page 46: Lighting And Image Quality Quick Reference
Complete Manual for the ConferenceSHOT AV Enterprise-Class Conferencing System Lighting and Image Quality Quick Reference Here are some tips for using the color settings for lighting and image quality. What do you need to correct? Make this adjustment: The image is too dark... -
Page 47: Adjusting The Focus
Complete Manual for the ConferenceSHOT AV Enterprise-Class Conferencing System Adjusting the Focus AMERA PAGE Open the Focus control to select Auto-focus, or set manual focus with the + (near) and – (far) buttons. The + and – buttons only work when Auto Focus is not selected. -
Page 48: Setting The Speeds For Manual Movements
Complete Manual for the ConferenceSHOT AV Enterprise-Class Conferencing System Setting the Speeds for Manual Movements AMERA PAGE The Pan Speed, Tilt Speed, and Zoom Speed sliders control how fast the camera moves in response to the direction and zoom controls on the IR remote and in the web interface. -
Page 49: Setting The Direction For Camera Movements
Complete Manual for the ConferenceSHOT AV Enterprise-Class Conferencing System Setting the Direction for Camera Movements AMERA PAGE By default,the arrow buttons on the remote and in the web interface show the direction you would see the camera move if you were looking the same direction as the camera. If a person facing the camera is controlling it with the remote, using the right arrow pans the camera to the person's left. -
Page 50: Configuring Streaming Behavior
Complete Manual for the ConferenceSHOT AV Enterprise-Class Conferencing System Configuring Streaming Behavior Conferencing applications use USB streaming. The camera's USB stream can be viewed using the computer connected to the camera, either in a conference or using a media player. -
Page 51: Viewing A Stream
Complete Manual for the ConferenceSHOT AV Enterprise-Class Conferencing System Viewing a Stream To view the RTSP stream: 1. Open a stream viewer such as VLC Media Player. 2. Select "Network stream" or your viewer's equivalent option. 3. Copy the streaming URL from the camera's Streaming page and paste it into the viewer as the URL for the network stream. -
Page 52: Setting Up Ip Streaming In Easy Mode
Complete Manual for the ConferenceSHOT AV Enterprise-Class Conferencing System Setting up IP Streaming in Easy Mode TREAMING PAGE Note Consult your network specialist when setting up IP streaming, to be sure that you select settings that are appropriate for the network. -
Page 53: Setting Up Ip Streaming In Custom Mode
Complete Manual for the ConferenceSHOT AV Enterprise-Class Conferencing System Setting up IP Streaming in Custom Mode TREAMING PAGE Note Consult your network specialist when setting up IP streaming, to be sure that you select settings that are appropriate for the network. -
Page 54: Rtsp Streaming Protocol And Url
URL shown. Consult your IT department before changing these settings. RTSP port: Vaddio strongly recommends using the default RTSP port number. Path: The portion of the streaming URL that appears after the IP address. You may wish to change this to help identify the stream source –... -
Page 55: Configuring Rtmp Streaming
Complete Manual for the ConferenceSHOT AV Enterprise-Class Conferencing System Configuring RTMP Streaming TREAMING PAGE To use RTMP streaming, you must have an account with a streaming service. To configure an RTMP streaming service: 1. Select RTMP streaming, and select Settings. -
Page 56: Changing Mtu
Complete Manual for the ConferenceSHOT AV Enterprise-Class Conferencing System To select the enabled RTMP streaming service: Expand the list of available streaming services, and select the one to use. Note When RTMP streaming is selected and a service is configured, the camera streams to that service until you stop the stream. -
Page 57: Managing Audio
Complete Manual for the ConferenceSHOT AV Enterprise-Class Conferencing System Managing Audio The web interface provides separate controls for each of the audio inputs (microphones 1 and 2, USB playback) and outputs (line out, IP stream, and USB record). Muting All Audio Inputs Together Use the audio mute button at the top of any page of the web interface. -
Page 58: Fine-Tuning Microphone Performance
Complete Manual for the ConferenceSHOT AV Enterprise-Class Conferencing System Fine-Tuning Microphone Performance UDIO PAGE NPUTS TAB To adjust microphones for best far-end audio performance: Check or clear the checkboxes for the desired adjustments: Echo Cancellation – Keeps microphones from feeding the speaker output back into the system. Under most circumstances, echo cancellation is desirable. -
Page 59: Fine-Tuning Speaker Performance
Complete Manual for the ConferenceSHOT AV Enterprise-Class Conferencing System Fine-Tuning Speaker Performance UDIO PAGE UTPUTS TAB To reduce the dynamic range from the connected speaker: If some people on the far end are inaudible while others are too loud, check the Compressor box. -
Page 60: Setting Up Macros And Triggers
Software triggers allow you to program custom functions for third-party control devices, such as defining the buttons on a conference room touch-screen. Hardware triggers (labeled One Touch in the web interface) allow you to define responses to connected Vaddio trigger devices such as TableMIC microphones or StepVIEW mats. -
Page 61: Writing And Editing Macros
Complete Manual for the ConferenceSHOT AV Enterprise-Class Conferencing System Writing and Editing Macros ONTROL EVICES PAGE ACROS TAB To define a macro: 1. Enter a name in the Macro Editor's Name field. 2. Enter one or more Telnet commands in the editing area. -
Page 62: Testing Macros
Complete Manual for the ConferenceSHOT AV Enterprise-Class Conferencing System To edit an existing macro: Select the Edit button associated with the macro, make your changes in the Macro Editor, and save your work. To create a new macro based on an existing one: Select the Edit button for the existing macro to open it, and use the Save As button to give it a new name. -
Page 63: Assigning Macros To Triggers
Complete Manual for the ConferenceSHOT AV Enterprise-Class Conferencing System Assigning Macros to Triggers ONTROL EVICES PAGE RIGGERS TAB A trigger may be associated with a macro that runs when the trigger is on, one that runs when the trigger is off, or one of each. -
Page 64: Testing Triggers
Complete Manual for the ConferenceSHOT AV Enterprise-Class Conferencing System Testing Triggers ONTROL EVICES PAGE Just as it can be helpful to test macros when you write them, it can also be helpful to test triggers when you assign macros to them. The Trigger Testing section is available from both tabs of the Control Devices page. -
Page 65: Additional Camera Settings
Complete Manual for the ConferenceSHOT AV Enterprise-Class Conferencing System Additional Camera Settings AMERA PAGE AMERA ETTINGS BUTTON , DIP S YSTEM PAGE WITCHES TAB To see the camera's current soft DIP switch settings and configure certain camera behaviors, do one of these things: Select the Camera Settings button on the Camera page. -
Page 66: Indicator Light And Standby Behavior
Cameras using older firmware may include these settings on the DIP Switches tab. LED On – Clear the check box to turn off the LED. In most cases, Vaddio recommends leaving the status light on, to let people in the room know whether the camera is currently sending video. -
Page 67: Operating The Camera
Complete Manual for the ConferenceSHOT AV Enterprise-Class Conferencing System Operating the Camera ONTROLS PAGE USER OR GUEST ACCESS The Controls page provides most of the same controls as the IR Remote Commander, along with some that are not available from the remote:... -
Page 68: Managing The Camera Ready State
Complete Manual for the ConferenceSHOT AV Enterprise-Class Conferencing System Managing the Camera Ready State Use the Standby button to switch between low-power (standby) and ready states. In standby mode, the screen presents the message “Device is in standby.” On entering standby mode, the camera pans 90°... -
Page 69: Adjusting Speaker And Microphone Volume
Complete Manual for the ConferenceSHOT AV Enterprise-Class Conferencing System Adjusting Speaker and Microphone Volume Use the Line Out slider or the + and - buttons to set the speaker volume. Use the USB Record slider or the + and - buttons to set the microphone volume. -
Page 70: Telnet Serial Command Api
Complete Manual for the ConferenceSHOT AV Enterprise-Class Conferencing System Telnet Serial Command API The Vaddio Telnet command API allows an external device such as an AMX or Crestron presentation system to control the camera. It is also used for writing macros. Network connectivity and a Telnet client are required;... -
Page 71: Camera Home
Complete Manual for the ConferenceSHOT AV Enterprise-Class Conferencing System camera home Moves the camera to its home position. Synopsis camera home Example >camera home > camera pan Moves the camera horizontally. Synopsis camera pan { left [<speed>] | right [<speed>] | stop | get | set <position> [<speed>] } Options Moves the camera left. -
Page 72: Camera Tilt
Complete Manual for the ConferenceSHOT AV Enterprise-Class Conferencing System camera tilt Moves the camera vertically. Synopsis camera tilt{ up [<speed>] | down [<speed>] | stop | get | set <position> [<speed>] } Options Moves the camera up. Moves the camera down. down speed <1 - 20>... -
Page 73: Camera Zoom
Complete Manual for the ConferenceSHOT AV Enterprise-Class Conferencing System camera zoom Moves the camera in toward the subject or out away from the subject. Synopsis camera zoom { in [<speed>] | out [<speed>] | stop | get | set <position> } Options Zooms the camera in. -
Page 74: Camera Focus
Complete Manual for the ConferenceSHOT AV Enterprise-Class Conferencing System camera focus Changes the camera focus. Synopsis camera focus { near [<speed>] | far [<speed> | stop | mode {get | auto | manual} } Options Brings the focus nearer to the camera. Can near only be used when camera is in manual mode. -
Page 75: Camera Preset
Complete Manual for the ConferenceSHOT AV Enterprise-Class Conferencing System camera preset Moves the camera to the specified preset, or stores the current camera position and optionally CCU information. Synopsis camera preset { recall | store} [1 - 16] [save-ccu] Options recall [1 - 16] Moves the camera to the specified preset. -
Page 76: Camera Ccu Get
Complete Manual for the ConferenceSHOT AV Enterprise-Class Conferencing System camera ccu get Returns CCU (lighting and color) information. Synopsis camera ccu get <param> Options auto_white_balance Returns the current state of the auto white balance setting (on or off). red_gain Returns the red gain value as an integer (0 to 255). -
Page 77: Camera Ccu Set
Complete Manual for the ConferenceSHOT AV Enterprise-Class Conferencing System camera ccu set Sets the specified CCU (lighting) information. Synopsis camera ccu set <param> <value> Options auto_white_balance {on | off} Sets the current state of the auto white balance setting (on or off). Auto white balance overrides red gain and blue gain manual settings. -
Page 78: Camera Led
Complete Manual for the ConferenceSHOT AV Enterprise-Class Conferencing System camera led Set or change the behavior of the indicator light. Synopsis camera led { get | off | on } Options Returns the indicator light's current state (on or off). Disables the indicator light. -
Page 79: Camera Standby
Complete Manual for the ConferenceSHOT AV Enterprise-Class Conferencing System camera standby Set or change camera standby status. Synopsis camera standby { get | off | on | toggle } Options Returns the camera's current standby state. Brings the camera out of standby (sleep) mode. -
Page 80: Video Mute
Complete Manual for the ConferenceSHOT AV Enterprise-Class Conferencing System video mute Gets or sets the camera's video mute status. When video is muted, the camera sends blue or black video with an on-screen message stating that video mute is on. This can be desirable when preparing the room, or when privacy is needed. -
Page 81: Audio Volume
Complete Manual for the ConferenceSHOT AV Enterprise-Class Conferencing System audio volume Gets or sets the volume of the specified audio channel. Synopsis audio < channel > volume { get | up | down | set } Channels master Applies the command to all audio channels. -
Page 82: Audio Mute
Complete Manual for the ConferenceSHOT AV Enterprise-Class Conferencing System audio mute Gets or sets the mute status of the specified audio channel. Synopsis audio < channel > mute { get | on | off | toggle } Channels master Applies the command to all audio channels. -
Page 83: Trigger
Complete Manual for the ConferenceSHOT AV Enterprise-Class Conferencing System trigger Turn an existing trigger on or off. This command has no effect if the specified trigger has not been defined. Note If the web interface's macro/trigger test mode is in use, this command may return parse errors. -
Page 84: Streaming Settings Get
Complete Manual for the ConferenceSHOT AV Enterprise-Class Conferencing System streaming settings get Returns current IP and USB streaming settings. Synopsis streaming settings get Parameters IP Custom_Frame_Rate Frame rate (Custom mode). IP Custom_Resolution Resolution (Custom mode). IP Enabled True if IP streaming is enabled, False if it is not. -
Page 85: Network Settings Get
Complete Manual for the ConferenceSHOT AV Enterprise-Class Conferencing System network settings get Returns the camera's current network settings and MAC address. Synopsis network settings get Example network settings get Name eth0:WAN MAC Address 00:1E:C0:F6:CA:7B IP Address 192.168.1.67 Netmask 255.255.255.0 VLAN... -
Page 86: System Reboot
Complete Manual for the ConferenceSHOT AV Enterprise-Class Conferencing System system reboot Reboots the system either immediately or after the specified delay. Note that a reboot is required when resetting the system to factory defaults (system factory-reset). Synopsis system reboot [<seconds>] Options <seconds>... -
Page 87: Version
Complete Manual for the ConferenceSHOT AV Enterprise-Class Conferencing System version Returns the current firmware version. Synopsis version Example >version Audio 1.03 Commit 598672663c7763ca45a02a6c8755f641068af509 PScC Version Sensor Version 04.00 System Version ConferenceSHOT AV 1.0.0 > history Returns the most recently issued commands from the current Telnet session. Since many of the programs read user input a line at a time, the command history is used to keep track of these lines and recall historic information. -
Page 88: Exit
Complete Manual for the ConferenceSHOT AV Enterprise-Class Conferencing System exit Ends the command session and closes the socket. Synopsis exit Example exit... -
Page 89: Specifications
Complete Manual for the ConferenceSHOT AV Enterprise-Class Conferencing System Specifications Camera and Image Image device 1/2.8-type Exmor CMOS Pixels 2.14 million (effective) sensor IP (H.264) RTSP and 1080p down to 180p USB 3.0 (UVC) Video 1080p down to 180p at 60/30/15 RTMP Video Resolutions 1080p at 30/25/15;... -
Page 90: Troubleshooting And Care
When the camera doesn't behave as you expect, check the indicator light on the front before you do anything else. Use this table to determine whether it's time to call Vaddio Technical Support. Power and Control What is it doing? -
Page 91: Video And Streaming
Complete Manual for the ConferenceSHOT AV Enterprise-Class Conferencing System Video and Streaming What is it doing? Possible causes Check and correct No H.264 video stream. IP streaming is not enabled. Enable IP streaming: Streaming page in the web interface. No USB video stream. -
Page 92: Other Issues
Complete Manual for the ConferenceSHOT AV Enterprise-Class Conferencing System Other Issues What is it doing? Possible causes Check and correct Status light continues to blink The USB cable is not Connect the USB cable. blue. connected. Status light blinks yellow Pan or tilt motor is out of Reset the pan and tilt motors. -
Page 93: Correct A Motor Calibration Error
Complete Manual for the ConferenceSHOT AV Enterprise-Class Conferencing System Correct a Motor Calibration Error If the web interface presents an error message about the motors, or if the camera's status light is blinking yellow, you will need to reset the pan and tilt motors. -
Page 94: Restoring Default Camera Settings
Complete Manual for the ConferenceSHOT AV Enterprise-Class Conferencing System Restoring Default Camera Settings This returns the camera to its original state. If you export the camera's configuration before restoring factory defaults, you will be able to restore the room label, time zone information, and home information by importing the configuration afterward. -
Page 95: Glossary
– the people at the other end of the call. Field of View (FOV) How wide the video image is. Vaddio measures horizontal field of view. Some manufacturers use diagonal field of view, which yields a bigger number for the same actual image area. Tilt your head to one side and diagonal FOV will make sense. - Page 96 Complete Manual for the ConferenceSHOT AV Enterprise-Class Conferencing System full-duplex Simultaneous two-way (or multi-way) audio; conference participants at the near end can talk and still hear the participants at the far end(s), as in a face-to-face meeting. gamma A setting that adjusts the range (gray density) between bright areas and shadows.
- Page 97 A stored camera position. Contains pan, tilt, and zoom position; may also include color settings. RCLB Really Cool Logo Badge. A visual cue that the device is a genuine Vaddio product. Accept no substitutes! resolution 1. The image size. For Vaddio cameras, resolution is expressed in terms of digital TV standards, with 1080p being the default in most cases.
- Page 98 Audio from your site (near-end audio) in a conference call. UVC drivers (Universal Video Class) Standard USB video drivers used by Vaddio cameras. They're the reason your computer doesn't have to stop and download a driver when you connect your new Vaddio USB camera to it. UVC extensions Controls in UVC drivers to allow participants at the far end of a conference to control your camera, if it processes UVC commands.
-
Page 99: Compliance And Conformity Statements
(2) This device must accept any interference including interference that may cause undesired operation of the device. Changes or modifications not expressly approved by Vaddio can affect emission compliance and could void the user’s authority to operate this equipment. -
Page 100: European Compliance
Complete Manual for the ConferenceSHOT AV Enterprise-Class Conferencing System European Compliance This product has been evaluated for Electromagnetic Compatibility under the EMC Directive for Emissions and Immunity and meets the requirements for a Class A digital device. In a domestic environment this product may cause radio interference in which case the user may be required to take adequate measures. ... -
Page 101: Warranty And Return Policy
Vaddio Customer Service: Vaddio will test, repair, or replace the product or products without charge if the unit is under warranty. If the product is out of warranty, Vaddio will test then repair the product or products. The cost of parts and labor charge will be estimated by a technician and confirmed by the customer prior to repair. - Page 102 Initial shipments of equipment that are refused upon attempted delivery, for any reason, are subject to restocking charges. The Dealer has up to 60 days from the date of purchase to return Vaddio product for credit for future purchases of Vaddio product only.
- Page 103 Returns must be made in the original Vaddio packaging with all original materials if at all possible. Vaddio products with missing original materials will be billed to the dealer at dealer price.
- Page 104 Repair Charge Estimates: Estimates on repair charges for a specific problem will not be given before an RMA is issued and the actual product has been evaluated by a Vaddio technician. Repair estimates will be given after the repair department receives and evaluates the unit.
-
Page 105: Photo Credits
Complete Manual for the ConferenceSHOT AV Enterprise-Class Conferencing System Photo Credits This guide may include some or all of these photos. European Space Agency (ESA) astronaut Samantha Cristoforetti, a Flight Engineer with Expedition 42, photographs the Earth through a window in the Cupola on the International Space Station By NASA - https://blogs.nasa.gov/ISS_Science_Blog/2015/03/06/women-in-space-part-two-whats-... -
Page 106: Index
cheat sheet 19-20, 41 color adjustment 41 Index lighting and image quality 41 chroma setting 40-41, 71-72 cleaning 89 color codes for status light 18, 87 admin password 23, 30 color settings 40-41, 71-72 changing 30 command history 82 default 23 compatibility, browsers 21 AEC 13-15 conferencing 45-46... - Page 107 Complete Manual for the ConferenceSHOT AV Enterprise-Class Conferencing System light, status indicator 18, 60, 73, 87 behavior 60, 73 color scheme 60 gain 40-41 enabling/disabling 60 blue 40-41 meaning of colors 18, 87 iris 41 lighting settings 71-72 red 40-41...
- Page 108 Complete Manual for the ConferenceSHOT AV Enterprise-Class Conferencing System One Push White Balance 41 ready state 63, 74 operating environment 11, 89 rebooting 36, 81 recalibration, pan and tilt 73, 88 red gain 40-41, 71-72 packing list 4 remote control 19-20...
- Page 109 Complete Manual for the ConferenceSHOT AV Enterprise-Class Conferencing System static IP address 26, 28 triggers 55, 58-59, 78 configuring 26, 28 defining 58 status light 18, 60, 73, 87 deleting 58 behavior 60, 73 testing 59 color scheme 60 troubleshooting 80, 85...
- Page 110 Complete Manual for the ConferenceSHOT AV Enterprise-Class Conferencing System zoom 19-20, 43, 63, 68 speed 19-20, 43, 68...
- Page 111 ©2019 Legrand AV Inc. Vaddio is a registered trademark of Legrand AV Inc. All other brand names or marks are used for identification purposes and are trademarks of their respective owners. All patents are protected under existing designations. Other patents pending.
Need help?
Do you have a question about the ConferenceSHOT AV and is the answer not in the manual?
Questions and answers