Advertisement
Available languages
Available languages
Quick Links
INSTALLATION INSTRUCTIONS FOR PART 99-7612
Nissan Murano 2003-2007
99-7612A, 99-7612B
KIT FEATURES
• ISO DIN radio provision with pocket
• Double DIN radio provisions
• 7612A-Coated with brushed aluminum look
• 7612B-Painted matte black
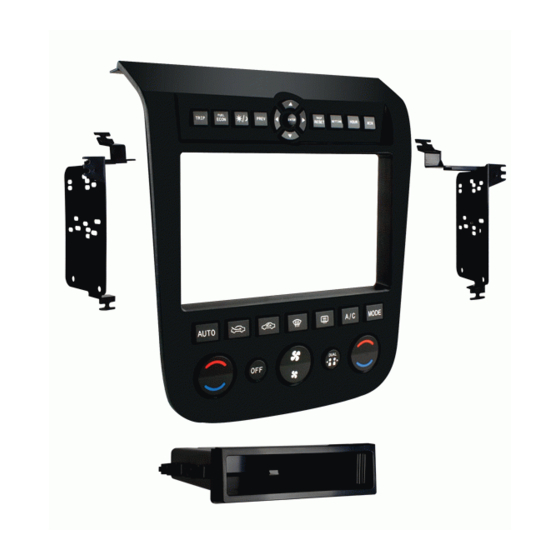
KIT COMPONENTS
• A) Radio housing • B) Radio housing brackets • C) Pocket • D) (14) #8 x 3/8" Phillips screws
• E) (2) #8 x 1/2" Phillips screws • F) 7612 Wire harness
A
B
C
WIRING & ANTENNA CONNECTIONS (sold separately)
Wiring Harness: • 70-7550 - 1995-up Nissan • 70-7551 - 1995-up Nissan amp integration
Antenna Adapter: • 40-NI11 - Nissan
TOOLS REQUIRED
• Panel removal tool • Phillips screwdriver • Socket wrench
METRA. The World's best kits.
APPLICATIONS
D
E
1-800-221-0932
™
Dash Disassembly
– Nissan Murano 2003-2007
*Note: This kit will work in NAV models, but you will lose the
OE NAV controls, and voice prompts.
Kit Assembly
– ISO DIN radio provision with pocket ...................3-4
– Double DIN radio provision ................................4-5
Wiring Instructions ................................................ 5
F
CAUTION: Metra recommends disconnecting the
negative battery terminal before beginning any
installation. All accessories, switches, and especially
air bag indicator lights must be plugged in before
reconnecting the battery or cycling the ignition.
NOTE: Refer to the instructions included with the
aftermarket radio.
metraonline.com
(without OE NAV)*
© COPYRIGHT 2004-2013 METRA ELECTRONICS CORPORATION
......2-3
Advertisement

Related Manuals for Metra Electronics 99-7612A


Summary of Contents for Metra Electronics 99-7612A
- Page 1 Antenna Adapter: • 40-NI11 - Nissan NOTE: Refer to the instructions included with the TOOLS REQUIRED aftermarket radio. • Panel removal tool • Phillips screwdriver • Socket wrench METRA. The World’s best kits. 1-800-221-0932 metraonline.com ™ © COPYRIGHT 2004-2013 METRA ELECTRONICS CORPORATION...
- Page 2 99-7612 Dash Disassembly 1. Unclip and remove the vent panel 4. Remove (2) Phillips screws on each radio trim panel. Lift up slightly and side of the radio chassis exposed proceed to step 7. (Figure E) above the radio. (Figure A) behind the lower trim panel.
- Page 3 99-7612 Dash Disassembly Kit Assembly 8. Remove the climate module ISO DIN radio provision with pocket 3. Mount the radio housing brackets to from radio chassis assembly. the aftermarket radio with the screws 1. Trim the shaded areas from the (Figure G) supplied with the radio.
- Page 4 99-7612 Kit Assembly ISO DIN radio provision Double DIN radio provision 3. Slide the Double DIN aftermarket with pocket (continued) radio into the radio housing 1. Trim the shaded areas from the brackets and secure with screws 5. Mount the climate module to the factory radio trim panel.
- Page 5 99-7612 Kit Assembly Wiring Instructions Double DIN radio provision From the included 7612 harness: Additional 12-pin harness (ASWC-1) (continued) 1. Plug the Black 16-way connector • This 12-pin harness is to be 4. Mount the climate module to the into the 99-7612. used in conjunction with the radio/bracket assembly using (2) ASWC-1 (not included).
- Page 6 99-7612 Notes...
- Page 7 99-7612 Notes...
- Page 8 Log onto www.installerinstitute.com or call 800-354-6782 for more information and take steps toward a better tomorrow. Metra recommends MECP certified technicians METRA. The World’s best kits. 1-800-221-0932 ™ © COPYRIGHT 2004-2013 METRA ELECTRONICS CORPORATION...
- Page 9 Adaptador de antena: • Adaptador de antena Nissan 40-NI10 NOTA: Remítase a las instrucciones incluidas con el HERRAMIENTAS REquERIDAS radio de postventa. • Herramienta para quitar paneles • Destornillador Phillips • Llave para dados METRA. The World’s best kits. 1-800-221-0932 metraonline.com ™ © COPYRIGHT 2004-2013 METRA ELECTRONICS CORPORATION...
- Page 10 99-7612 Desmontaje del tablero 1. Desenganche y quite el panel de 4. Quite los (2) tornillos Phillips de de la moldura del radio de fábrica. cada lado del chasís del radio que moldura que rodea la pantalla, (Figura E) quedan a la vista detrás del panel incluyendo los controles del aire 7.
- Page 11 99-7612 Desmontaje del tablero Ensamble del kit 8. Retire el módulo climático del Provisión de radio DIN ISO con bolsillo 3. Monte los soportes de la carcasa del radio en la unidad central con conjunto del chasis del radio. 1. Recorte las áreas sombreadas los tornillos incluidos con la unidad.
- Page 12 99-7612 Ensamble del kit Provisión de radio DIN ISO con Provisión de radio doble DIN 3. Deslice la unidad central doble DIN en los soportes de la carcasa bolsillo (continúa) 1. Recorte las áreas sombreadas del radio y sujete utilizando los 5.
- Page 13 99-7612 Ensamble del kit Instrucciones de cableado Provisión de radio doble DIN Desde el arnés 7612 incluido: Adicional de 12-pines del (continúa) arnés (ASWC-1) 1. Conecte el conector Negro de 4. Monte el medidor amplificador • Este arnés 12-pin es para 16 vías en el 99-7612.
- Page 14 99-7612 Notas...
- Page 15 99-7612 Notas...
- Page 16 800-354-6782 para obtener más información y avance hacia un futuro mejor. Metra recomienda técnicos con certificación del Programa de Certificación en Electrónica Móvil (Mobile Electronics Certification Program, MECP). METRA. The World’s best kits. 1-800-221-0932 ™ © COPYRIGHT 2004-2013 METRA ELECTRONICS CORPORATION...
Need help?
Do you have a question about the 99-7612A and is the answer not in the manual?
Questions and answers