Table of Contents
Advertisement
Quick Links
Advertisement
Table of Contents

Related Manuals for TREND MINI ELLIPSE JIG


Summary of Contents for TREND MINI ELLIPSE JIG
- Page 1 MINI ELLIPSE Please read these instructions before use.
-
Page 2: Table Of Contents
ME/JIG Dear Customer TECHNICAL DATA Thank you for purchasing this Trend product, we Ellipse size: max. 580mm x 430mm hope you enjoy many years of creative and min. 220mm x 160mm productive use. Circle size: max. 600mm Please remember to return your guarantee card within 28 days of purchase. -
Page 3: Safety
ME/JIG SAFETY outdoors. Wear protective hair positions. covering to contain long hair. WARNING: 17. Donʼt abuse the cable. Never carry power tool or accessory by cord or 5. Consider working environment. Do Observe the safety regulations in the pull it to disconnect from the socket. not use the product in the rain or in a instruction manual of the power tool to be Keep cord from heat, oil and sharp... - Page 4 Recommended speeds between cutter tip and inside edge of spanner or key and to the torque are shown in the Trend Routing bush and that it cannot come into value provided by the manufacturer. Catalogue and/or website.
-
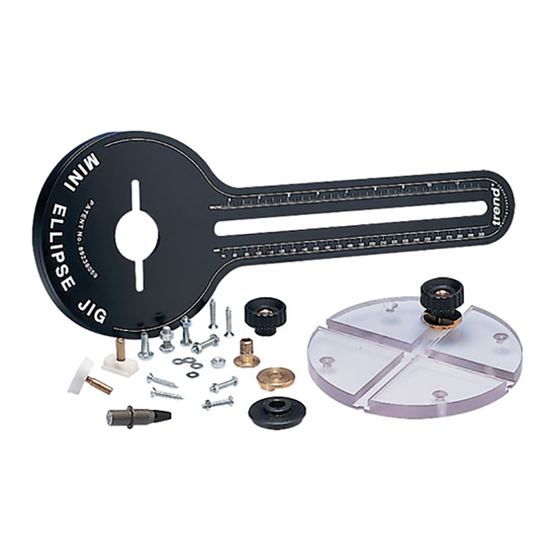
Page 5: Items Enclosed
ME/JIG ITEMS ENCLOSED ITEMS REQUIRED n Router. n Hand Tools. n Suitable router cutter. n Pencil. The following table shows limitations of sizes for ellipses it is possible to make. -
Page 6: Description Of Parts & Assembly
ME/JIG DESCRIPTION OF PARTS & ASSEMBLY Use the diagram below as a guide to assembling the jig. F Ellipse slider A Main plate B Cross frame G Circle slider H Pen plug & grommet C Securing knob Mounting screws D Index washer J Mounting kit for router E Index sleeve... -
Page 7: Mounting Router
ME/JIG Mounting Router Mounting Position of Routers Fixing screws are provided for mounting the router to the router plate. See chart for correct selection. Ensure router spindle is central with central hole in main plate. Slots are provided in main plate to allow for the various positions of the fixing points on the router base. -
Page 8: Screw Sizes Required
Size and quantity Distance between Handle suitable routers of mounting fixing centres position machine screws of router Trend T3, T4, T5 M5 x 20 (x2) 50mm At 90° OFE710, OF500S, OF450S M5 x 20 (x2) 50mm At 90° Atlas Copco... -
Page 9: Operation
ME/JIG OPERATION Basic Setting Up Procedure For an Ellipse 480mm x 360mm. Trial runs should be made on scrap material when first using this jig. Ensure working position is comfortable and that workbench is at a suitable height. Marking Out n Determine size of workpiece required. -
Page 10: Setting Minor Axis
ME/JIG Setting Minor Axis n Position router cutter over minor axis mark, slide main frame until cutter is positioned over mark and check that index washer on pivot point ʻBʼ reads 180mm, then lock knob ʻBʼ. Setting up is now complete. Alternatively Minor Axis the positions of the pivot points can be set before locating the pivot points onto the... -
Page 11: Circle Cutting
ME/JIG Circle Cutting n Fit the circle slider in the centre of the cross frame. n Screw pin through the slider so that it engages in the hole in the cross frame. n Adjust the length of the main plate as required for cutting circles from 160mm to 600mm in diameter. -
Page 12: Producing A Natural Timber Frame
ME/JIG Producing a Natural Timber Frame Drill and screw cross frame to the centre of the scrap material. Draw frame onto workboard by fitting plotter pen attachment to the ellipse jig. Rout the outside edge of the frame in an anti- clockwise direction at repeated depths of 2-3mm Plan the wood sections to fit the frame allowing until breakthrough is achieved. - Page 13 ME/JIG Routing the Rebate on a Router Table Using Ref. 46/39 The rebate for the glass and 9. Plan backing piece can be produced with a bearing guided rebate cutter inverted in a table as Rotate frame shown. clockwise Alternatively, the frame can be left fitted to the work-board as in Lead-on step 8 and the ellipse jig adjusted...
-
Page 14: Producing An Elliptical Plaque In Mdf
ME/JIG Producing an Elliptical Plaque in MDF This example does not include the use of bearing guided cutters Draw plaque dimensions onto workpiece and clamp to a false baseboard to prevent routing into the workbench. Secure centre area of plaque to baseboard (see clamping section) to prevent plaque from moving when breakthrough is achieved. -
Page 15: Maintenance
ME/JIG MAINTENANCE Please only use Trend original spares and accessories. This jig has been designed to operate over a long period of time with a minimum of maintenance. Continual satisfactory operation depends upon proper tool care and regular cleaning. Cleaning Keep the grooves on the main board clear of sawdust. -
Page 16: Spare Parts - Spare Parts List
ME/JIG ME/JIG - SPARE PARTS LIST v3.1 06/2013 Item Qty. Desc. Ref. Main Plate WP-MEJ/1 Cross Frame WP-MEJ/2 Plate Support c/w Pins WP-MEJ/3 Index Washer WP-MEJ/4 Index Sleeve WP-MEJ/5 Ellipse Slider WP-MEJ/6 Circle Slider WP-MEJ/7 Pencil Plug and Grommet WP-MEJ/8 Screw Wood No 8 x 25mm WP-SCW/100 Mounting Kit For Router... -
Page 17: Spare Parts Diagram
ME/JIG ME/JIG - SPARE PARTS DIAGRAM v3.1 06/2013 -16-... - Page 18 © Copyright Trend 2013. No part of this publication may be reproduced, stored or transmitted in any form without prior permission. Our policy of continuous improvement means that specifications may change without notice. Trend Machinery and Cutting Tools cannot be held liable for any material rendered unusable...
Need help?
Do you have a question about the MINI ELLIPSE JIG and is the answer not in the manual?
Questions and answers