Advertisement
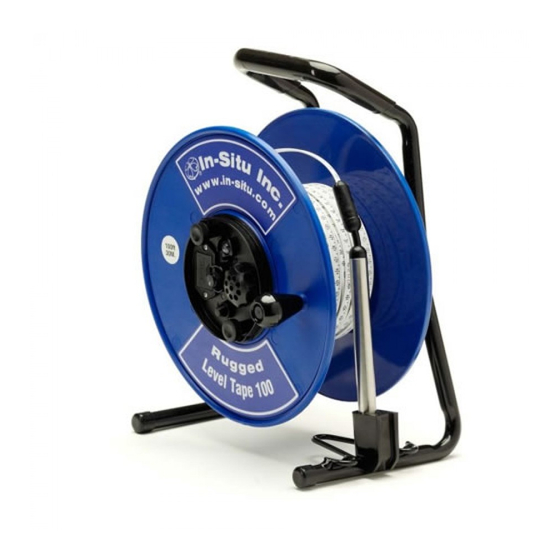
Rugged Level Tape 100 and Rugged Level Tape 200
Equipment Check
Test the circuit and battery
1.
Press the test button shown in Figure 3, number 5
(see opposite page).
2.
If you do not hear a beep, perform the following steps:
a.
Tighten the knobs that secure the control panel
(Figure 3, numbers 6 and 7) and retest.
b.
Turn the sensitivity knob fully clockwise (Figure
3, number 4) and retest.
c.
Replace the 9 V battery in the battery box
and retest.
Test the tape and probe
1.
Position the unit as shown in Figure 1.
Figure 1. Testing the tape and probe
2.
Place the tip of the probe on the axel stud while
also placing the probe body on the raised screw as
shown. If the tape and probe are working correctly,
you will hear a beep and see the LED light up.
Test the whole unit
1.
Dip the probe in a container of tap water. Do not
use deionized or distilled water.
2.
If the unit is working correctly, you will hear a beep
when the probe touches water.
Field Use
1.
Ensure the knobs that secure the control panel are
tightly fastened.
2.
If possible hang the unit on the well casing. Guide
the tape over the tape guide avoiding the edge of
the well casing to prevent damaging the tape.
Instruction Sheet
Technical Note
3.
Rotate the hand brake
counterclockwise until the tape
slowly unwinds from the reel.
4.
The unit will beep when the
probe touches water. Carefully
determine the depth to water
from the reference point by
slowly lowering and raising the
probe to the air/water interface.
Raise the probe, dry it, and
repeat the measurement.
Note: When measuring wells with cascading water,
rotate the sensitivity knob counterclockwise to
reduce probe sensitivity and eliminate false signals.
5.
Rugged Level Tape probes are rated to full depth
and can be used to measure the depth to the
bottom of a well. Slowly unwind the tape until
the probe touches the bottom and the tape
becomes slack.
Important: Do not allow the probe to fall freely to the bottom
of the well because it will damage the probe.
6.
As you wind the tape onto the reel, remove
moisture and debris.
Troubleshooting
No sound when the unit is in water
1.
Check the battery by pressing the test button.
Replace the battery if it is low (Figure 3, number 1).
2.
Tighten the knobs to secure the panel to the reel. If
the unit still does not sound, check all connections
on the control panel.
3.
Check the probe conductor to make sure that it is
clean and free of mineral deposits.
4.
Inspect the tape and probe for damage.
5.
Increase sensitivity.
Continuous sound when the unit is tested out of water
1.
Make sure the probe conductor tip is clean.
2.
Check for moisture on the back of the control panel.
3.
Check the probe/tape connection for damage that
might have allowed water to enter the system.
4.
Reduce sensitivity if unit has been used in saline water.
Innovations in
Innovations in
Water Monitoring
Water Monitoring
Figure 2. Hand brake
Advertisement
Table of Contents

Related Manuals for In-situ Water Level Tape 100


Summary of Contents for In-situ Water Level Tape 100
- Page 1 Innovations in Innovations in Water Monitoring Water Monitoring Instruction Sheet Technical Note Rugged Level Tape 100 and Rugged Level Tape 200 Rotate the hand brake Equipment Check counterclockwise until the tape Test the circuit and battery slowly unwinds from the reel. Press the test button shown in Figure 3, number 5 The unit will beep when the (see opposite page).
- Page 2 1-970-498-1500 (international & domestic) www.in-situ.com 0070002 rev. 004w 6/11 Information subject to change without notice. In-Situ, In-Situ logo, Baro Merge, BaroTROLL, HERMIT, Pocket-Situ, RDO, RuggedCable, RuggedReader, TROLL, and Win-Situ are trademarks or registered trademarks of In-Situ Inc. © 2011. All rights reserved.
Need help?
Do you have a question about the Water Level Tape 100 and is the answer not in the manual?
Questions and answers